
 How-To
Others Overview for AhsayOBM
Below is the list of other configurable options under the advanced backup set settings.
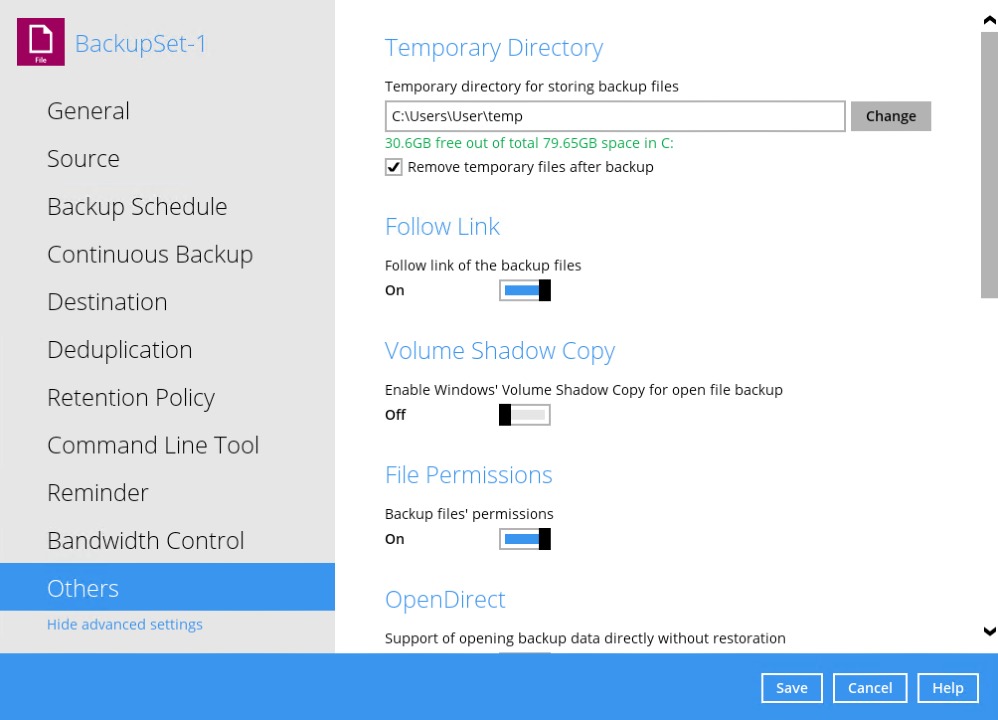
- Temporary Directory
- Follow Link
- Volume Shadow Copy
- File Permissions
- Compressions
- Encryption
- Recycle Bin
- Restore Drill
Temporary Directory
Temporary Directory is used for both backup and restore operations.

For a backup job, it is used to temporarily store backup set index files. An updated set of index files is generated after each backup job. The index files are synchronized to each individual backup destination at the end of each backup job.
For a restore job, it is used to temporarily store temporary restore files.
For best practice, the temporary directory should be located on a local drive for optimal backup and restore performance.
It should NOT be located on:
- The same partition as the OS, because if the OS partition becomes filled up, it can cause the system to crash. Better to use a different partition with enough space to handle the backup and restore job.
- A network drive, as it could affect both backup and restore performance.
It is recommended to select the "Remove temporary files after backup" option on the backup set to keep the temporary drive clear.
The message below will be displayed if the path to the temporary directory is inaccessible. Click OK then proceed to correct the temporary directory path.
Changing Temporary Directory
- Click the Change button to select a directory path for storing temporary data.
- Locate the directory that you would like to use, then click OK to select the folder. Click the Save button to apply the settings.
Follow Link
This feature allows the user to enable or disable the follow link which defines the NTFS junction or symbolic link during a backup job. This option is enabled by default.
This feature is only applicable for File Backup Sets.
Volume Shadow Copy
This feature allows AhsayOBM to use the Windows Volume Shadow Copy service to create a snapshot of the selected files and/or folders on the local drive(s) of the machine, so that AhsayOBM can continue to back up files even if they are opened and/or have been updated by the user. This feature is enabled by default.
- To use the Volume Shadow Copy, the license module must first be enabled on your backup user account. Otherwise, just enabling this setting on the AhsayOBM client will not activate this feature and can result in possible backup errors if the backup job encounters an open file. Please contact your backup service provider for more details.
- Volume Shadow Copy does not support open file backups on network drives.
File Permissions
This option defines whether to back up operating system file permission of the data selected as backup source. This option is enabled by default.
Compressions
When this feature is enabled, AhsayOBM will compress all files before it is backed up to the backup destination(s).
For newly created backup set(s), Fast with optimization for local is selected by default.
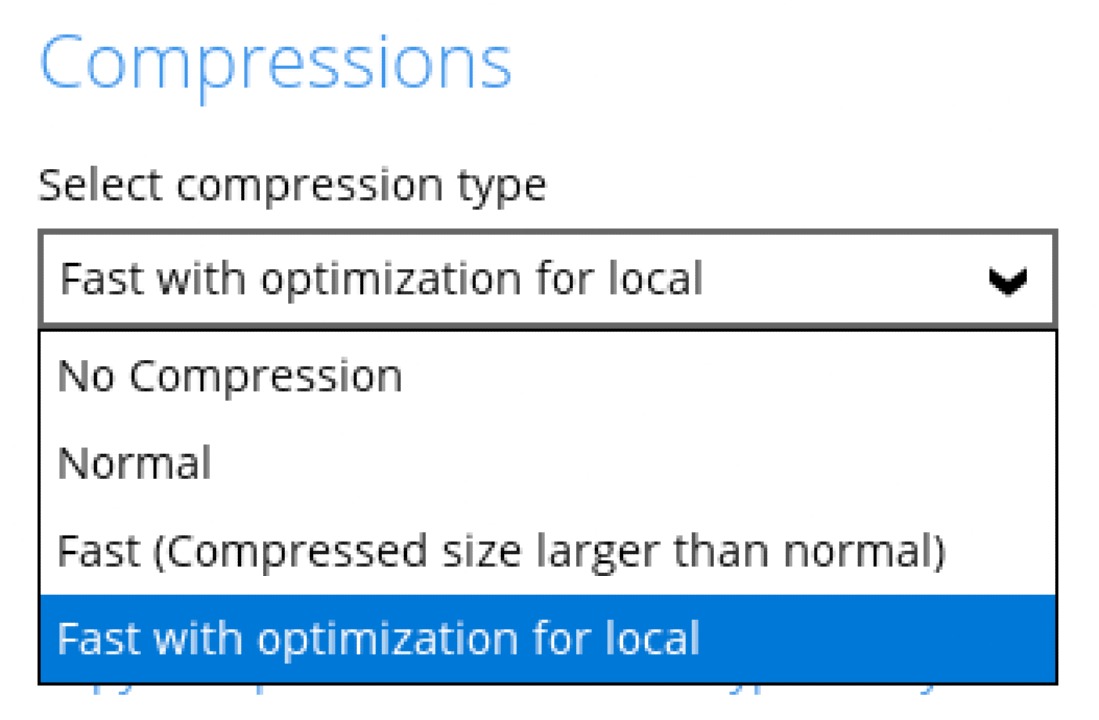
The following are the four (4) compression types:
| Compression type | Description |
|---|---|
| No Compression | File will not be compressed before backup. |
| Normal | Compression is comparable to gzip Normal compression ratio. |
| Fast (Compressed size larger than normal) | Compression will be faster but with less compression and lower CPU usage compared to normal. |
| Fast with optimization for local | Uses Snappy compression library when backing up to local destinations only, otherwise setting will default to gzip if backing up to other destinations. Has the lowest CPU usage, very high speed and reasonable compression but compressed file size may be larger than Fast. |
The compression type can be changed anytime, even after a backup job. The modified compression type will be applied towards future backup jobs.
Encryption
This feature allows the user to view the current encryption settings. The encryption settings can only be enabled or disabled during the creation of a backup set.
Viewing the Encryption Key
- Go to Backup Sets, then select a backup set.
- Click the Others tab in the backup set settings.
In the "Encryption", click the Unmask encryption key link to display the encryption of the backup set.
There are three encryption types available which can be set during backup set creation:
| Encryption type | Description |
|---|---|
| Default | An encryption key with 44 alphanumeric characters will be randomly generated by the system. |
| User Password | The encryption key will be the same as the login password of your AhsayOBM at the time when the backup set is created. Please be reminded that if you change the AhsayOBM login password later, the encryption keys of the backup sets previously created with this encryption type will remain unchanged. |
| Custom | You can customize your encryption key, where you can set your own algorithm (Twofish, DESede or AES), encryption key, method (ECB or CBC), and key length (128-bit or 256-bit). |
Encryption settings can only be configured during backup set creation. It cannot be changed once the backup set is created. If you need to enable (or disable) after the backup set is created, then you will need to create a new backup set with the desired settings.
For best practice on managing your encryption key, refer to the following article: Best practices for managing encryption key on AhsayOBM or AhsayACB.
Recycle Bin
This feature is for protection of the BAK (block) files stored in the Backup Set's destination, allows the user to set the number of days BAK files that were deleted due to Retention Policy or Data Integrity Check, will be held under Recycle Bin as added protection.
This is how the Recycle Bin will treat deleted data:
- Data in the Recycle Bin will consume Quota.
- It does not move the data in another location within the storage, instead the index tracks the xxxxxx.bak files and the remaining time in the Recycle Bin.
- If the index is reverted to a previous timestamp, the settings of the Recycle Bin in the reverted index will be followed.
- Recoverability of data is not affected when the Recycle Bin is alternately enabled or disabled.
- When enabled, it will only check if the data inside the Recycle Bin is still within the set number of days. Once it is beyond the set number of days it will only be deleted when the following operations are run: Backup, Space Freeing Up, Data Integrity Check, and Delete Backup Data.
- When disabled, if there are already deleted files it will not automatically delete the data inside the Recycle Bin. It will remain in the Recycle Bin even if it is beyond the set number of days. It will only be deleted when the following operations are run: Backup, Space Freeing Up, Data Integrity Check and Delete Backup Data
- Once the Recycle Bin is disabled, deleted files will be removed immediately and will not be moved in the Recycle Bin.
- The setting applies to all destinations for the backup set.
- Viewing Recycle Bin contents is not available.
- Recycle Bin cleanup is done at the start of the backup job process.
To recover backup data in the Recycle Bin, kindy submit a ticket for assistance.
This is enabled by default set with 7 days.
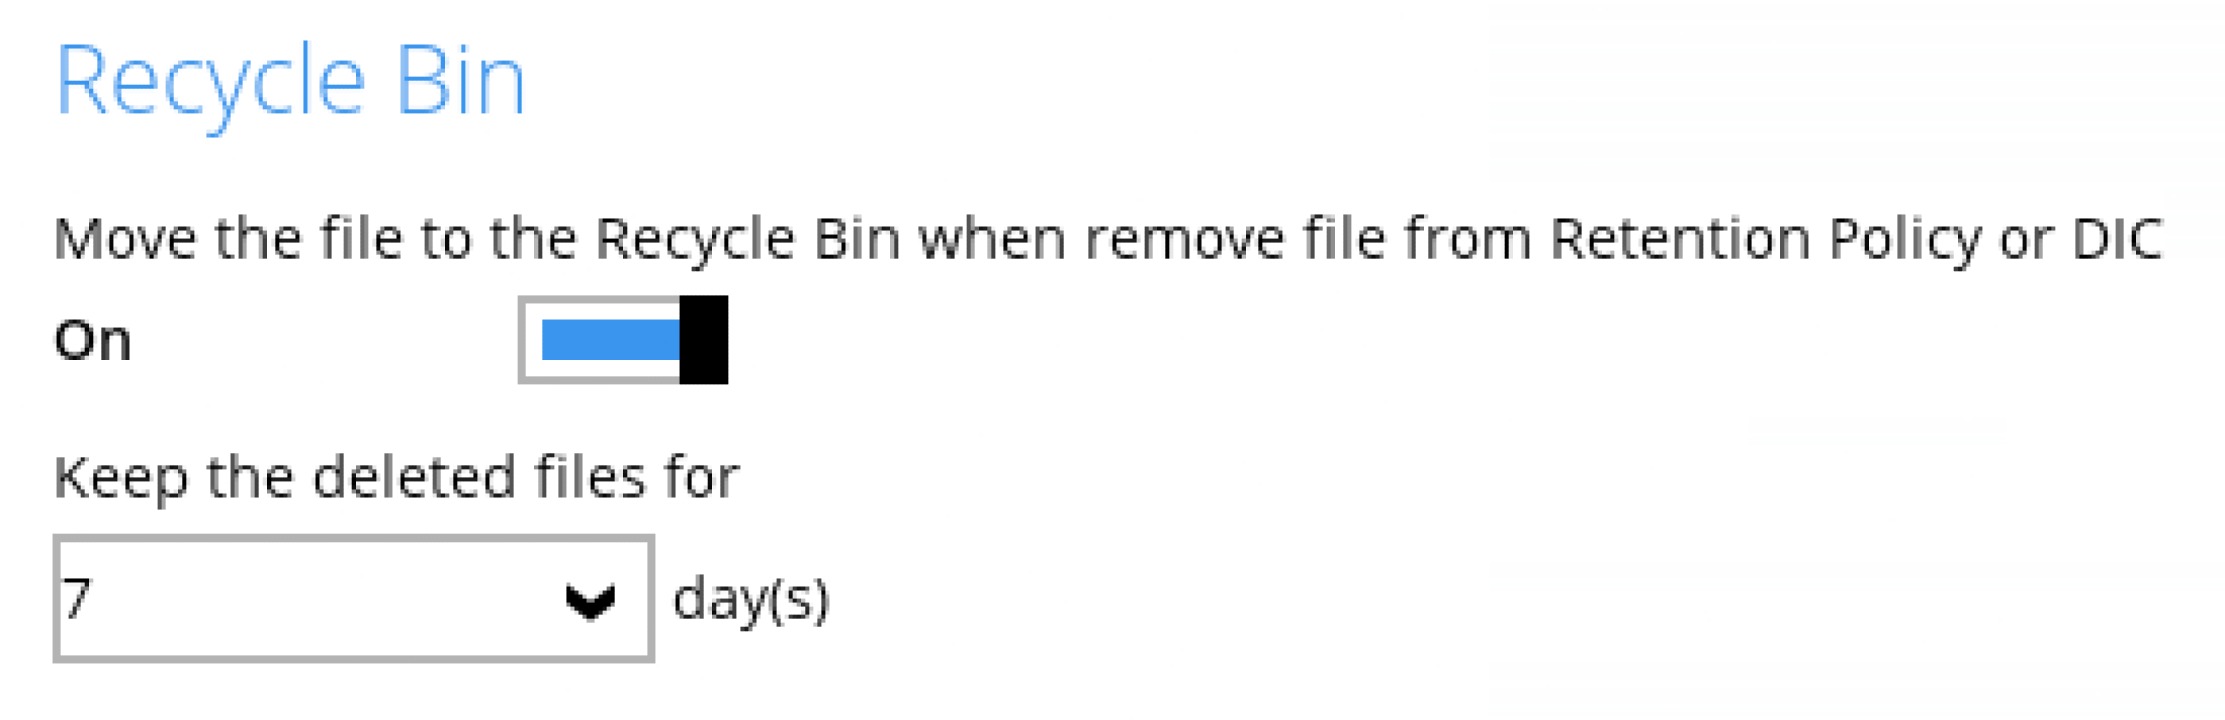
Setting the Number of Days
- Go to Backup Sets, then select a backup set.
- Click the Others tab in the backup set settings.
- Slide the lever to the right to enable the "Recycle Bin".
Select the number of days to keep the deleted files or you can enter it manually.
- Click the Save button to apply the settings.
Restore Drill
This feature is used to run a trial restore to detect corrupted data. It helps to ensure that backup data is always restorable since an email report will be sent to the user (depends on the setting made by the administrator). The email will inform the user the status of the backup data so that if there are corrupted data found, the user should update the corrupted data, and either manually or schedule a backup job to be run.

Configuring Restore Drill
- Go to Backup Sets, then select a backup set.
- Click the Others tab in the backup set settings.
- Slide the lever to the right to enable the "Restore Drill".
Select the interval in months when the restore drill will run.
- Click the Save button to apply the settings.