FAQ
FAQReplication (Web Console)
AhsayCBS replication server provides an additional layer of data protection by providing an offsite backup store for synchronizing data from either a single or multiple AhsayCBS servers to provide high availability for your business needs. The replication feature is specially designed for replicating user home data hosted physically on AhsayCBS to either another AhsayCBS (Replication Server) or a predefined destination (e.g. cloud storage, FTP/SFTP or local/network storage) configured in the AhsayCBS backup server. The replication process is close to real-time and therefore can reduce the possibility of significant data loss in the event of an AhsayCBS server outage. In case the AhsayCBS backup server is down, the replication server can be quickly converted into a backup server with minimal down time.
This feature is designed to provide replication services for AhsayCBS only and it does not provide general replication service for other files within the system. This means that you cannot use AhsayCBS replication to replicate your Windows/Linux/Unix system to another machine.

Overview
Technology Used for Replication
During the Resync stage of the replication process (refer to How Does Replication Work below for details), snapshot images of users’ backup sets will be created and then sent to the replication server. By utilizing the snapshot image technology, the data on the backup server can be replicated in a rather short time and therefore close to real-time replication is made possible.
By utilizing the multi-threading technology, replication can now be processed faster than the traditional single thread replication. Refer to Multiple Threads Replication for further details.
Differences Between v6 and v9 on Replication
The replication service has been revamped to empower you with a more reliable and secure replication experience. The table below explains the major feature differences between v6 and v9 on replication.
| Version 6 | Version 9 | |
|---|---|---|
| Multi Threads Replication | Replication process is performed over single thread mode which takes longer time to complete. | The replication process is performed over multi threads mode where multiple backup sets are sent to the replication location concurrently. The number of threads for replication is also configurable by the backup user. |
| Support Replication to Cloud Storage | Only replication to AhsayRPS is possible. | Supports replication to either another AhsayCBS server or cloud storage (as defined in the predefined destination). |
| Replication Port | A dedicated port has to be defined for replication receiver to perform replication. | Replication is performed via the http/https (ports 80 and 443 by default) defined on AhsayCBS. No additional ports are required. |
| Real-time Monitoring Progress | Real-time replication progress cannot be monitored. | The real-time replication progress of each backup set can now be monitored on the AhsayCBS web console. |
| Replication of Individual Backup Sets only | User Level - all backup sets from all backup users must be replicated when the replication feature is turned on. | Backup Set Level - replication of only selected backup set is now possible. |
How Does Replication Work
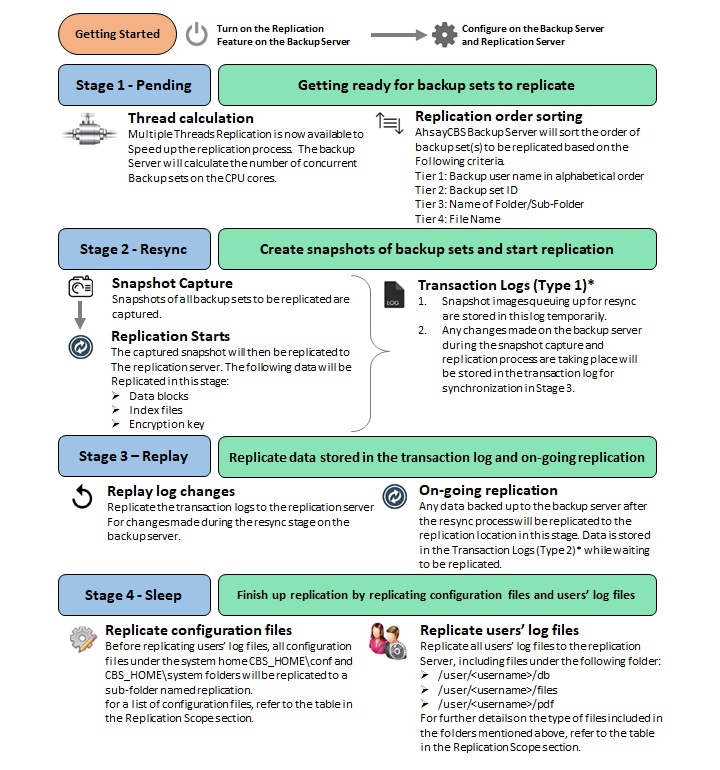
Replication runs in 4 stages, namely Pending, Resync, Replay and Sleep. Refer to the diagram below for an overview of the replication process.
Replication Scope
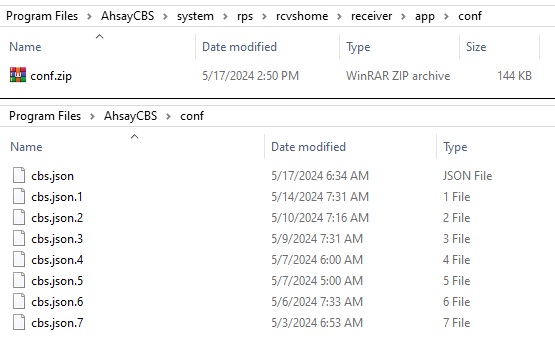
The following three folders on the local file system are included in the replication process.
%CBS_INSTALL%\conf
These are the list of files included in this folder.
| Server Configuration | |
|---|---|
| Path | Description |
| /conf/server.xml | Connector setting file |
| /conf/afc.opt /conf/cbs.opt | CBS option files |
| /conf/cbssvc.ini | Runtime setting file |
| /conf/ca.crt /conf/ssl.crt /conf/ssl.key | Default certificate files |
| /conf/cbs.json | CBS setting file |
| /conf/lfsConfig.xml | Redirector configuration file |
| CBS Configuration | |
|---|---|
| Path | Description |
| /conf/obs.json | Backup Server setting file |
| /conf/lic.json /conf/license.xml | License files |
| /conf/cbs.opt | CBS/OBS option file |
| /conf/autoUpdate.bdb | Autoupdate index |
| /conf/rpsSend.xml | Replication configuration file |
| /conf/users.xml | Users' profile |
| RPS Configuration | |
|---|---|
| Path | Description |
| /conf/rps.xml /conf/rpsRecv.xml /conf/rps-recv.json | Replication configuration files |
| RDR Configuration | |
|---|---|
| Path | Description |
| /conf/rdr.xml /conf/rdr.json | Redirector configuration files |
| /conf/rdr-lic.json /conf/rdr-license.xml | License files |
| Others | |
|---|---|
| Path | Description |
| /conf/Branding/*.* | Branding directory |
| /conf/Backup/*.* | Auto Save snapshot file |
| /conf/certs | Only created after administrator imports a SSL certificate or generates a new CSR (Certificate Signing Request) |
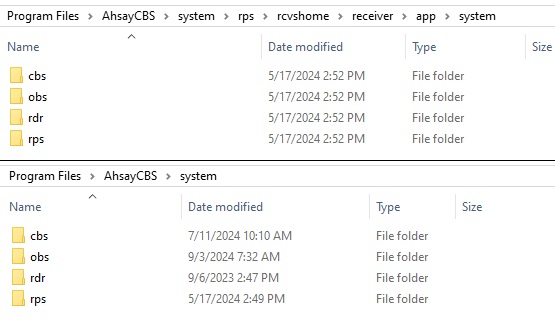
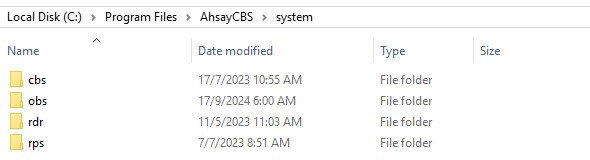
%CBS_INSTALL%\system
These are the list of files included in this folder.
| Others | |
|---|---|
| Path | Description |
| /system/obs/policies/userGroup.xml | User group definition |
| /system/obs/policies/policyList.xml | Policy group definition |
%USER_HOME%
These are the list of files included in this folder.
| Others | |
|---|---|
| Path | Description |
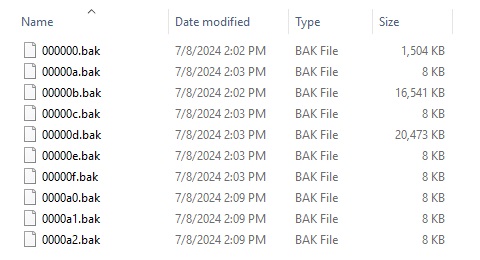
| /user/%username%/db | This sub-folder contains files with the following info:
|
| /user/%username%/files | This sub-folder contains files for all backup sets with the following info:
|
| /user/%username%/pdf | This sub-folder contains all backup and restore reports in pdf format. |
| /user/%username%/%backup set ID% | This sub-folder contains files with the following info:
|
- Please be reminded that ALL 3 folders will be CRITICAL and REQUIRED if you need to rebuild AhsayCBS from scratch, or to recover system settings.
- Only user data hosted physically on AhsayCBS will be replicated. Local drive includes, for example, local hard disk, mapped network drive, removable drive, external storage device connected to AhsayCBS with UNC path, etc. Certain types of external storage connection, for example FTP/SFTP, are not regarded as local drive even if it is connected through LAN, and therefore will not be included for replication.
Coexistence of v6 and v9 Formats Backup Data
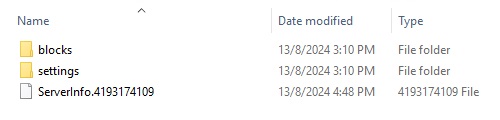
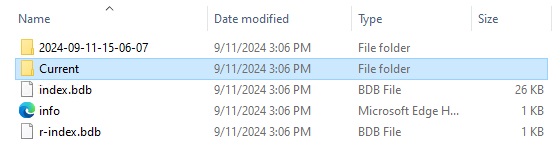
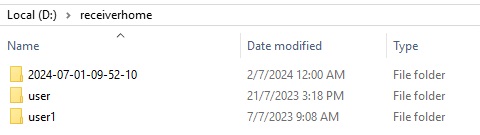
When you have enabled replication for v6 backup sets on AhsayCBS v9, the backup data will be replicated to your replication destination in v6 data format. If, afterwards, a v9 upgrade of AhsayOBM/AhsayACB is done and backup is performed for those backup sets, the backup data will be produced and replicated in v9 format. In that case, there will be two sets of backup data stored for the same backup set in separate locations under the CBS_HOME\user. The following illustrations show the location where the v6 and v9 format backup data are stored.
v9 Format Backup Data
Backup set ID - unique ID for individual backup set
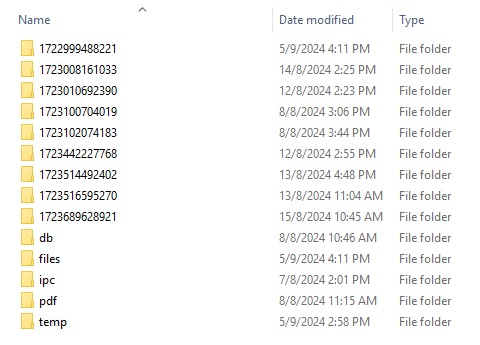
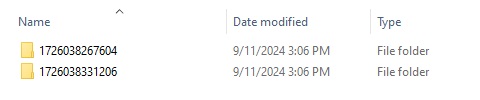
Data blocks folder
A new folder created every time a backup is run, using the date and time in the folder name
Data block in v9 format
v6 Format Backup Data
Under the files folder
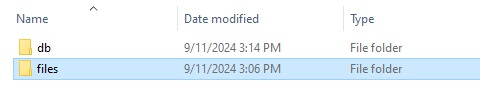
Backup set ID - unique ID for individual backup set
Backup data stored under the "Current" folder

Transaction Log Location
Transaction log is the location where backup data are stored temporarily before they enter the replication cycle mentioned in How Does Replication Work.
There are two different kinds of transaction logs which are located separately under the AhsayCBS folder.
Type 1 - Transaction Log Stored in User Home
Location
%USER_HOME%/%BACKUP_SET_ID%/rps/{%DELETE_TIME%.%LOG_SEQ%}
Kind of transaction logs stored
This folder stores the transaction log entries produced during Stage 2 – Resync of the replication process. In specific, the transaction logs are the changes made on the backup server while the snapshot capture and replication process are taking place. This kind of data will only be replicated to the replication location in Stage 3 – Replay.
Type 2 - Transaction Log Stored in System Home
Location
%SYSTEM_HOME%/%USER_ID%/%BACKUP_SET_ID%/rps/replay-XXXXXX.log
Kind of transaction logs stored
This folder stores the transaction log entries produced in Stage 3 - Replay mode where it stores data from the backup server pending for replication to the replication location in the on-going replication process.
Replication Order
Replication is performed in the order of the tiers as shown below.
Tier 1 - Backup User Name
Tier 2 - Backup Set ID
Tier 3 - Name of Folder/Sub-folder
Tier 4 - File Name
Within each tier, the order of replication is performed according to the standard defined by the American Standard Code for Information Interchange (ASCII), refer to ASCII Table for details of the order.
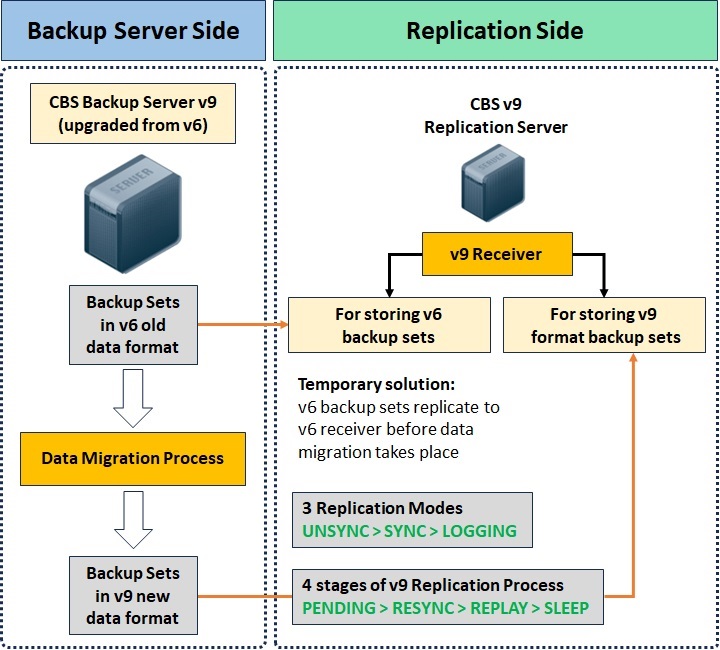
Replication of v6 Backup Sets on AhsayCBS v9
Supports replication of v6 backup sets to a receiver on a v9 replication receiver, this feature can be set under the Replication > Sending Data > Replication page.
The v6 backup set replication feature is designed as a temporary solution to provide extra protection during data migration (conversion from v6 data format to v9 data block format) on a v9 backup server after an upgrade from v6 to v9, it is not intended to be used as a permanent replication solution. Once the data migration process is completed for all backup user accounts, the v6 replication feature should be disabled as v6 backup set data would already have been automatically removed post data migration.
Details of the v6 replication status can be viewed under Monitoring > Replication Logs > Replication Sending.
Requirements
- Both the AhsayCBS Backup Server (sender) and AhsayCBS Replication Server (receiver) must be on v9.1.0.0 or above.
- v6 backup set replication must be enabled on both the backup server and replication server.
- Replication license modules are required for replication of v6 backup sets.
- The v9 replication on AhsayCBS must be enabled to another replication server.
- A separate dedicated replication port (default port 9444) is required.
Limitations
- v9 replication must be enabled on another AhsayCBS server in order to use the feature. As replication to predefined destination does not support replication of v6 backup sets.
- Replication of v6 backup sets is supported using a single thread.
- Only v6 backup set data found in the %USER_HOME%\%USERNAME%\files folder will be replicated. The replication of other folders and files are handled by v7 replication process.
Requirements
License Information
The pricing unit of AhsayCBS Replication Server module is per device to be replicated. If you will replicate to another AhsayCBS, an AhsayCBS module license will also be required.
Version / Platform Compatibility
While AhsayCBS can be deployed on Windows, Linux, FreeBSD, or Solaris x64 platform, it should be noted that only some of the version and platform combinations are supported as illustrated below.
| Backup Server | Replication Server | Compatible? | ||
|---|---|---|---|---|
| Version | Platform | Version | Platform | |
| v9 | Windows | v9 | Windows | Yes |
| v9 | Linux/FreeBSD/Solaris x64 | v9 | Linux/FreeBSD/Solaris x64 | Yes |
| v9 | Windows | v9 | Linux/FreeBSD/Solaris x64 | Yes |
| v9 | Linux/FreeBSD/Solaris x64 | v9 | Windows | No* |
| v6 | Windows | v9 | Linux/FreeBSD/Solaris x64 | Yes |
| v6 | Linux/FreeBSD/Solaris x64 | v9 | Windows | No* |
* The incompatibility is a result of the limitations on Windows operating systems handling of Linux file/folder naming conventions.
Replication Server Storage Requirement
There is a possibility that after your backup data is replicated to the replication server, the final data size on the replication server may be larger than the original data size on the backup server. This situation could arise if there are differences in the way each respective storage device is formatted, i.e. different default block sizes or different files systems.
Your retention policy settings would also determine the storage required on the replication server. You will need to weigh the advantages of using smaller Restore Point Interval which allows for a greater chance of recovery and or the Retention Customization Policy setting is configured for a large number of days against your replication server storage limitations.
Considering the factors mentioned above, the disk capacity of your replication server should by default be greater than your backup server to accommodate the replication data.
Location of the Replication Server
In terms of disaster recovery situation, the restore media should not be stored or located on the same premises, and these rules would also depend on different compliances, regulations or terms with your customers.
Here are some suggestions that you may need to consider:
Set up the AhsayCBS Replication Server in another data center. In case you need to host the Replication Server with your Backup Server, you may consider hosting it in another server rack or another server room if possible.
Dedicated Server for Replication
Following are the pros and cons on setting up replication on a dedicated server.
Pros
- Able to switch from Replication Server to Backup Server.
- Fast in recovery hence small recovery window and short downtime.
- Able to keep replicated snapshots in retention area in case recovery of data in past snapshots becomes necessary.
Cons
- Relatively more complex setup; requires datacenter hosting and maintenance cost.
- Relatively expensive to expand storage.
- Downtime required for regular maintenance and upgrade.
- Upfront investment in hardware storage.
Predefined Destination (Cloud Storage / FTP / SFTP) for Replication
Following are the pros and cons on setting up replication on a predefined destination.
Pros
- Quick setup; low hosting and maintenance cost.
- Cheaper cost for storage expansion.
- No upfront hardware investment required.
Cons
- To recover the replicated data, it is required to set up new backup server and restore data from the predefined destination.
- Slow in recovery hence large recovery window and longer downtime.
For more information and comparison on different replication environment setup, please refer to Comparison of Different Replication Setup Environment.
AhsayCBS Replication Partitioning
The AhsayCBS replication module makes heavy use of the User Home directory to process the snapshots of the backup sets during the Resync stage. During Resync stage, snapshots of backup sets will be written to the User Home in the form of transactions log files.
It is not recommended to use the O/S partition or drive as the System Home. If the System Home folder fills up, this will cause your O/S to become unstable and may even crash your AhsayCBS server. It is strongly recommended the System Home directory should be located on a dedicated local drive.
Replication Performance Tuning
The connection speed between the backup server and the replication location (whether it is an AhsayCBS server or a cloud storage) is typically the primary factor of the replication performance. However, even with a fast and stable connection between the backup server and replication location, the replication performance could be affected by the following factors:
- Poor disk I/O on the backup server – when scanning and retrieving data files to be sent to the replication server.
- Poor disk I/O on the replication server – when receiving and committing files to the receiver home.
Poor disk I/O can be attributed to:
- The use of network drives as AhsayCBS user and system homes on the backup server side.
- The use of network drives as AhsayCBS receiver home(s) on the replication side.
- The use of a single large disk or volume for AhsayCBS user home.
- The use of a single large disk or volume for multiple AhsayCBS receiver home(s) on the replication side.
- Slow performing local hard drives or storage devices.
In order to improve overall replication performance, the following are recommended:
- A separate local drive for each AhsayCBS user home on the backup server side.
- Distributing user accounts across multiple user homes to balance the I/O load.
- A separate local drive for AhsayCBS system home on the backup server side.
- A separate local drive for each receiver on the replication side.
AhsayCBS Java Heap Size Setting
The machine with the Replication server installed may require more memory for additional feature such as retention policy to run.
- For a replication server with single receiver, a maximum Java heap size setting of at least 1024M is recommended.
- For a replication server with multiple receivers, a maximum Java heap size setting of at least 2048M is recommended.
When setting the maximum Java heap size for the replication server, please ensure this value does not exceed 2/3 of the RAM on the server, to allow sufficient memory for O/S processes and operations.
It is not recommended to set excessively high values for the maximum Java heap size, as this could result in performance issues on the replication server during internal Java VM garbage collection or memory recycling routines.
Firewall Settings
Since replication is performed via the http/https ports defined on the AhsayCBS backup server, after you have finished setting up your replication server, please ensure you have updated your firewall settings to allow network traffic through those ports, which are typically port 80 for http and port 443 for https.
Best Practices
Dedicated Restore Drive on Replication Server
In order to facilitate a fast restore of snapshots from the retention area on the replication server, it is recommended the files are not restored to an existing receiver home drive to avoid affecting replication performance. Your replication server should be configured with a dedicated disk for restore purposes. Alternatively, an external USB drive can also be used.
Storage Requirement on Replication Server
The amount of space required to keep this replication depends on the amount of data changed on your Backup Server.
To calculate the amount of storage required for the retention settings, we can base on the following assumption and formula.
Assumption:
There is a 2% data change in the backup server daily.
Formula:
Total data storage required = (1+0.02)n x original data size, where n = number of days of the retention customization policy.
For n=30 days, it will be around 1.81 times of the original data size, and 3.28 times if n=60.
Replication Server with Multiple Receivers
If you have configured multiple receivers on your replication server to serve more than one backup server, it is recommended that each receiver is located on its own individual disk. The major advantage of this kind of setup is that it will minimize the I/O on each disk and therefore improve the replication performance.
Replication Using Cross Over Cable
It is not recommended to set up a connection between the backup server and replication server using a cross over cable. As from our experience this setup will result in connection and performance issues.
If the backup server and replication server are located on the same site, they should be connected via a switch.
Do Not Deploy the Backup and Replication Server on a Single Machine
It is not recommended to configure and use both services on one single machine because it will completely defeat the purpose of the replication service as a backup or standby server for your backup server.
Moreover, the two services will compete for system resources, such as CPU and memory. This could affect the performance and stability of your backup service.
Deployment
There are three (3) major methods to deploy the replication service. All available deployment options, deployment combination and features comparison on different deployment methods will be discussed to help you decide which option to use.
Deployment Method
There are three (3) methods to deploy the replication service.
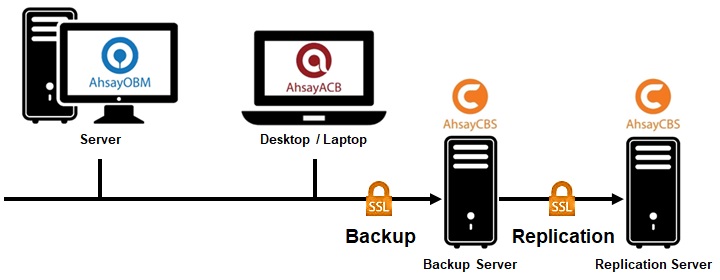
Method 1 (Recommended) - Deploy On A Single AhsayCBS Backup Server, Replicate On Another AhsayCBS Replication Server
Introduction
This is the typical deployment option, as well as the most recommended one, which features replication between a single AhsayCBS backup server and AhsayCBS replication server.
System Architecture
Requirement
Set up a new machine where you wish to host the replication server and install AhsayCBS on it. In other words, you will have two AhsayCBS services running. One on the backup server, and the other on the replication server where you would like to have the backup data replicated to.
Pros and Cons
PROS:
Speed of Replication and Restore
Multiple Threads Replication
Multiple threads replication is supported to improve the replication speed. The actual number of threads that are available for use depends on the CPU power of the backup server. The more CPU cores the backup server has, the more threads it will have for replication.
High Hardware Performance for High Replication Speed
A direct attached storage and SAN storage would provide good replicating speed.
Recovery
Fast Recovery in a Few Clicks
In case of a backup server outage, the replication server can be switched as the backup server in a short time to minimize the system down time and interruption to backup users.
For instructions to switch a replication server to backup server, refer to Method 3 - Startup Replication Server as Backup Server.
CONS:
Cost
Higher Cost
- Setup cost is higher.
- Cost for hardware storage expansion is relatively higher.
Although this option involves higher setup cost, consider the higher replication/restore speed and recovery switching, it may be worth the investment.
Storage Provisioning
Slower Storage Provisioning
Compared to cloud storage deployment, it takes more time and effort to assign the additional storage acquired when you need to expand the hardware storage.
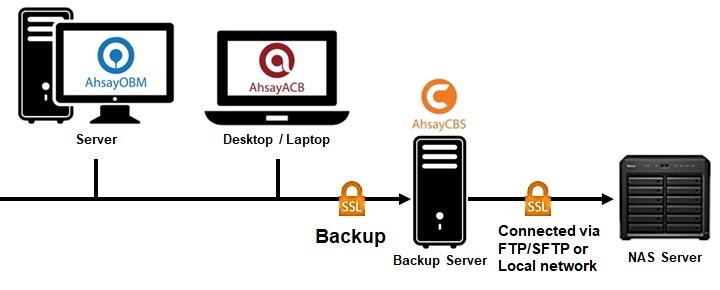
Method 2 - Deploy On A Single AhsayCBS Backup Server, Replicate To A Predefined Destination
Introduction
This deployment option allows you to replicate your backup data on the backup server to a cloud storage, local/mapped drive/removable storage, or FTP/SFTP server.
Refer to the list below for all the available predefined destination options.
System Architecture
Cloud Storage as Replication Destination connected via Internet.
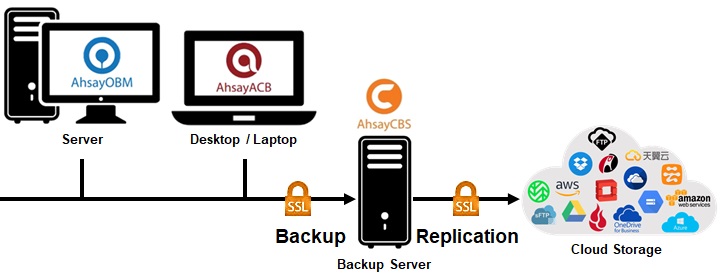
NAS Server as Replication Destination connected via FTP/SFTP or local network.
Requirement
First you need to have a cloud storage account, a local/network/removable drive, or a FTP/SFTP server in place. Then, the predefined destination must have been set under the System Settings > Predefined Destinations menu so it can be used for replication purposes.
Available Predefined Destinations
- Aliyun (阿里云)
- CTYun (中国电信天翼云 )
- Amazon Compatible Cloud Storage
- Amazon S3
- Backblaze
- Dropbox
- Google Cloud Storage
- Google Drive
- Microsoft Azure
- OneDrive
- OneDrive for Business
- Rackspace
- OpenStack
- FTP
- SFTP
- Wasabi
- Local / Mapped Drive / Network Drive / Removable Drive
Pros and Cons
PROS:
Multiple Threads Replication
Multiple threads replication is supported to improve the replication speed. The actual number of threads that are available for use depends on the CPU power of the backup server. The more CPU cores the backup server has, the more threads it will have for replication.
Cost
Low Cost
- Setup cost is low.
- Cost for storage expansion, especially on cloud storage, is relatively cheaper.
CONS:
Speed of Replication and Restore
Slower Upload Bandwidth
The replication and restore speed is subject to the connection speed to the predefined destination, and administrator may not always have control over the bandwidth.
Recovery
Longer Recovery Process
There is no quick way to restore the replicated data from the predefined destination to the backup server. To recover the replicated data on a predefined destination, you have to:
- Setup a new machine.
- Install AhsayCBS.
- Download the replicated files from the predefined destination back to the Backup Server.
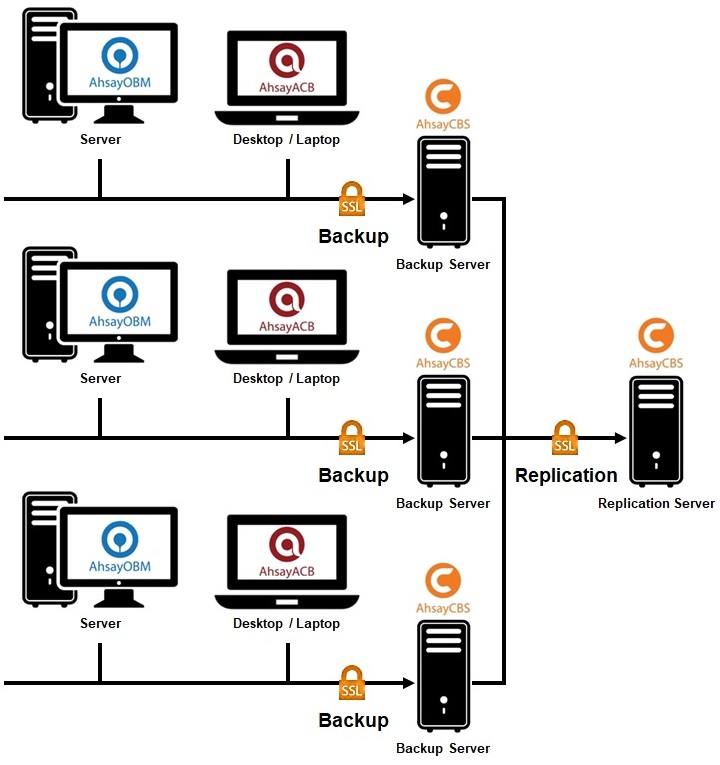
Method 3 - Deploy On Multiple AhsayCBS Backup Servers, Replicate To Another AhsayCBS Replication Server
Introduction
This deployment option allows you to replicate backup data from multiple AhsayCBS backup servers to an AhsayCBS Replication Server.
System Architecture
Requirement
Set up a new machine where you wish to host the replication server and install AhsayCBS on it.
In other words, you will have multiple AhsayCBS services running. Each backup server runs on its own license, while the replication server where you would like to have the backup data replicated to requires another license as well.
Pros and Cons
PROS:
Cost
Lower Setup Cost
You only require to have one replication server to accommodate replication from multiple backup servers, instead of one-to-one replication between backup server and replication server.
Single Replication Point Management
With only a single replication server, this deployment option allows you to centrally manage the replication settings and view replication status on the replication server web console, As opposed to the Method 1 deployment where you have to access multiple AhsayCBS web console pages for settings and management.
CONS:
Speed of Replication and Restore
Slower Upload Bandwidth
The replication and restore speed is subject to the connection speed to the predefined destination, and administrator may not always have control over the bandwidth.
Recovery
Longer Recovery Process
There is no quick way to restore the replicated data from the predefined destination to the backup server. To recover the replicated data on a predefined destination, you have to:
- Setup a new machine.
- Install AhsayCBS.
- Download the replicated files from the predefined destination back to the Backup Server.
Comparison Between Deployment On AhsayCBS and Cloud Storage
| Deploy on AhsayCBS Replication Server | Deploy on Cloud Storage | |
|---|---|---|
| Replication Retention | ✔ | x |
| The replication server creates snapshot of the replication data. Under the Replication Retention configurations, Restore Point Interval can be configured to define the number of days between each retention snapshot; Retention Customization Policy can be configured to define the number of days before an existing retention snapshot is removed from the replication server. | ||
| Startup Replication Server as Backup Server | ✔ | x |
| This feature allows you to quickly convert your AhsayCBS replication server into AhsayCBS backup server in the event of a backup server down, so that you can keep serving the backup users with minimal impact to your business. Refer to Method 3 - Startup Replication Server as Backup Server for detailed steps to perform this recovery. | ||
| Replicate Multiple Backup Servers | ✔ | ✔ |
| It is possible to replicate backup data from multiple AhsayCBS backup servers to another AhsayCBS replication server or cloud storage. This gives you the convenience of hosting backup data of multiple backup servers in one single replication server for the purposes of cost saving and easier management. | ||
| Support v6 Backup Set Replication | ✔ | x |
| This feature gives you the flexibility to back up not only v8 format backup sets, but also the v6 ones to the replication server, before the v6 format backup sets undergo the data migration process. | ||
| Quick Storage Provisioning | x | ✔ |
| As time goes by, your replication data may fill up the capacity on your AhsayCBS replication server or cloud storage and you will have to expand the storage capacity to accommodate the replication data. Comparing to AhsayCBS deployment, cloud deployment allows a hassle-free storage upgrade where you only have to pay your cloud storage service provider to get the upgrade done. | ||
| Upfront Hardware Investment | ✔ | x |
| Depending on your organization’s budget on deploying the replication service, it is generally more cost saving to deploy the replication service on cloud storage instead of the AhsayCBS as you do not need to invest on hardware and hosting upfront. | ||
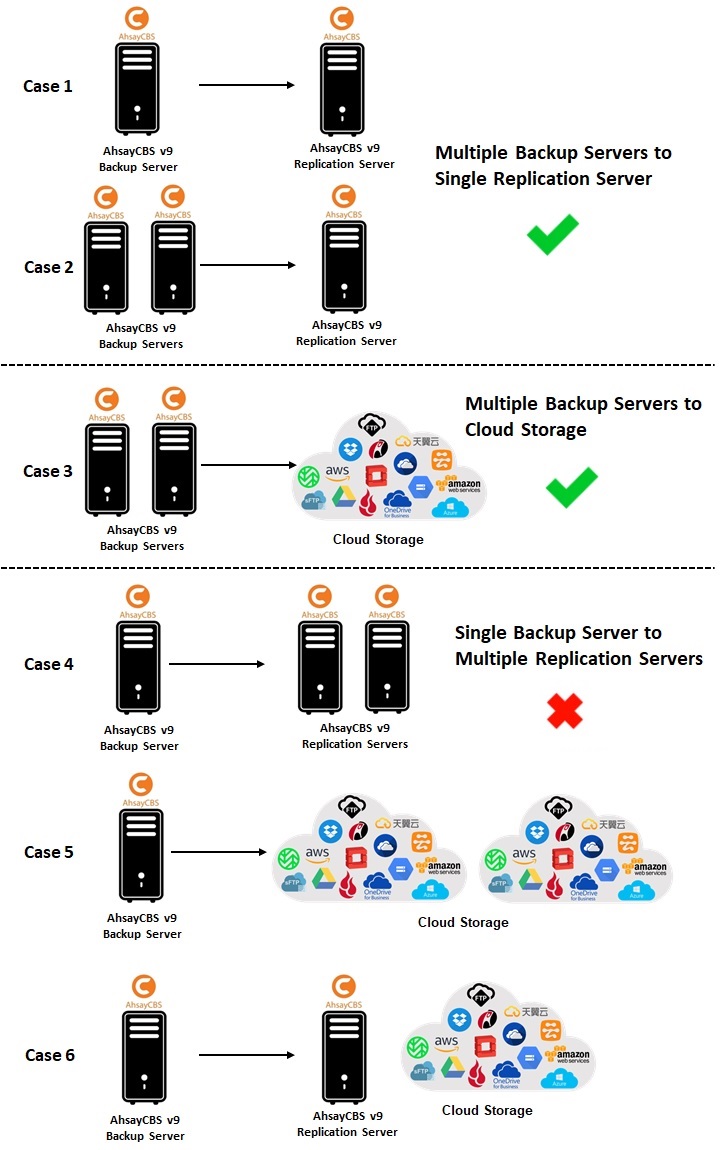
Deployment Combinations Of Backup and Replication Servers
It is only possible for a single replication server or cloud storage to host replication data from multiple backup servers, but not the other way around, i.e. a single backup server replicating to multiple replication servers or cloud storage destinations. Refer to the illustration below for details on the possible deployment combinations.
Steps To Deploy A Replication Service
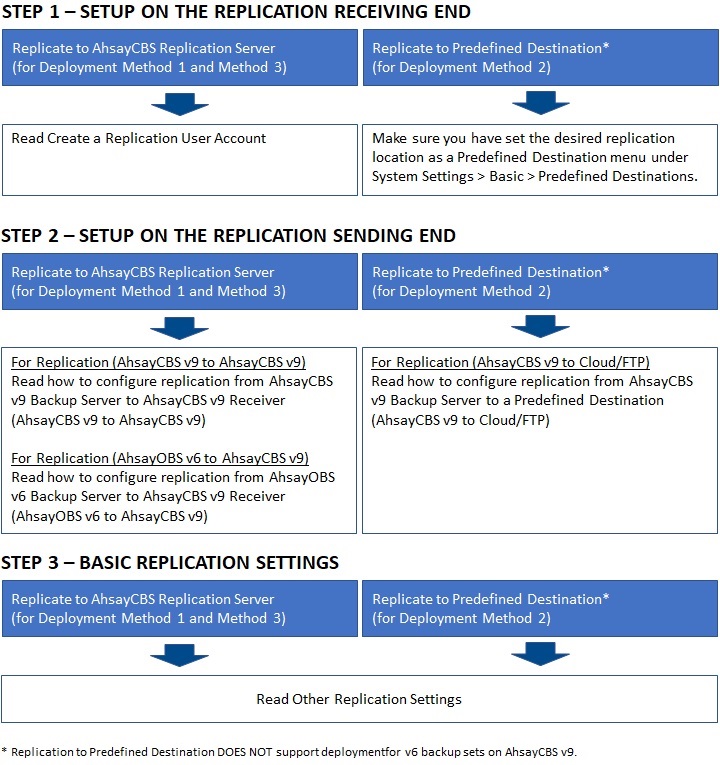
Configuration on the Replication Receiving End
Create a Replication User Account
Before an AhsayCBS/AhsayOBS backup server can replicate backup data to another AhsayCBS replication server, a receiver user account must be created on the AhsayCBS replication server first. Follow the steps below to create a replication receiver account.
Go to Replication > Accepting Data.
Click the Create button in the "Manage Receiver" section.
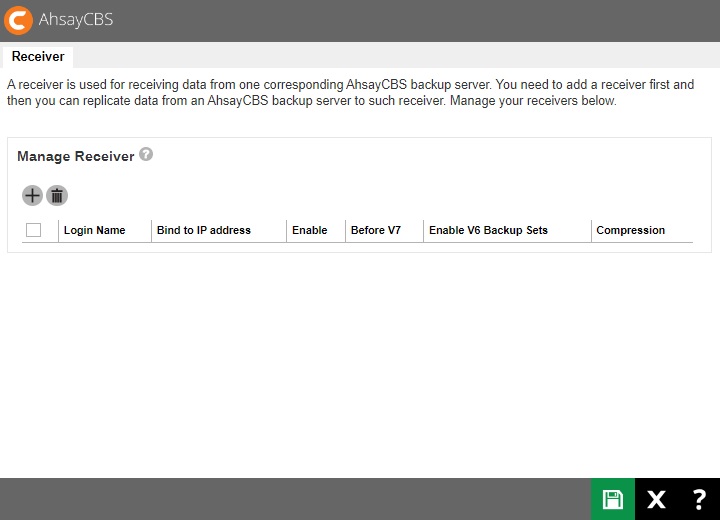
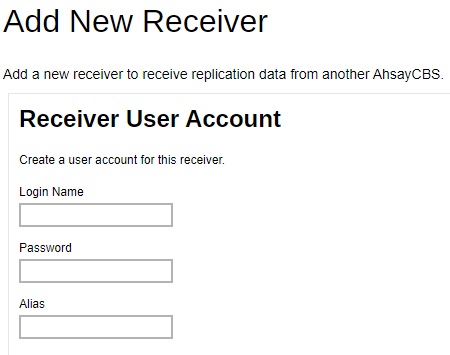
Set the login name, password and alias of the receiver account.
Configure the source backup server host settings, including the http/https protocol, source backup server host name and port number.
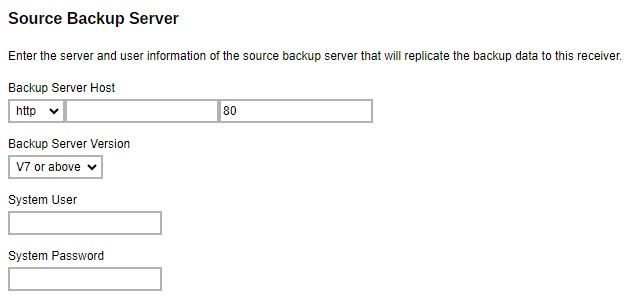
- Backup Server Host - IP address / host name of the backup server.
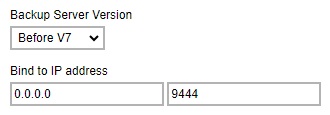
- Backup Server Version - source backup server version.
If you select V7 or above, it means the source backup server is an AhsayCBS version 9 backup server.
If you have upgraded your backup server to v9 from v6, and still wish to replicate backup sets in v6 format before they are migrated to v9 format, make sure you select V7 or above in this menu.
- System User – the system user login of the source backup server.
- System Password – the system user password of the source backup server.
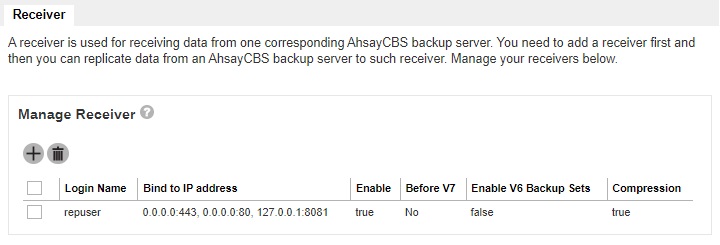
If you select Before V7 as the backup server version, enter the bind to IP address and the replication port. “0.0.0.0” and “9444” are the default values, you can assign a specific IP if you have multiple network cards. For multiple backup servers’ replication, a unique replication port number is required to set, such as “9444”.
Switch the “Enable V6 Backup Sets Replication” on if you will replicate v6 backup sets to the replication server.

Configure the retention settings for the replicated data.
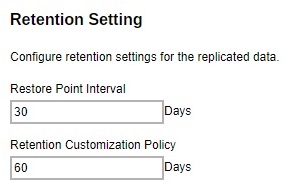
Restore Point Interval – defines the number of days before new snapshot of the replicated data will be taken and stored in the retention area. A retention snapshot will be taken only when the following two conditions are met:
- There is data received from the backup server.
- Restore Point Interval is reached.
No retention snapshot will be taken if there is no data received, even when the Restore Point Interval is reached.
- Retention Customization Policy – defines the number of days the old snapshot copies will be retained in the retention area.
- Click Next to proceed when you are done with the settings.
Set the default home directory for this replication and set up the path to store the user homes.
The following is an example of a v9 receiver setup. In v9 receiver setup, you will be able to configure the default home directory, as well as replication home directory for individual backup server user home.
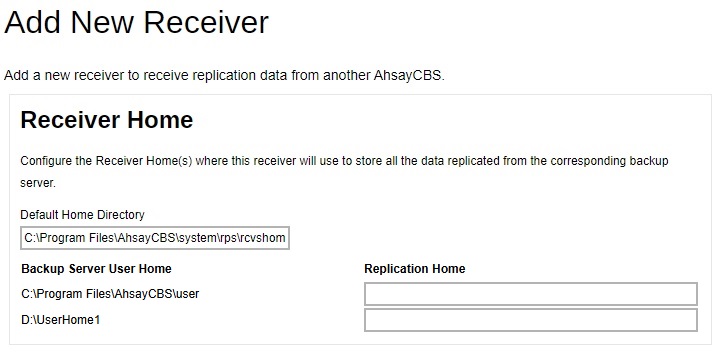 If AhsayCBS is receiving multiple backup servers, please use unique path for each receiver’s “Replication Home”.
In v6 receiver, you can only set up the default home directory.
It is recommended to configure the default home directory to a non-system drive (i.e. not C:\ drive), especially when there are v6 backup sets, as the replication transaction log files may fill up the disk space and cause the operating system to become unstable.- Click OK to confirm the configuration.
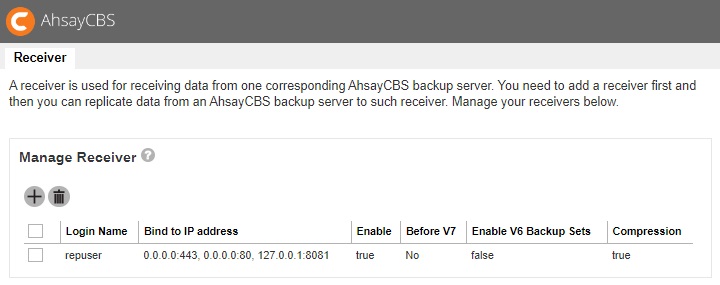
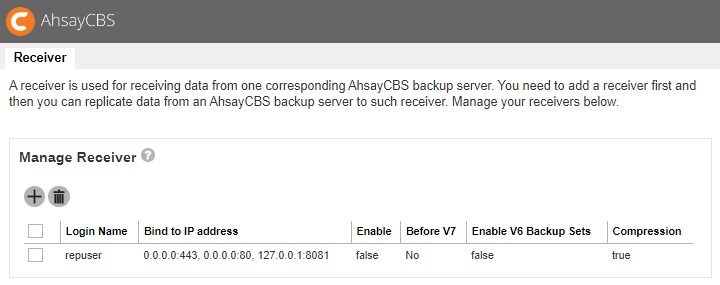
Although the receiver has been created, it is still disabled.

Click on the receiver you created then tick the Enable Replication checkbox. Click OK to confirm the configuration.
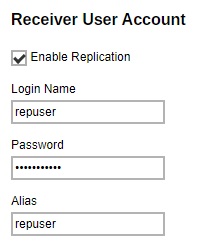
The receiver is now enabled as you can see from the screenshot below. Click Save to save the settings.

Edit Replication Receiver
You can edit the configurations of the replication receiver after it has been set up.
- Go to Replication > Accepting Data on the AhsayCBS web console on the replication receiver side.
- Click on the replication receiver account under the “Manage Receiver” section which you wish to edit configurations for.
- Revise the desired replication receiver item, then click OK and Save to confirm the changes.
Configuration On The Replication Sending End
Enable and configure the replication feature on the backup server side by following the corresponding sub-chapter below depending on the backup server version or replication destination.
AhsayCBS v9 Backup Server to AhsayCBS v9 Receiver
The following example is a v9 (backup server) to v9 (replication server) replication setup. For earlier version setup, please refer to AhsayOBS v6 Backup Server to AhsayCBS v9 Receiver (AhsayOBS v6 to AhsayCBS v9) for details.
- Make sure you have created a replication receiver account on the receiving end of the AhsayCBS server first. Refer to Create a Replication User Account for detailed instructions.
Click on the Sending Data icon under the Replication section on the AhsayCBS web console of the backup server.

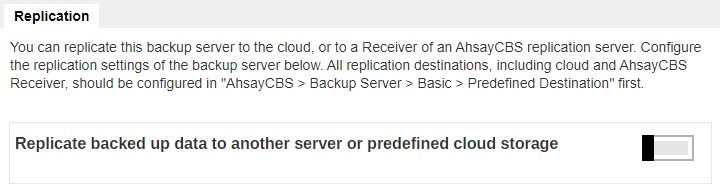
Switch on "Replicate backed up data to another server or predefined cloud storage".
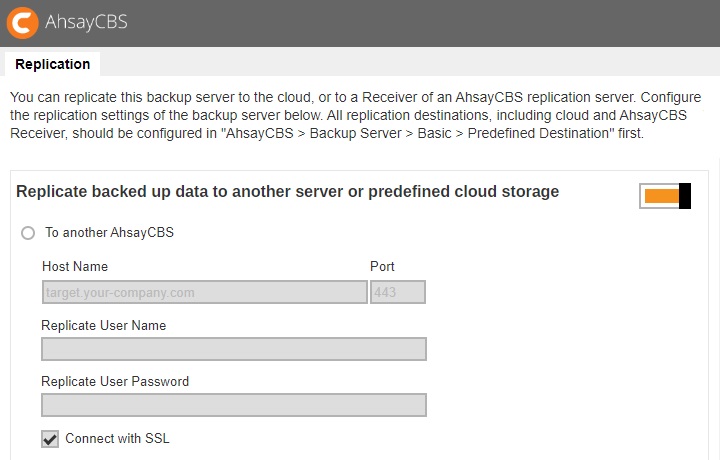
Select the To another AhsayCBS option, and then enter the “Host Name”, “Port”, “Replicate User Name”, “Replicate User Password” of the replication receiver. Tick the “Connect with SSL” if needed.
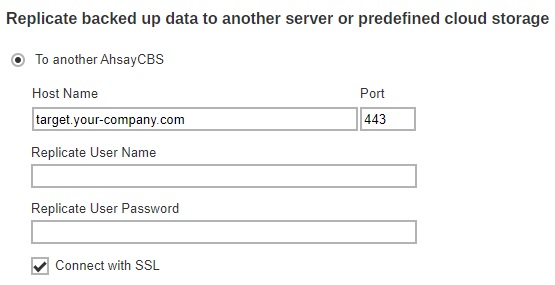
- Host Name – IP address or host name of the replication server with AhsayCBS installed.
- Replicate User Name – the username of the receiver created on the AhsayCBS replication server.
- Replicate User Password – the password to log in to the receiver created on the AhsayCBS replication server.
- Connect with SSL – connect to the replication server with SSL.
If proxy is required to access the replication server, tick the “Use proxy” checkbox.

If there are backup sets in v6 format to be replicated to the replication server, make sure you switch on “Replicate v6 backup sets to v7 or above server”. The default port is set as “9444”.

- If you wish to configure the following replication settings, refer to Other Replication Settings.
- Traffic limit for replication – which limits the amount of bandwidth used by replication.
- Selectable backup set for replication – which allows you to choose individual backup set from selected users for replication.
- Concurrent backup set for replication – which allows you to configure the maximum number of backup set allowed for replication at the same time.
- Cyclic Redundancy Check (CRC) Checking – which allows you to enable this checking to run automatically for verifying the integrity of the replicated data.
- Click Save to save the configuration.
AhsayOBS v6 Backup Server to AhsayCBS v9 Receiver
It is suggested to upgrade your v6 backup server to v9 so that you can enjoy the latest features provided by AhsayCBS. If you still wish to continue using the v6 backup server to replicate to a v9 receiver, follow the steps below for configuration of the v6 backup server.
- Make sure you have created a replication receiver account on the receiving end of the AhsayCBS server first. Refer to Create a Replication User Account for detailed instructions.
In your backup server, go to Manage System > Replication Config, then enter the username, password, target host and connecting port.
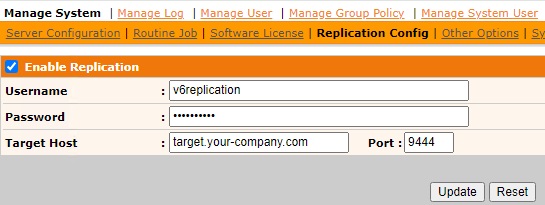
Click Update to confirm the settings.
The index files stored in the v6 backup server will not be replicated to the AhsayCBS (Replication Server) nor any cloud storage.
There is no multiple threads replication.
The AhsayCBS replication server cannot be started as a v6 backup server.
AhsayCBS v9 Backup Server to a Predefined Destination
- Make sure you have created a predefined destination first in System Settings > Basic > Predefined Destinations.
Click on the Sending Data icon under the Replication section on the AhsayCBS web console of the backup server.
Switch on “Replicate backed up data to another server or predefined cloud storage”.
Select the To a predefined destination option. You will then see a list of predefined destination you have set under the System Settings > Basic > Predefined Destinations menu.
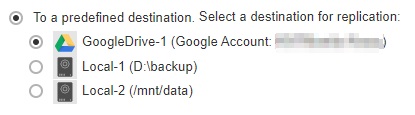
You can configure the folder name in the selected predefined destination to store the replication data.

If proxy is required to access the replication server, tick the “Use proxy” checkbox.
- If you wish to configure the following replication settings, refer to Other Replication Settings.
- Traffic limit for replication – which limits the amount of bandwidth used by replication.
- Selectable backup set for replication – which allows you to choose individual backup set from selected users for replication.
- Concurrent backup set for replication – which allows you to configure the maximum number of backup set allowed for replication at the same time.
- Cyclic Redundancy Check (CRC) Checking – which allows you to enable this checking to run automatically for verifying the integrity of the replicated data.
- Click Save to save the configuration.
Other Replication Settings
The following replication settings can only be set when the replication feature has been enabled on the AhsayCBS backup server.
Traffic Limit
This is an optional setting that allows you to limit the amount of bandwidth used by replication traffic between a specified period of your choice.
Click on the Sending Data icon under the Replication section on the AhsayCBS web console of the backup server
Slide the switch to the right to turn on “Set traffic limit”.

Click Create to configure.
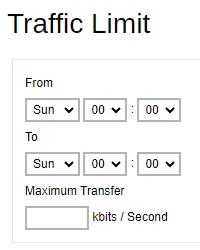
- From – set the start time to apply the traffic limit by selecting a day of the week and time in hh:mm (24-hr format).
- To – set the end time to apply the traffic limit by selecting a day of the week and time in hh:mm (24-hr format).
- Maximum Transfer – set the maximum bandwidth allowed for data transfer in the format of kbits /second.
- Click OK then Save to save the changes.
Replicate Individual Backup Sets
By default, all backup sets of all users on all user homes will be replicated to the replication location (either another AhsayCBS or a predefined destination). However, it is possible to select specific backup users and their specific backup sets for replication.
Click on the Sending Data icon under the Replication section on the AhsayCBS web console of the backup server
Slide the switch to the right to turn on “Replicate individual backup sets”.
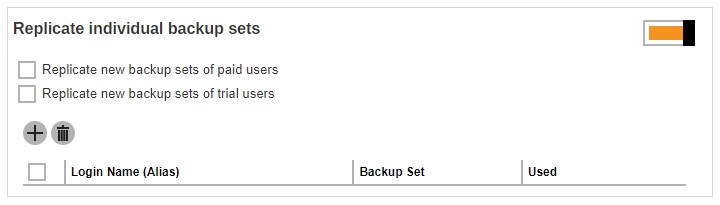
First, select to replicate the backup data of either the paid users or trial users, or both by checking the corresponding checkbox(es).

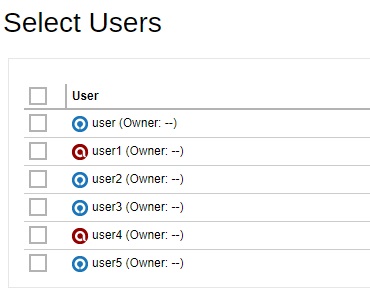
Then start selecting specific backup sets(s) to replicate. Click Create to select the desired backup users first. Multiple selection is possible. Click Next to proceed when you are done with the selection.
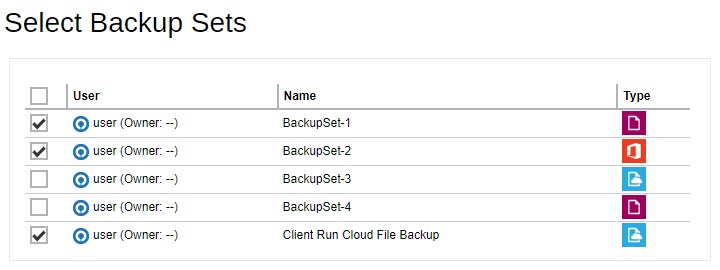
A page listing all the backup sets of the backup user(s) you have selected from the previous step will be displayed. Each individual row shows the name of the backup user, the name of the backup set, and the backup set type in corresponding icon. Select the desired backup sets by clicking the corresponding checkbox, then click Add to confirm the selection.
The selected backup sets will be added to the “Replicate individual backup sets” section. Each row of the entry shows the corresponding backup username, backup set name and the size of the backup set.
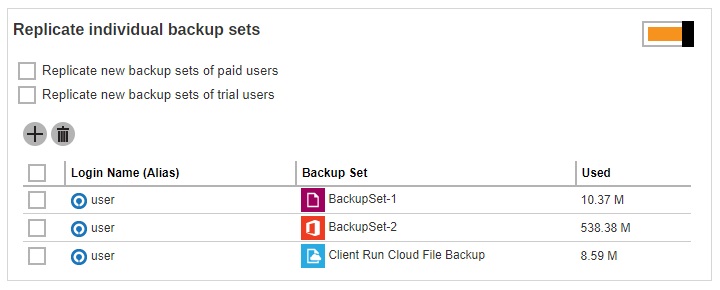
- Click Save to save the changes.
Set the number of backup sets to replicate concurrently
The number of backup sets to replicate concurrently may be changed on the AhsayCBS backup server web console under Replication > Sending Data.
Under the “Replicate backed up data to another server or predefined cloud storage” section, there is a drop-down menu for the “No. of backup sets to replicate concurrently” setting. The minimum number of backup sets that can be configured to replicate concurrently is 1 while the maximum is 16.
The default value is Auto, with this setting the number of backup sets to replicate concurrently is automatically computed. The way this value will be computed depends on the setting of the maximum threads for replication option which can be added in the %CBS_INSTALL_PATH%\conf\cbs.opt file.
Here are the two ways that the Auto value will be computed:
If the maximum allowed number of replication threads is enabled "com.ahsay.cbs.obs.config.Index.RepMaxThreads=true"
The default (Auto) number of concurrent backup sets = the number of CPU cores
For example, if the AhsayCBS server has a total of 8 CPU cores, then the number of concurrent backup set to replicate is 8.
There is no maximum value for the default (Auto) value, so if the AhsayCBS server has a total of 64 CPU cores then the Auto value will be 64.If the maximum allowed number of replication threads is disabled (default) "com.ahsay.cbs.obs.config.Index.RepMaxThreads=false"
The default (Auto) number of concurrent backup sets = Total number of CPU cores / 8
For example, if the AhsayCBS server has a total of 8 CPU cores, then the number of concurrent backup set to replicate is 1.
Another example, if the AhsayCBS server has a total of 16 CPU cores, then the number of concurrent backup set to replicate is 2.
There is a minimum value for the default (Auto) value which is 1. While the maximum number for the default (Auto) value is 4.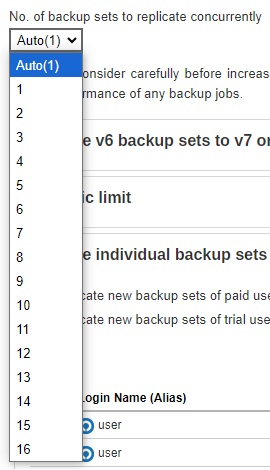
You may adjust the concurrent backup set value from the drop-down menu as highlighted above. In case you find the default setting is too low, the value can be increased to a larger value. Or if the large value is causing performance issues such as hard disk I/O or high network bandwidth utilization, it can be decreased to a lower value.
For more information regarding replication threads please refer to this article: Increase Replication Threads on AhsayCBS
Cyclic Redundancy Check (CRC) Checking
The Cyclic Redundancy Check (CRC) job will check all new files replicated to the AhsayCBS receiver since the last CRC job. This checking can be run automatically for verifying the integrity of the replicated data.
A replication receiver must have been set before you can enable the Cyclic Redundancy Check (CRC) Checking.
Click on the Accepting Data icon under the Replication section on the AhsayCBS web console of the replication server.
Click on the receiver which you wish to enable the CRC checking feature.
Scroll to the “Cyclic Redundancy Check (CRC) Checking” section and turn on the feature by sliding the switch to the right.

- The CRC checking is set to run on the second and fourth Saturdays of every month by default. You can configure the time for the checking to run on the specified dates.
- Click OK then Save to save the changes.
The Cyclic Redundancy Check (CRC) Checking feature option is only available for backwards compatibility: AhsayOBS v6 to AhsayCBS v9.
It is not supported in replication setups for:
- AhsayCBS v9 to AhsayCBS v9
- AhsayCBS v7 to AhsayCBS v9
Recovery Process
After you have deployed the replication server, data from the backup server will be replicated to the replication destination you have selected. In the event of a system down on your backup server, or you wish to retrieve deleted data from the replication destination, you can recover the configurations and backup data replicated from the backup server by using any one of the recovery methods below.
Method 1 - Rebuild AhsayCBS From Replication
Introduction
This recovery method rebuilds the AhsayCBS by extracting AhsayCBS configuration, system files, user profiles and backup data from the replication destination then restoring it either to the Backup Server or restoring the raw data alone using a Backup Client Agent (AhsayOBM / AhsayACB).
Pros
Selective Backup Set Restore
After extracting the backed up data from the replication destination, you have the flexibility to restore only the selected backup sets from selected backup users, instead of restoring all data at once.
Restore as Raw Data
Instead of restoring the backed up data to the backup server, you can only restore the raw data by using a client backup agent (AhsayOBM / AhsayACB).
Cons
Relatively Time and Effort Consuming
As opposed to Method 3 where you can quickly convert the replication server as backup server, this recovery method takes more time and effort to rebuild the backup server.
Steps
- Set up a new AhsayCBS on a new machine with similar hardware specification, and sufficient hard disk space as the original backup server.
- Make sure replication has been performed before you start restoring any replication data. Refer to To check replication logs on the Backup Server and To check the replication logs on the Replication Server for details.
- Extract data in the 3 folders (conf, system and user) from the replication destination. Below are the links that can quickly direct you to the corresponding section for the detailed steps.
- from AhsayCBS Replication Server
- from a Predefined Destination
- from v6 Replication
- from Snapshot in Retention Area
- Stop AhsayCBS server on the new machine.
To rebuild the AhsayCBS on the new machine by restoring the extracted data, continue to read through the rest of the steps in this section.
or
To restore the backup raw data alone using a Backup Client Agent, disregard the steps below and skip to Restore Raw Data Using AhsayOBM / AhsayACB for further steps.
Copy all the contents in the 3 folders to your new server as instructed below:
- system > CBS_HOME\system
- user > CBS_HOME\user
- conf\conf.zip > CBS_HOME\conf
Expand the conf.zip first.- Start the AhsayCBS server on the new machine after copying the data as instructed above.
- Logon to the AhsayCBS web management console.
- You will notice that there is a license error. This is because your AhsayCBS is running on the new machine with hardware and settings changed. Please contact our support with your licensee name and license key. We shall relax the license for you. There is a 14 days grace period before the license deactivates.
List of suggested items to check after you started up your AhsayCBS
- Check SMTP settings in AhsayCBS web console by navigating to System Settings > Basic > Email.
- Check all users’ profile, backup and policy group settings in AhsayCBS web console by navigating to Backup/Restore > Users, Groups & Policies.
- Check https connection to the AhsayCBS on different browsers (IE, Firefox and Chrome).
Method 2 - Rebuild From Auto Save
Introduction
This recovery method only restores the AhsayCBS configuration, system files and user profiles but not the users’ backed up data. Users’ backed up data will have to be re-uploaded again to complete the recovery.
So it is very important to configure a replication for your AhsayCBS if you need to restore everything that was originally on the Backup Server.
- As the system keeps only a maximum of 30 Auto Save snapshots on software vendor’s cloud, if you want to keep these snapshot(s) on your server, you need to download these snapshots manually.
- If you restore an earlier snapshot, you will not be able to restore again all the snapshots beyond the restore date. For example, If today is Jan 21st 2024, after you restore the snapshot on Jan 19th, 2024, you will not be able to select the snapshot on Jan 20th and Jan 21st from the dropdown list.
Please refer to the Replication Scope for all the major system configuration files that are saved on the cloud daily by the Auto Save system job.
Pros
Quick Rebuild of AhsayCBS
AhsayCBS can be quickly rebuilt by applying only the configuration files and user profiles.
Cons
Longer Time to Re-upload Backup Data
Since the users’ backup data is not restored and required to be re-uploaded again, it is going to take a longer time to complete the whole recovery process.
Steps
- Login to AhsayCBS management console and go to System Settings > Advanced > Auto Save.
Turn on the “Use Auto Save” switch, then click on the Restore button.
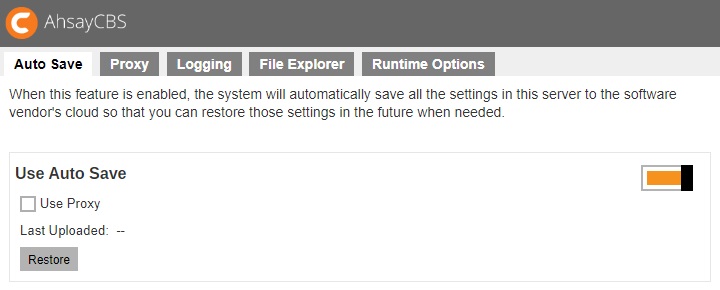
Select to download the snapshot file or to overwrite the existing configuration.
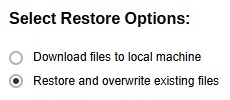
In this example, we have selected the Restore and overwrite existing files option, skip to the Manual Restore section if you want to restore the downloaded files manually.
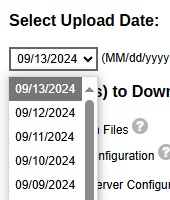
Select the snapshot that you want to restore.
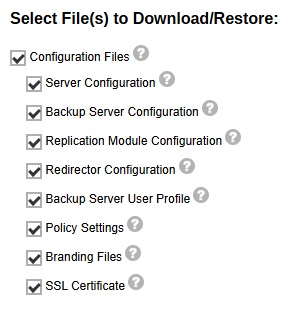
Select the items that you need to restore. Select all the items if you need to restore the configuration exactly on that restore point.
- Click on the Restore button if you want to restore and overwrite the existing configuration.
- Restart the AhsayCBS service, and the configuration will be overwritten.
Manual Restore
- Here is an example of the downloaded configuration file, the name of the folder follows this format dr-YYYY-MM-DD.zip
- (Optional) If you need to restore the file manually, you can unzip the 2 folders “conf” and “policies” into the CBS_HOME\system\recovery. After the restart of the AhsayCBS service, the configuration will be imported to the AhsayCBS.
Method 3 - Start Up Replication Server As Backup Server
Introduction
This recovery method allows you to quickly convert AhsayCBS in replication receiver mode to a backup server. This is a quick and direct way to access your backup data in the event of a system down on your backup server.
Pros
Fastest Recovery
This recovery method is the fastest way to turn the replication server as a backup server so as to minimize the system down time in the event of a backup server disaster.
Steps
Check on the Receiver's Setting by following the steps below and make note of the Default Home Directory and Replication Home settings.
- On the AhsayCBS in replication receiver mode, login to the AhsayCBS web console.
- Confirm on the replication receiver's settings. Under Replication, select Accepting Data.
Check on the Default Home Directory setting, as well as the Replication Home setting.

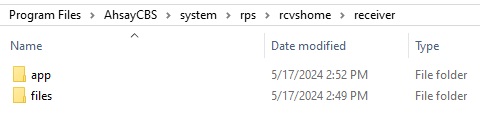
Default Home Directory is where the replication sender's system home, user settings, and configuration settings are stored (in the app folder).
Replication Home is the location where users' backup data and logs are stored.
In the example above, the following settings are used:
Default Home Directory is set to: C:\Program Files\AhsayCBS\system\rps\rcvshome\receiver
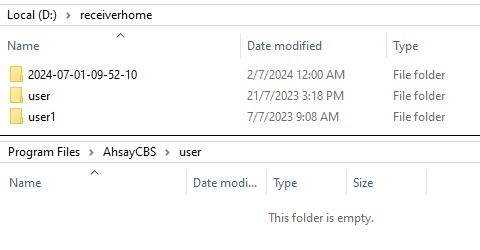
- Replication Home is set to: D:\receiverhome
Configure the Software License by following the steps below.
- On the AhsayCBS in replication receiver mode, login to the AhsayCBS web console.
Under System Settings, select Licenses, then apply the AhsayCBS license (the license from the AhsayCBS in backup server mode).
This will ensure that there are sufficient “Client Software” and “Client Add-on Modules” available to the backup users after the switch.
- Click Update, then click Save. Ensure that the license information is properly applied by checking the Client Software and Client Add-on Modules settings under “License Details”.
Before continuing with the next step, ensure that the license is properly applied. Failure to do so may result in backup accounts being suspended and all backup settings being reset.
Also, ensure to shut down the AhsayCBS on the backup server, so that you are not running two servers with the same AhsayCBS license.
Convert the AhsayCBS in Replication Receiver Mode to Backup Server Mode by following the steps below.
- Shutdown the AhsayCBS service.
Copy the replicated system config files to the corresponding location.
Extract the content of the conf.zip file from the “Default Home Directory” to the AhsayCBS installation conf folder.
Extract %Default Home Directory%\app\conf\conf.zip
to %AhsayCBS Install Home%\*
Using the example in Step 1, extract the content of C:\Program Files\AhsayCBS\system\rps\rcvshome\receiver\app\conf\conf.zip to C:\Program Files\AhsayCBS\conf
Copy the replicated system home from the “Default Home Directory” to the AhsayCBS system home folder.
Copy %Default Home Directory%\app\system\* to %AhsayCBS System Home%\*
Using the example in Step 1, copy the content of C:\Program Files\AhsayCBS\system\rps\rcvshome\receiver\app\system\* to C:\Program Files\AhsayCBS\system
 If you are planning to change the system home location, copy the replicated system home to the new system home location instead.
Copy the replicated user home from the Replication Home to the AhsayCBS user home folder.
Copy %Replication Home%\%username% to %AhsayCBS User Home%\*
Do not copy over the folder in YYYY-MM-DD-hh-mm-ss format.Using the example in Step 1, copy the content of D:\receiverhome to C:\Program Files\AhsayCBS\user
 If you are planning to change the user home location, copy the replicated user home to the new user home location instead.
- Startup the AhsayCBS services.
- Login to the AhsayCBS web console, confirm the settings.
Confirm the system settings under the System Settings > Basic and System Settings > Advanced menus.
Modify the “System Home” setting under System Settings > Basic if necessary (e.g. if you had copied the replicated system home to a new location in the previous step).
Confirm the user and policy settings under Backup / Restore > Users, Groups & Policies menu.
Modify the “User Home” setting under
Basic if necessary (e.g. if you had copied the replicated user home to a new location in the previous step).
For AhsayCBS installation on Linux platforms, the conversion procedure is the same except all directory paths are in the Linux convention.
EXTRACT DATA FROM THE REPLICATION DESTINATION
If you have chosen to recover your replication data using Method 1 - Rebuild AhsayCBS from Replication, you will have to extract the replication data from the replication destination first. Before getting started, make sure replication has been performed before you start restoring any replication data by performing the following checking.
To Check Replication Logs on the Backup Server
Log in to the AhsayCBS web console, go to Monitoring > Replication Logs > Replication Sending.
![]()
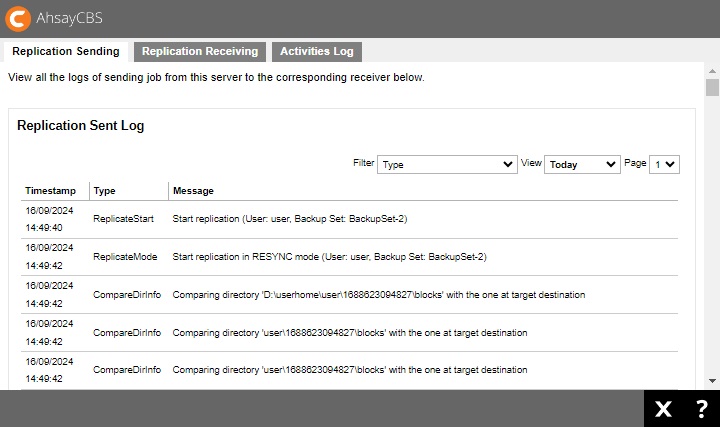
Use the drop-down filters at the top right corner to filter the desired replication sending logs.
- Type – select the desired type of replication log to display.
- View – select a specific date or range of time of the replication logs.
To Check Replication Logs on the Replication Server
Log in to the AhsayCBS web console, go to Monitoring > Replication Logs > Replication Receiving.
![]()
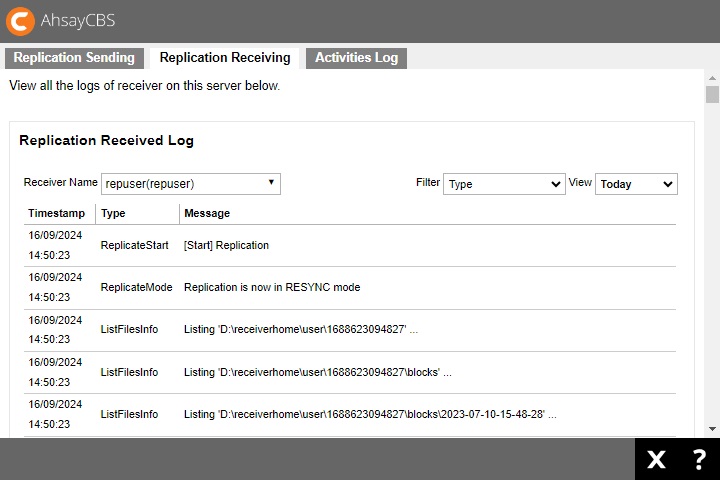
Use the drop-down filters at the top right corner to filter the desired replication receiving logs.
- Receiver Name – select the receiver name of whom the replication data is from.
- Type – select the type of replication log to display.
- View – select a specific date or range of time of the replication logs.
Here are the different ways how to extract the replication data:
- Extract from AhsayCBS Replication Server
- Extract from a Predefined Destination
- Extract from v6 Replication
- Extract Snapshot from Retention Area
Extract from AhsayCBS Replication Server
- Follow the steps below to disable the replication service on both the Backup Server and the Replication Server.
- To disable on the Backup Server Side
Click on the Sending Data icon under the Replication section on the AhsayCBS web console of the backup server.
Slide the switch to the left in the “Replicate backed up data to another server or predefined cloud storage” to turn the replication feature off.
- To disable on the Replication Server Side
Click on the replication receiving end, go to Replication > Accepting Data on the AhsayCBS web console.
Click on the replication receiver user under the “Manage Receiver” section which you wish to turn off.
Untick the Enable Replication checkbox under the “Receiver User Account” section
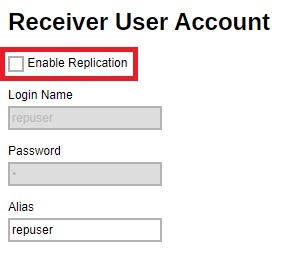
- To disable on the Backup Server Side
Go to Replication > Accepting Data > Manage Receiver > %receiver_name% in the Replication Server web console.
Locate the “Restore” section at the bottom of the page. Click on the Current snapshot to display all the replicated users.
Enter the path you want to restore the data to (e.g. D:\restored). Then select the user(s) that you want to recover, select all if you want to recover all the users for the Backup Server.
- Click the Restore button to start the restoration.
It will then go back to the Edit Receiver page and you will see the restore progress under the “Restore” section.
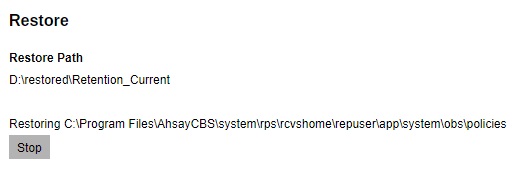
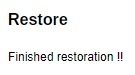
When you see the “Finished restoration !!” message, the restore is completed.
The data of the selected users and the server configuration are restored to the specified restore path on the Replication Server.
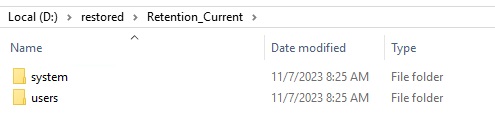
You will find the folder structure as:
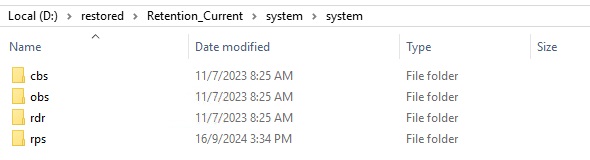
D:\restored\Retention_Current\system which contains “CBS_HOME\conf” and “SYSTEM_HOME”.
D:\restored\Retention_Current\users which contains the user folders.
- Copy the whole restored folder D:\restored to a free space on your Backup Server first, e.g. C:\Desktop
After extracting the replication data, you can follow the instructions in Restore Replication Data to the Backup Server to restore the replication data to your AhsayCBS backup server.
or
Refer to Restore Raw Data Using AhsayOBM / AhsayACB if you wish to recover the raw data alone without restoring them to AhsayCBS.
Extract from a Predefined Destination
There are different predefined destinations that may be used to replicate backed up data like cloud storage, FTP, SFTP, local drive, network drive, removable drive etc.
Google Drive will be used as an example for the predefined destination. The extraction method is basically the same for the other predefined destination.
Prerequisite: Google Drive is installed.
- Disable the replication on the Backup Server, for instructions please refer to the previous section.
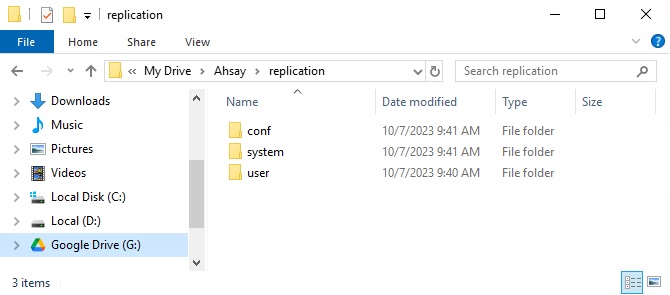
- Locate the replication folder, go to your Google drive folder or login to the Google drive web interface to access to your storage.
You will find the following path such as My drive > Ahsay > replication. (‘replication’ is the replication profile name)
Google Drive File Explorer
Google Drive Web Interface

The path of the replication folder is usually %Replication_Home%\Ahsay\%Replication_Profile_Name%.
Example for:
- Cloud storage = My Drive\Ahsay\replication
- SFTP = sftp_root/Ahsay/replication
- Local Drive = E:\rpshome\replication
You will see the following folders:
- conf
- system
- user
You may download/copy all three (3) folders to your local drive if you need to restore all the files. Or select the folder to download/copy according to your requirement.
The “conf” and “system” folders are AhsayCBS configuration or system related files. The “user” folder contains the replicated user folders.After extracting the replication data, you can follow the instructions in Restore Replication Data to the Backup Server to restore the replication data to your AhsayCBS backup server.
or
Refer to Restore Raw Data Using AhsayOBM / AhsayACB if you wish to recover the raw data alone without restoring them to AhsayCBS.
Extract from v6 Replication
This section provides steps on restoring replication data in v6 format to a v6 version backup server.
Please be reminded that the steps in this section apply only if you are restoring the replication data in v6 data format back to a backup server in v6 version.
If the backup server has been upgraded to v9, the replication data in v6 data format cannot be restored in the upgraded backup server due to the fundamental differences of the system structure and data format between v6 and v9. If you have upgraded your backup server to v9, you will have to configure the replication receiver again and make sure to select the Backup Server Version as 9 during the receiver creation process. Refer to the Create a Replication User Account section for further details on the configuration.
- Disable the replication on the Backup Server, for instructions please refer to the previous section.
- Follow steps 2 – 7 in the Extract from AhsayCBS Replication Server section.
The data of the selected users and the server configuration are restored to the restore path on the Replication Server.
You will find the folder structure as:
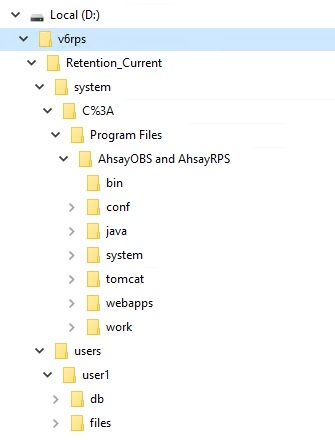 The folder D:\v6rps\Retention_Current\ contains all the restore materials for your v6 OBS. Under the folder, D:\v6rps\Retention_Current\system, you can see the folder “C%3A” which indicate the drive letter of the installation, “%3A” is the URL encoding for the colon character which means “C:”.
Here is a summary of the restored folders under the path D:\v6rps\Retention _Current\system\C%3A\Program Files\AhsayOBS and AhsayRPS:
Folder Name Description bin Contains the startup scripts. conf PBS server configuration files. java Bundled Java for the OBS. system System configuration and policy settings. tomcat Bundled Tomcat for the OBS. webapps OBS and RPS application folder, OBC installer files etc. work Cache folder. - Copy the whole restored folder D:\v6rps to your AhsayOBS machine.
Locate the AhsayOBS installation directory in the AhsayOBS machine, conf folder, system folder and user folder.
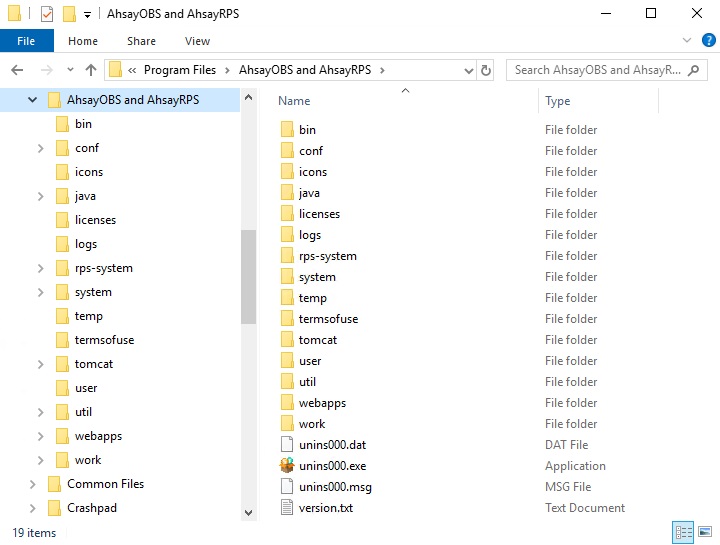
In this case, all three (3) folders are located in the same directory. If you have changed the AhsayOBS system home or user home folder, you can check this information in your AhsayOBS Management Console > Manage System > Server Configuration page.
After extracting the replication data, you can follow the instructions in Restore Replication Data to the Backup Server to restore the replication data to your AhsayCBS backup server.
or
Refer to Restore Raw Data Using AhsayOBM / AhsayACB if you wish to recover the raw data alone without restoring them to AhsayCBS.
Extract Snapshot from Retention Area
A snapshot of the replicated data is taken and stored in the retention area for a certain period of time of your configuration. This gives you an extra layer of protection in case you need to retrieve the old replication data. For details of the retention policy setting, refer to the Retention Setting under the Create a Replication User Account section.
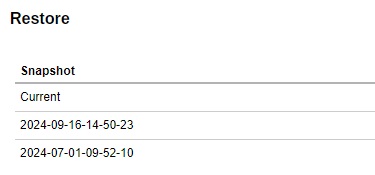
Go to Replication > Accepting Data > Manage Receiver > %receiver_name% in the Replication Server web console.
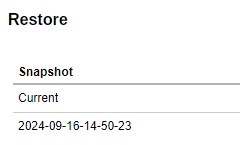
Locate the “Restore” section at the bottom of the page. The past snapshots are named in date and time when it was captured. Click on the desired snapshot you wish to extract the replication data from.
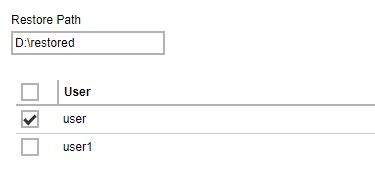
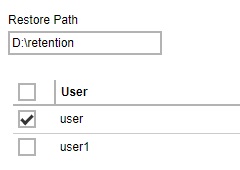
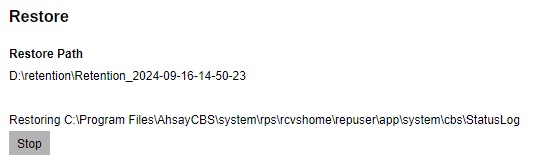
Enter the path where you want to restore the data in the retention area (e.g. D:\retention). Then select the user(s) that you want to recover, select all if you want to recover all the users for the Backup server.
 Do not restore the retention data in the same folder where you normally store the extracted replication data so as to avoid any possible confusion.
- Click the Restore button to start the restoration.
It will then go back to the Edit Receiver page and you will see the restore progress under the “Restore” section
When you see the “Finished restoration !!” message, the restore is completed.
The data of the selected users and the server configuration are restored to the specified restore path on the Replication Server.
You will find the folder structure as:
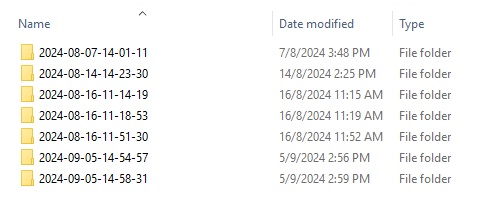
D:\retention\Retention_2024-09-16-14-50-23\system which contains “CBS_HOME\ conf” and “SYSTEM_HOME”.
D:\retention\Retention_2024-09-16-14-50-23\users which contains the user folders.
- Copy the whole restored folder D:\retention to a free space on your Backup Server first, e.g. C:\Desktop.
After extracting the replication data, you can follow the instructions in Restore Replication Data to the Backup Server to restore the replication data to your AhsayCBS backup server.
or
Refer to Restore Raw Data Using AhsayOBM / AhsayACB if you wish to recover the raw data alone without restoring them to AhsayCBS.
RESTORE REPLICATION DATA
Restore Replication Data to the Backup Server
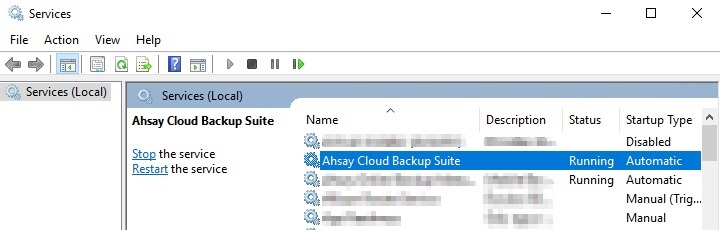
Stop the AhsayCBS service on the Backup Server by going to the “Services” console, click on Ahsay Cloud Backup Suite then click the Stop button on the left.
If you want to recover the user data, copy the %user_name% folder from the %Restored_folder%\Retention_Current\users folder, then paste it to the User Home folder located in “\AhsayCBS\user\” on your backup server machine.

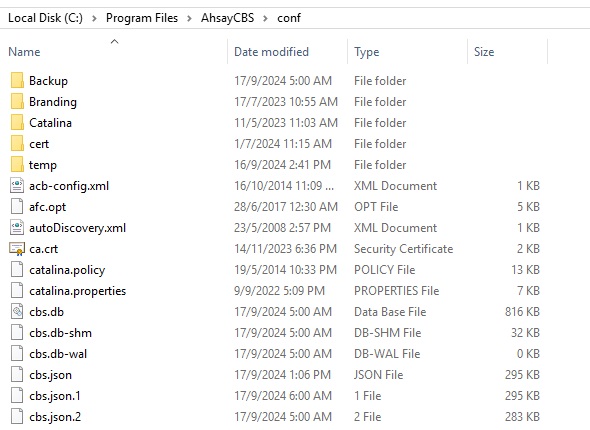
If you want to recover the server configuration, extract the %Restored_folder%\Retention_Current\system\conf\conf.zip, then unzip the file and replace all the unzipped files with those located on “\AhsayCBS\conf\”.

If you want to recover the system home, copy the content of the %Restored_folder%\Retention_Current\system\system folder in the restored folder, then paste it in the system folder located in “AhsayCBS\system\” on your backup service machine.
- Restart the AhsayCBS service on the Backup Server by going to the Services console, click on Ahsay Cloud Backup Suite then click the Start button on the left.
Restore Raw Data using AhsayOBM / AhsayACB
Besides restoring the replication data back to the backup server, you can also restore the raw data alone using either of the client backup agent (AhsayOBM / AhsayACB).
Make sure you have extracted the replication data from the replication destination before you start with the restore. Refer to the instructions in the Extract Data from the Replication Destination. Once you have extracted the replication data, follow the steps below to restore the raw data.
AhsayOBM is used in the following instructions for decrypting the data. The procedures work basically the same for AhsayACB.
Log in to the AhsayOBM client backup agent, go to Utilities > Decrypt Backup Data section.
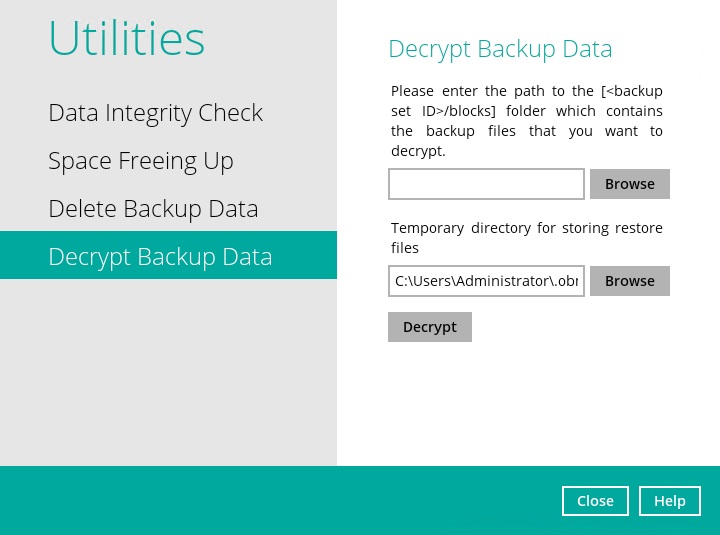
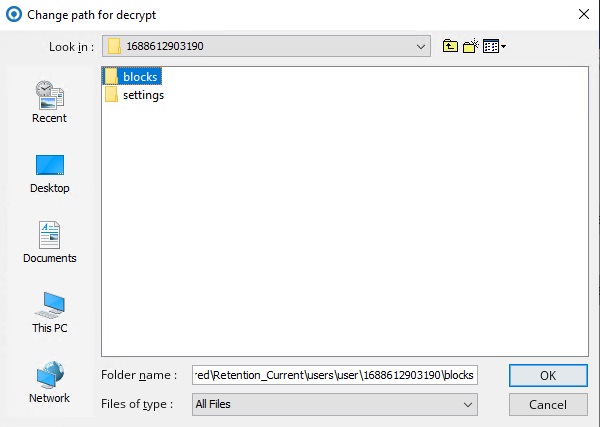
Click Browse to locate the backup set you wish to decrypt replication data you have extracted, then navigate to the %backup set ID%/blocks level of the backup set you wish to restore data from then click OK.
- Click Decrypt to proceed.
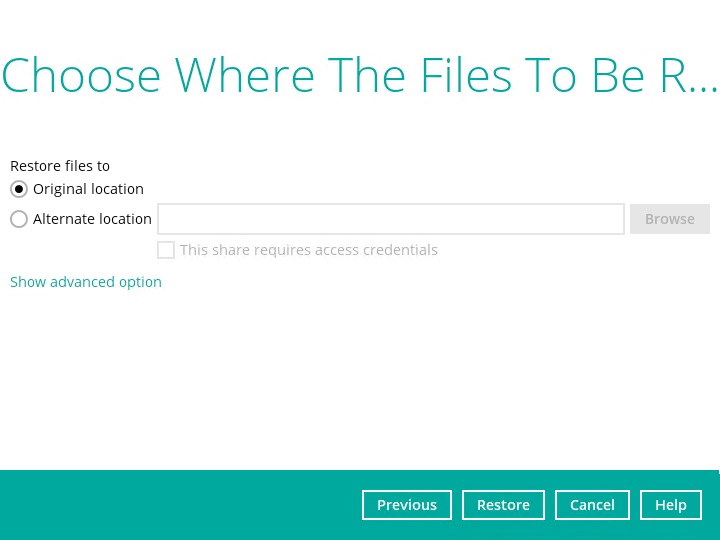
Select the file(s)/folder(s) you wish to restore from the selected source, then click Next to proceed.

Select to restore to the Original location or an Alternate location of your choice. Click Restore to start the decryption process.