
 FAQ
FAQWeb Console Overview
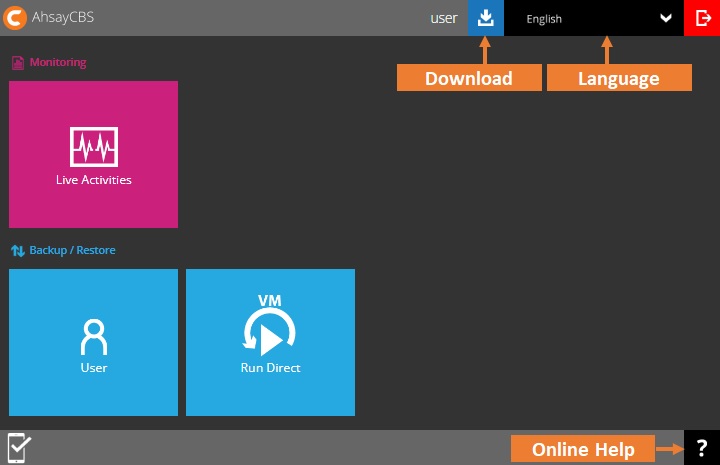
AhsayCBS has six menus that can be accessed by the user, these are:
Download
The Download menu contains the different client software that the user can download.

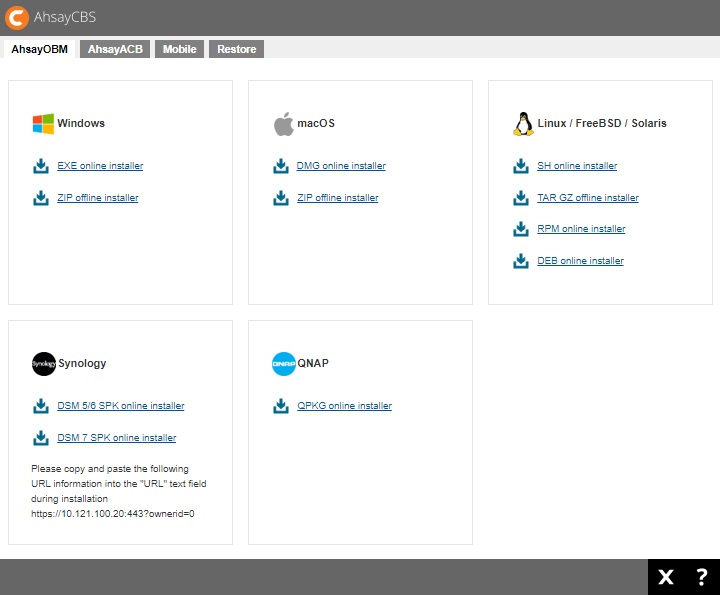
There are four tabs available, with each tab containing the installer for the different platforms available for a particular client software. For more information on how to download and install please refer to their respective download and installation instructions.
AhsayOBM
The AhsayOBM tab contains installers for the following platforms:
- Windows
- macOS
- Linux / FreeBSD / Solaris
- Synology
- QNAP
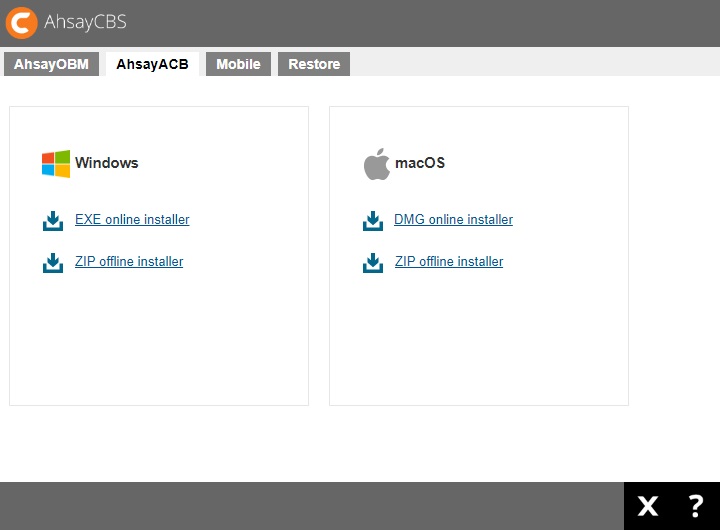
AhsayACB
The AhsayACB tab contains installers for the following platforms:
- Windows
- macOS
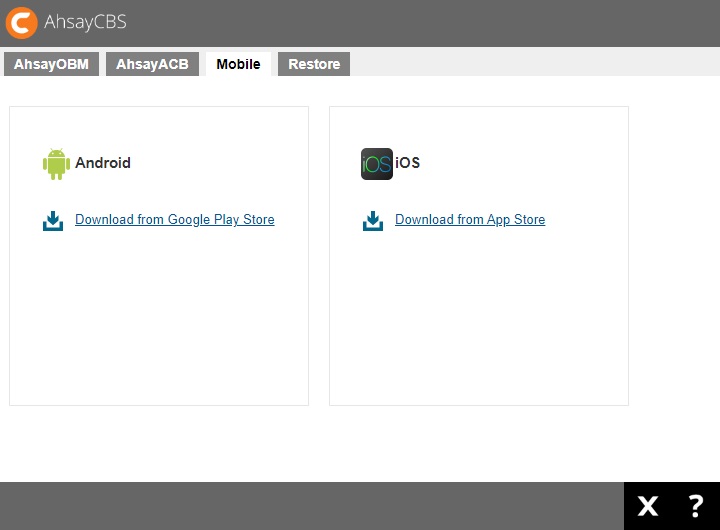
Mobile
The Mobile tab contains a link to the installers for the following platforms:
- Android
- iOS
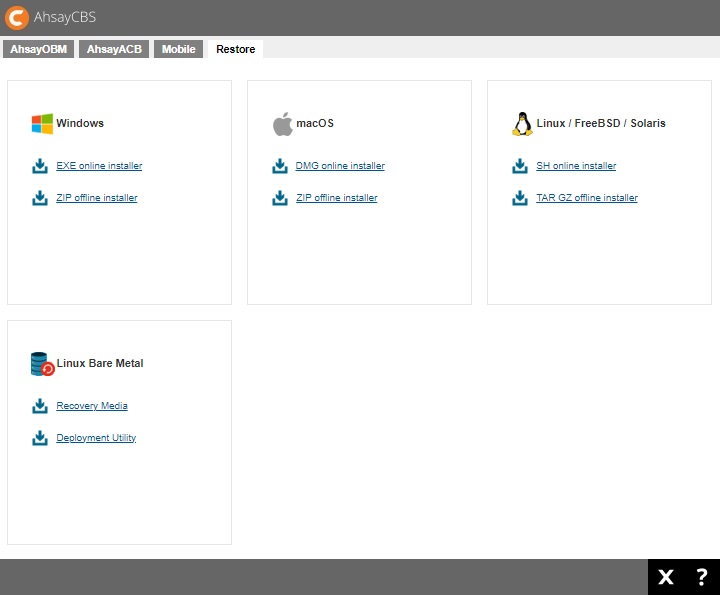
Restore
The Restore tab contains installers for the following platforms:
- Windows
- macOS
- Linux / FreeBSD / Solaris
- Linux Bare Metal
Language
You can change the language of AhsayCBS anytime, whether before or after you login to the system. Click the downward arrow to select the language of your choice.

The available languages are:
- Arabic
- Basque
- Catalan
- Chinese (Simplified)
- Chinese (Traditional)
- Czech
- Danish
- Dutch
- English (default)
- Finnish
- French
- German
- Greek Modern
- Hebrew
- Hungarian
- Indonesian
- Italian
- Japanese
- Korean
- Lithuanian
- Norwegian
- Polish
- Portuguese (Brazil)
- Portuguese (Portugal)
- Russian
- Slovenian
- Spanish
- Swedish
- Thai (Western digits)
- Turkish
- Vietnamese
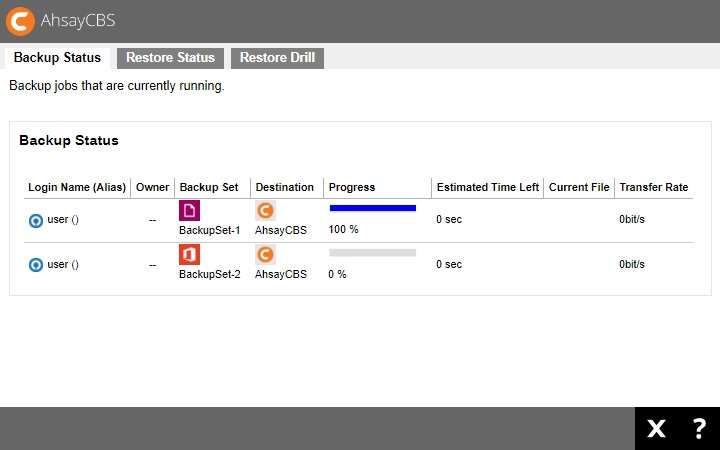
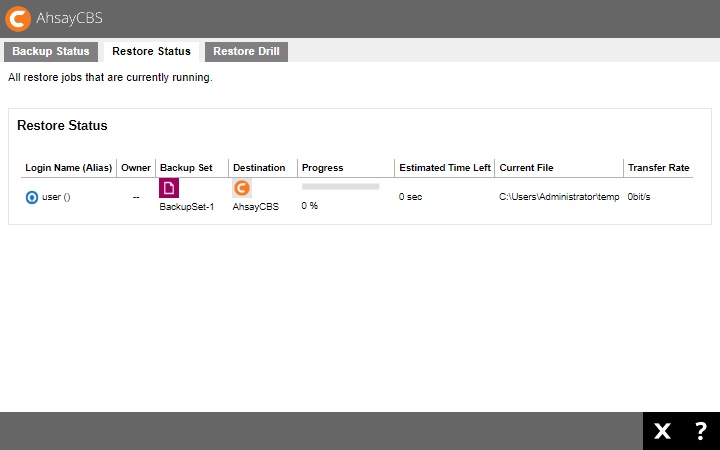
Live Activities
The Live Activities menu is for monitoring backup, restore and restore drill activities. It will only list currently running jobs.
![]()
Example for backup activities:
Example for restore activities:
Example for restore drill activities:

User
The User contains the information regarding the user account as well as backup sets and settings.

You can perform the following operations on your own user account:
- Manage your user profile settings, e.g. New Password, Language, Timezone, Contact Information.
- Customize event log settings, which is supported on AhsayOBM / AhsayACB clients installed on Windows platform only.
- View backup or restore reports for different time periods.
- View usage statistics by selecting destination, backup set, and period.
- View details of policies and settings on users, backup sets, GUIs, default values, preempted values, preempted backup sets, and mobile. The settings and the availability of this feature is dependent on your backup service provider.
- Register mobile device for two-factor authentication.
- View mobile device registered for mobile backup.
- View backed up files of backup sets saved in AhsayCBS backup destination.
It is divided into seven categories:
User Profile
The User Profile page contains information regarding the user account. This includes the user backup account settings information, subscribed modules backup quota, subscription type, contact information, user group information, two-factor authentication settings and registered mobile device for mobile backup.
Among all the above information, you can modify the user backup account settings information, contact information and registered mobile device for two-factor authentication. However, for the subscribed modules backup quota, subscription type, and user group information, as the setting was done when the user account was created, the settings cannot be modified by the user. While the registered mobile device for mobile backup and its backup destination can only be viewed here.
It is further divided into six tabs:
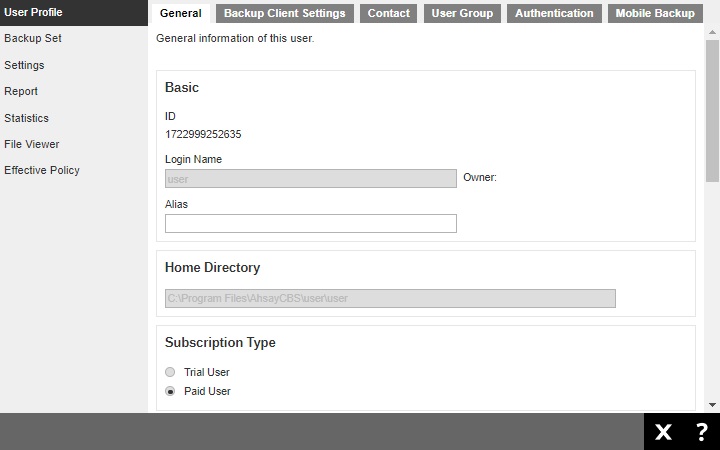
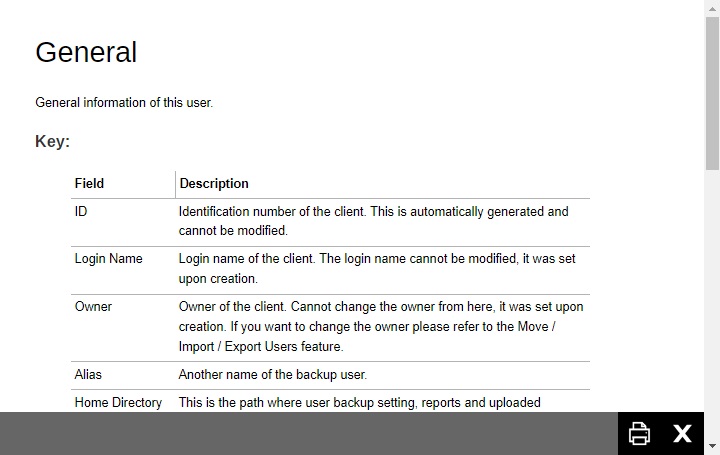
General
The following shows the General tab under the user Profile page.
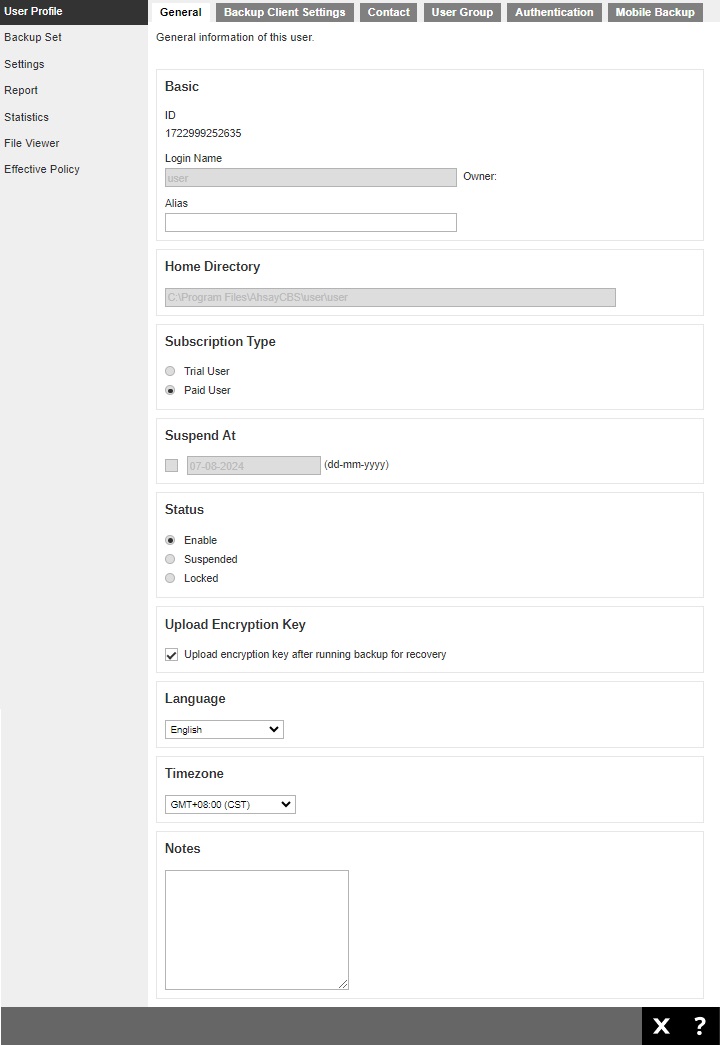
There are several groups of settings under the General tab and they are described below:
- Basic - there are three elements in the "Basic" section, which are the following:
- "ID" of the backup user, this is system generated and cannot be changed.
- "Login Name" of the backup user, defined by the service provider which cannot be changed.
- "Alias" is another name for the backup user which can be modified.
- Home Directory - the path where your backup data is stored on AhsayCBS backup destination.
This was set when your account was created and cannot be modified by the user. - Subscription Type - there are two subscription types: Trial User and Paid User. Trial users are subject to automatic removal after the trial period. Paid users do not have such restrictions.
This was set when your account was created and cannot be modified by the user. If you need to change it, please contact your backup service provider. - Suspend At - shows the date when a trial user account is scheduled to be suspended.
This was set when your account was created and cannot be modified by the user. If you need to update it, please contact your backup service provider. - Status - there are three user account status: Enabled, Suspended and Locked. The Locked status refers to account lockout rules. For example, when the user has three consecutive unsuccessful log in attempts, the user account will be locked.
This was set when your account was created and cannot be modified by the user. If you need to change it, please contact your backup service provider. - Upload Encryption Key - to enable or disable this feature, please contact your backup service provider for support. The encryption key file will be uploaded to the backup server when a backup run.
If you forget the encryption key, please contact your backup service provider for support. - Language - select your preferred language for all email reports.
- Timezone - select the time zone of the backup user.
- Notes - a field for AhsayCBS user to add notes.
Backup Client Settings
This shows the Backup Client Settings tab under the User Profile page.
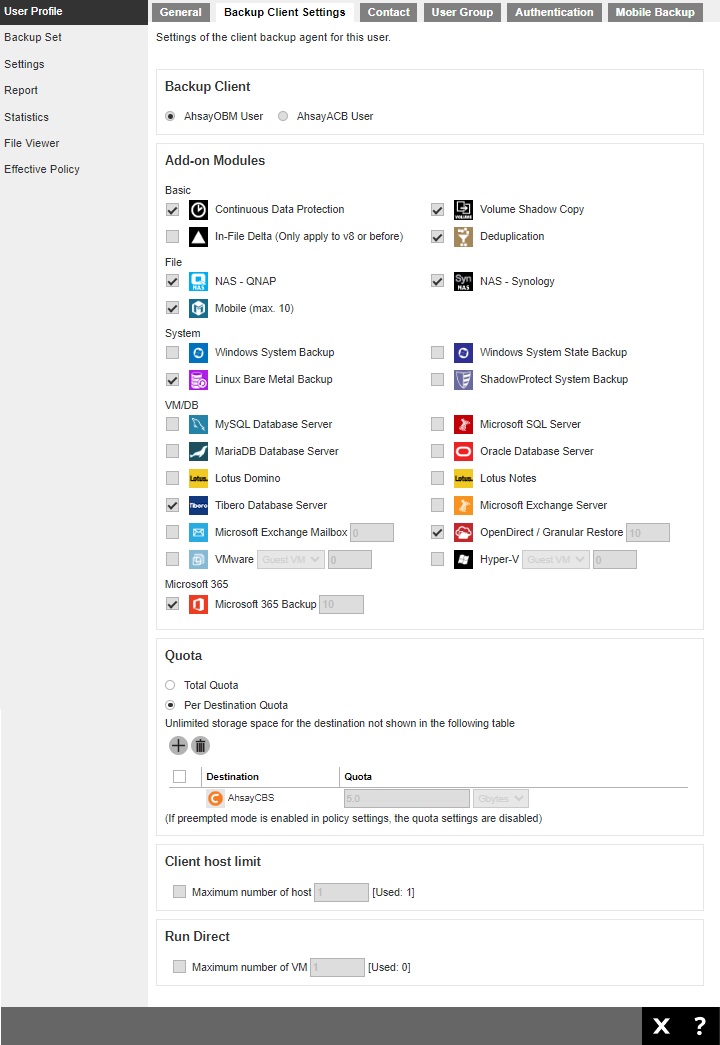
There are several groups of settings under the Backup Client Settings tab and they are described below:
- Backup Client - there are two types of backup user accounts: AhsayOBM and AhsayACB. This was set when your account was created and cannot be modified by the user. If you need to update it, please contact your backup service provider.
- Add-on Modules - the backup client comes with add-on modules.
These add-on modules were set when the user account was created and cannot be modified by the user. If you need to change the add-on modules, please contact your backup service provider. - Quota - there are two quota calculations: Total Quota and Per Destination Quota.
If Total Quota is selected, it will display the allowed total backup quota in GB.
If Per Destination Quota is selected, it will list all the predefined and standard destinations associated with the user account and the backup quota per destination.
The quota was set when your account was created and cannot be modified by the user. If you need to change it, please contact your backup service provider. - Client host limit - the maximum number of host machine for your backup user account. This field cannot be changed by the user. If you need to update this field, please contact your backup service provider.
- Run Direct - the maximum number of VMs to be restored by running them directly from the backup files on AhsayCBS. This field cannot be changed by the user. If you need to update this field, please contact your backup service provider.
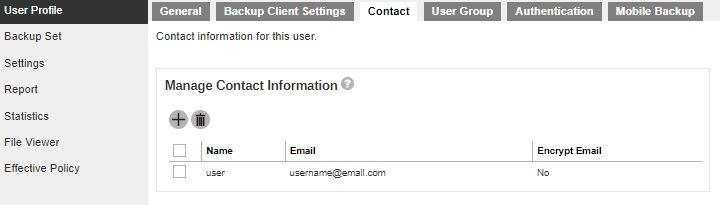
Contact
Contact information may be added here to receive backup and restore reports. You can also delete your contact information here.
The following shows the Contact tab under the User Profile page.
To add a contact information:
- Click the Create button.
Enter your “Name”, “Email”, “Address”, “Company”, “Website”, “Phone 1” and “Phone 2”, then click the Add button to add.
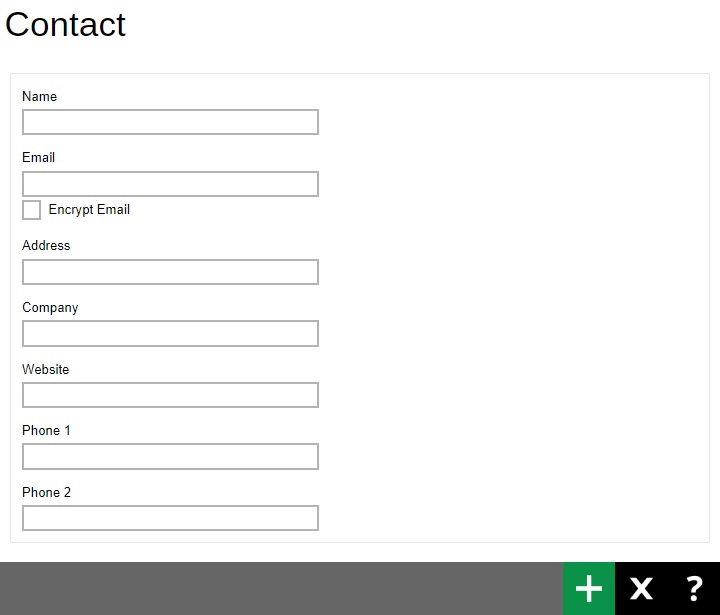
- Click the Save button to save.
To delete a contact information:
Check the box next to the contact information you want to delete, then click the Delete button.
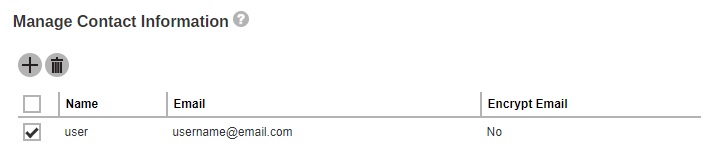
- Click OK to delete the contact information.
- Click the Save button to save the changes.
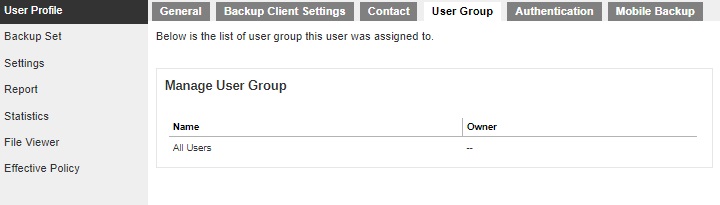
User Group
The following shows the User Group tab under the User Profile page. It shows the user group where your user account belongs to. This is set when your account was created and cannot be modified.
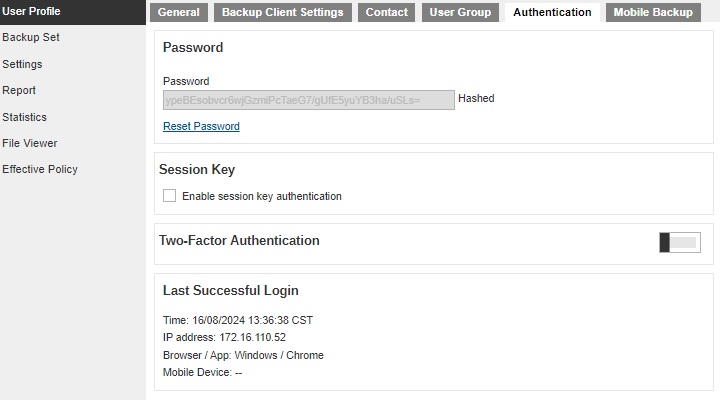
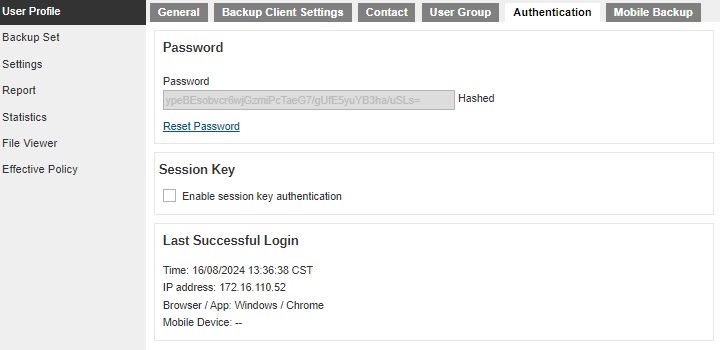
Authentication
The Authentication tab allows the User to add additional layer of security to their backup user accounts. This tab allows resetting of password and enables the Two-Factor Authentication (2FA). Please contact your service provider for more details on this feature.
This view applies when two-factor authentication is enabled for the user account.
If two-factor authentication is not enabled, this will be displayed instead.
There are several groups of settings under the Authentication tab and they are described below:
- Password - there are two elements in the "Password" section, which are:
- "Password" in hashed format defined by the service provider which cannot be changed.
- "Reset Password" allows the backup user to change the password.
- Session Key - allow the administrators to make API requests on profile changes and server side updates on behalf of the user.
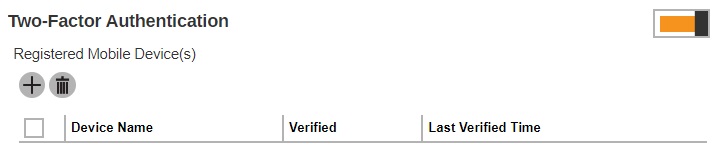
- Two-Factor Authentication - allows the user to add mobile device(s) that will be used for two-factor authentication. It displays the device name, whether it has been verified or not and the last verified time and date.
This will only be visible if two-factor authentication is enabled for the user account.
The “Re-pair with authenticator” will only be available if Ahsay Mobile is used as the authenticator app. If the registered device used for 2FA was damaged, lost or missing; the backup content of the device can be migrated to the new device by using AhsayOBM/AhsayACB. For instructions on how to do this please refer to the Ahsay Mobile User Guide. Once the migration is finished, the new device must be re-paired with Ahsay Mobile to enable sign-in using push notification and disable the one in the original device.
Please contact your backup service provider for details. - Last Successful Login - there are four elements in the "Last Successful Login" section which are:
- “Time”, this is the date and time the backup user last logged in, this changes every time the user logs in.
- “IP address” used to log in, which cannot be changed.
- “Browser / App” used to log in. If browser, the operating system and browser used will be displayed. If app, either AhsayOBM or AhsayACB will be displayed.
- “Mobile Device”, the name of the mobile device used to log in.
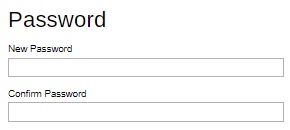
Reset the password
- Click the Reset Password link.
Enter the new password twice and click the Save button to save.
Add mobile device for two-factor authentication
Enable Two-Factor Authentication by sliding the switch to the right.

Click the Create button.
- Follow the instructions discussed in Register Device to register your device for two-factor authentication.
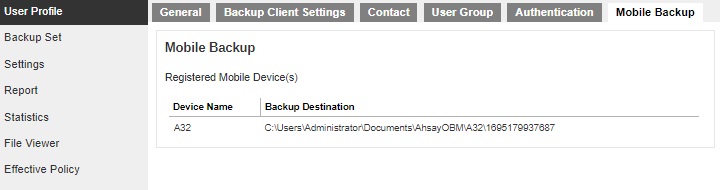
Mobile Backup
The Mobile Backup tab allows the User to view the mobile device(s) that has been registered for mobile backup and the corresponding backup destination. To add a mobile device use AhsayOBM or AhsayACB.
For more information on how to do this please refer to the Ahsay Mobile User Guide.
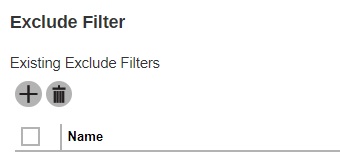
Backup Set
The Backup Set page contains the backup sets of the user.
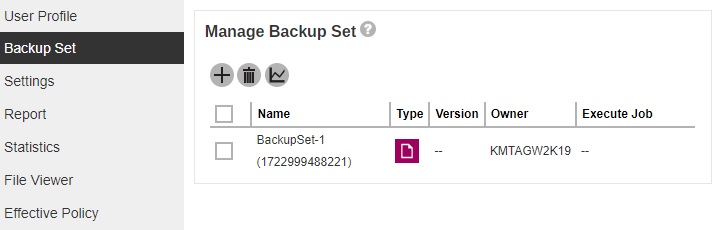
The following process/action can be done from here:
- Create a backup set, either a Run on Server or a Run on Client. For Run on Client, a client backup agent (AhsayOBM or AhsayACB) is needed to complete the setup of the backup set.
- Delete a backup set.
- Perform a Run on Server backup.
- Perform a Run on Server restore.
- Delete backup data of Run on Server backup set.
- Run a data integrity check on a Run on Server backup set.
For details on how to do these, follow the instructions in the Run on Server Backup and Restore section.
Difference between AhsayOBM and AhsayACB backup set
The available tabs that can be accessed from an AhsayOBM and AhsayACB backup sets are different. This is to align the actual settings displayed in AhsayACB with AhsayCBS.
| AhsayOBM | AhsayACB | |
|---|---|---|
| General | ✔ | ✔ |
| Source | ✔ | ✔ |
| Backup Schedule | ✔ | ✔ |
| Continuous Backup | ✔ | located in Others |
| Destination | ✔ | ✔ |
| Deduplication | ✔ | x |
| Retention Policy | ✔ | located in Others |
| Command Line Tool | ✔ | x |
| Reminder | ✔ | ✔ |
| Bandwidth Control | ✔ | x |
| IP Allowed for Restore | ✔ | ✔ |
| Others | ✔ | ✔ |
Here are examples of AhsayOBM and AhsayACB to show the difference:
AhsayOBM

AhsayACB
Below are the configurable settings under a Backup Set:
- General
- Source
- Backup Schedule
- Continuous Backup
- Destination
- Deduplication
- Retention Policy
- Command Line Tool
- Reminder
- Bandwidth Control
- IP Allowed for Restore
- Others
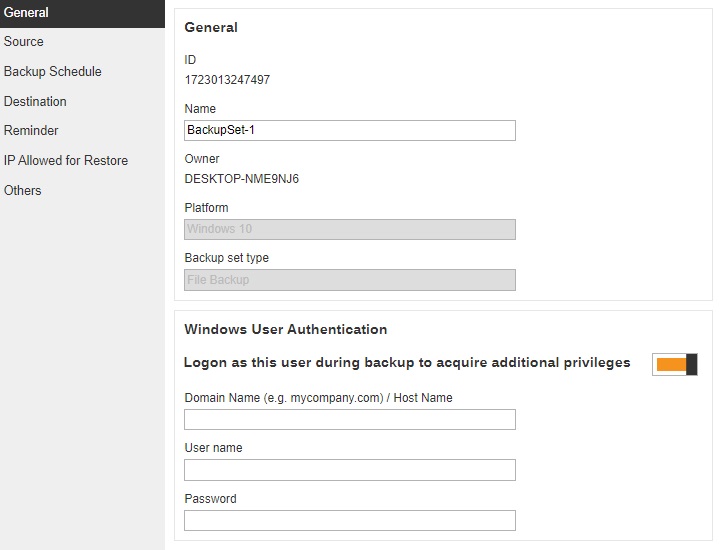
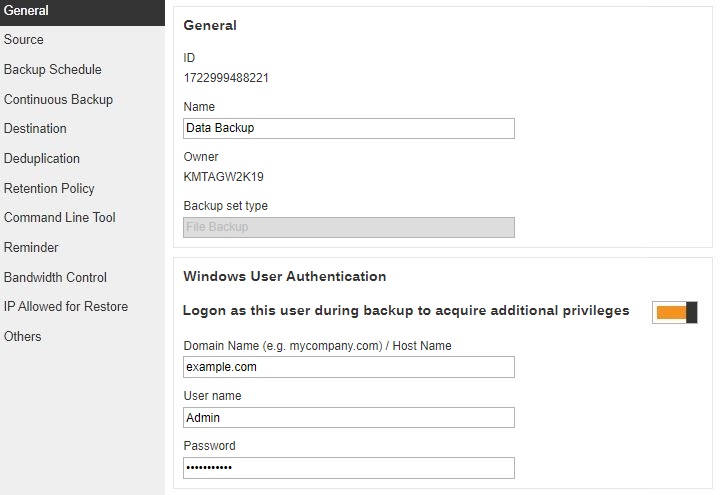
General
The General page allows you to modify the backup set name and manage the Windows User Authentication information.
Modify the backup set name
In the "Name" field, enter a new backup set name.
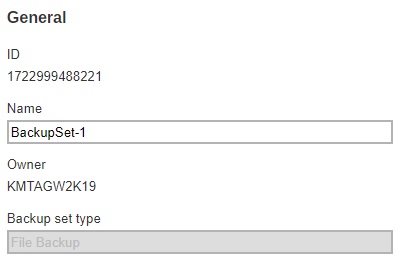
In this example, we are going to change the backup set name to Data Backup. Click the Save button to store the new backup set name.

The backup set name is successfully updated.

Windows User Authentication
The Windows User Authentication is only required when “Schedule” is enabled when creating select backup sets.
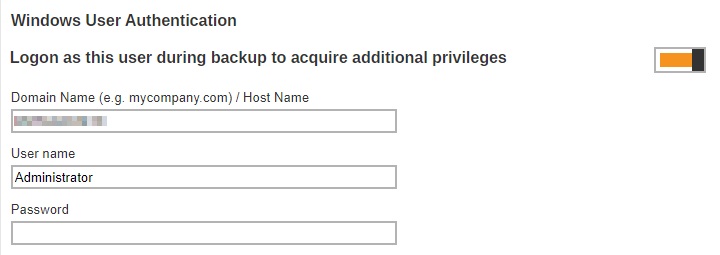
Here’s the list of backup sets that requires Windows User Authentication:
- Backup set containing network path for:
- Backup source
- Filter
- Destination
- Pre-command
- Post-command
- MSSQL backup set
- Exchange Server backup set version 2007 or above
- Exchange Mail backup set
- Hyper-V backup set
- VMware backup set
- VMware server
- VMware Workstation
- VMware Player
- Multiple host backup set (e.g. DAG/cluster)
Modify the Windows User Authentication information
In the "Domain Name" and "User name" field, enter a new name. Provide the password.
In this example, we are going to change the domain name to example.com and user name to Admin. Click the Save button to store the new domain and user name.
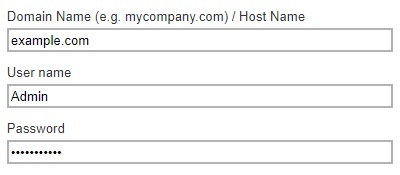
The domain and user name are successfully updated.
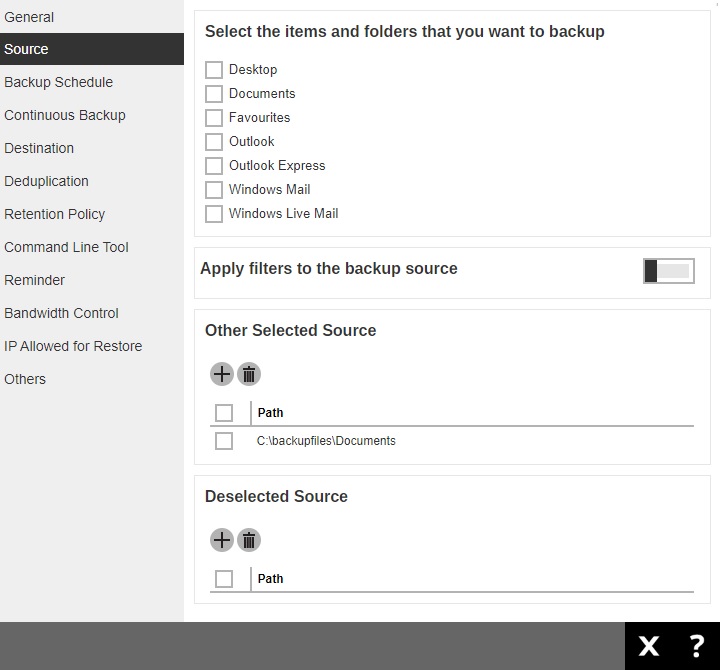
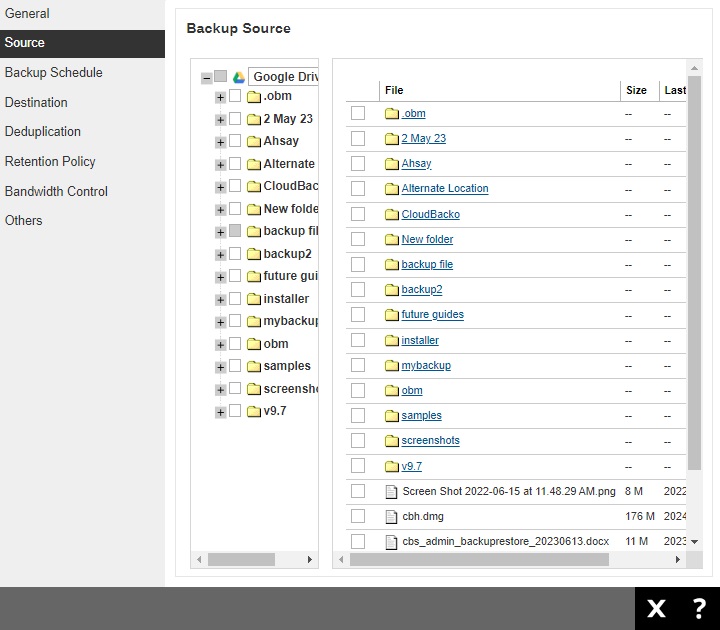
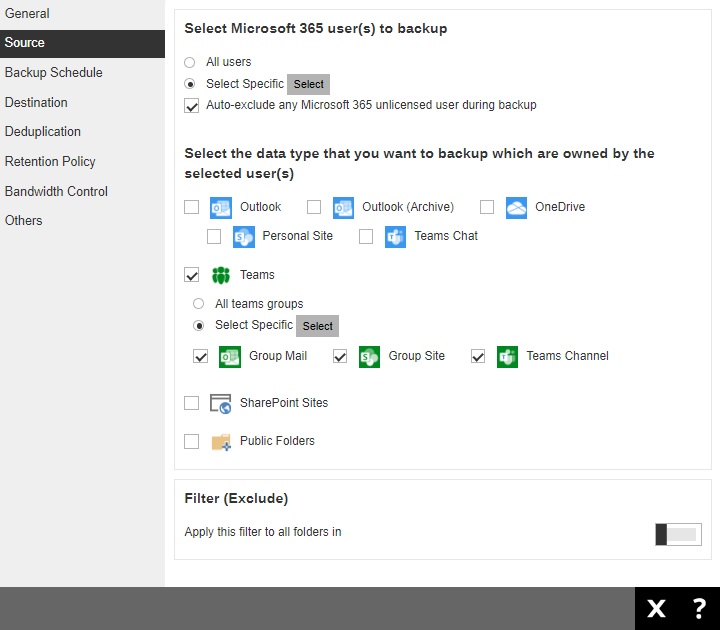
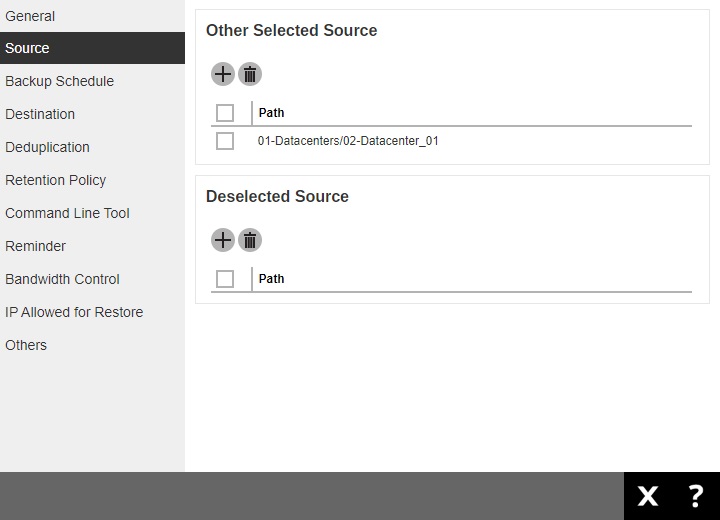
Source
The Source page allows you to select files and/or folders to back up.
The backup source varies between modules, here are some examples. Details on how to select the backup source will be discussed in the respective AhsayOBM/AhsayACB guides.
FILE BACKUP SET
CLOUD FILE BACKUP SET
MICROSOFT 365 BACKUP SET
HYPER-V BACKUP SET

VMWARE BACKUP SET
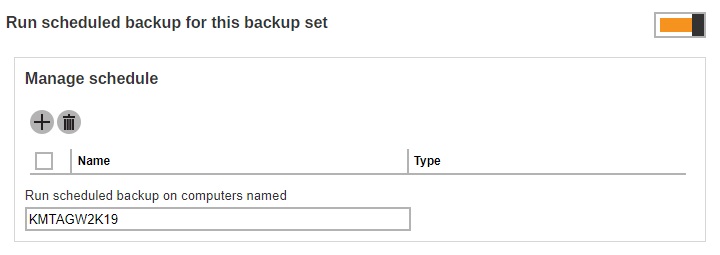
Backup Schedule
The Backup Schedule page allows you to create/modify a backup schedule for the backup job to run automatically.
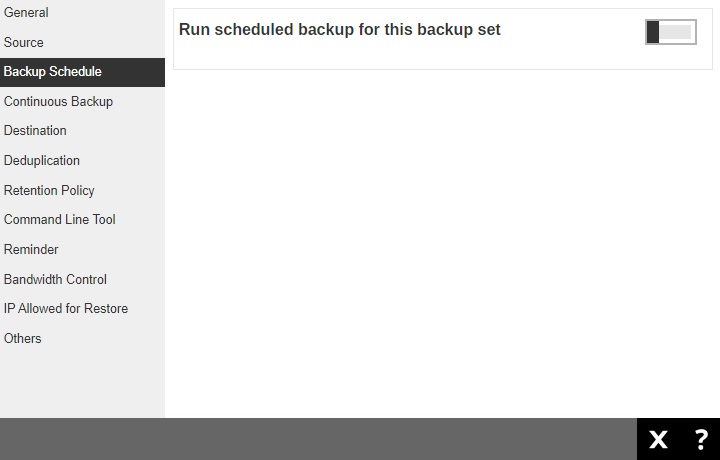
Slide the lever to the right to turn on the backup schedule setting. Click the Create button.
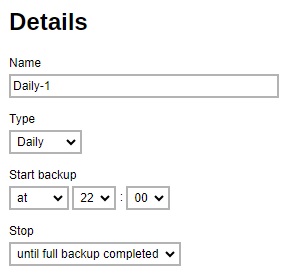
In the "Backup Schedule" window, configure the following backup schedule settings.
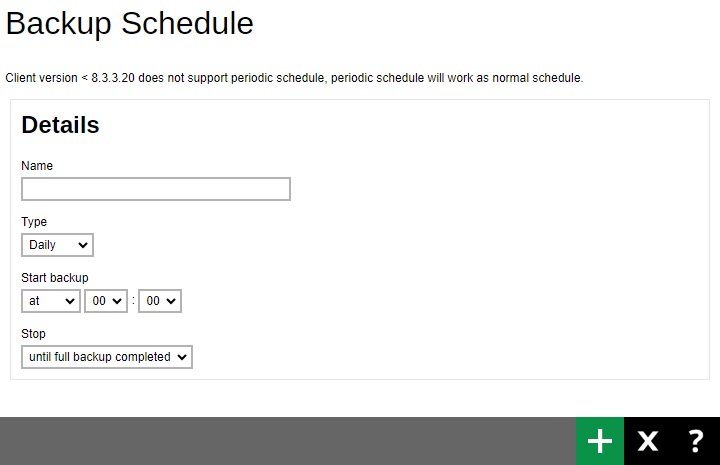
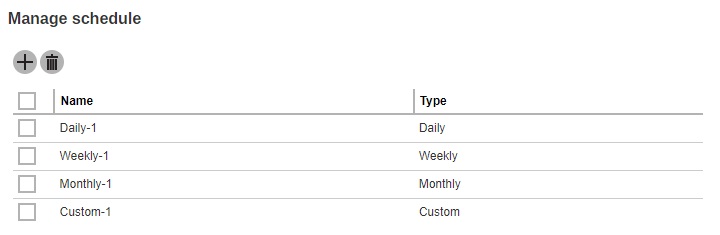
- Name - the name of the backup schedule.
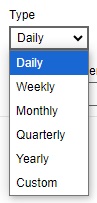
- Type - the type of backup schedule. There are four (4) types of backup schedule:
Daily - the time of the day or interval in minutes/hours when the backup job will run.
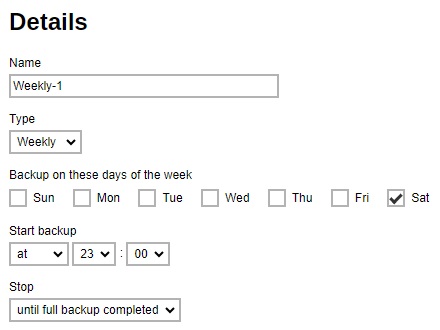
Weekly - the day of the week and the time of the day or interval in minutes/hours when the backup job will run.
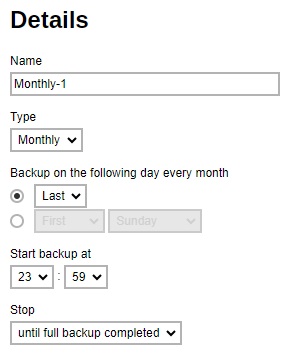
Monthly - the day of the month and the time that day when the backup job will run.
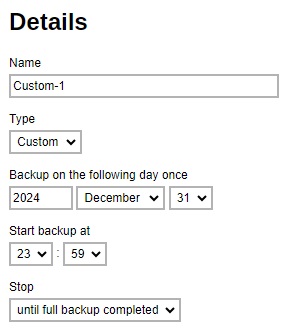
Custom - a specific date and time when the backup job will run.
- Start backup - the start time of the backup job.
- at - this option will start a backup job at a specific time.
every - this option will start a backup job in intervals of minutes or hours.

Here is an example of a backup set that has a periodic and normal backup schedule.
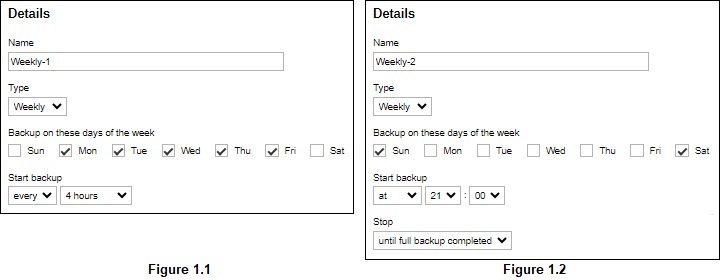
Figure 1.1 - Periodic backup schedule runs every 4 hours from Monday - Friday during business hours
Figure 1.2 - Normal backup schedule runs at 21:00 or 9:00 PM on Saturday and Sunday on weekend non-business hours
- Stop - the stop time of the backup job. This only applies to schedules with start backup at and is not supported for periodic backup schedule (start backup every).
- until full backup completed - this option will stop a backup job once it is complete. This is the configured stop time of the backup job by default.
after (defined no. of hours) - this option will stop a backup job after a certain number of hours regardless of whether the backup job has completed or not. This can range from 1 to 24 hrs.
The number of hours must be enough to complete a backup of all files in the backup set. For small files in a backup, if the number of hours is not enough to back up all files, then the outstanding files will be backed up in the next backup job. However, if the backup set contains large files, this may result in partially backed up files.
For example, if a backup has 100GB file size which will take approximately 15 hours to complete on your environment, but you set the “stop” after 10 hours, the file will be partially backed up and cannot be restored. The next backup will upload the files from scratch again.
The partially backed up data will have to be removed by running the Data Integrity Check.
As a general rule, it is recommended to review this setting regularly as the data size on the backup machine may grow over time.
- Click Add to add the configured backup schedule settings.
Enter the name of the computer where the backup schedule will be run.

Click Save to save the backup schedule.
Multiple backup schedules can be created.
For backup sets with multiple backup schedules configured at the same time, this will be the order of priority to determine which schedule will be run:
Backup Type: Full > Differential
While for Schedules that have selectable Backup Type:
- IBM Lotus Domino: Database > Log
- MS Exchange Server: Database > Log File
- MS SQL Server: Full > Differential > Incremental (VSS Backup Mode)
Full > Differential > Transaction Log (ODBC Backup Mode) - MS Hyper-V: Full > Incremental
- Oracle Database: Database > Log
- ShadowProtect: Complete > Differential > Incremental
- VMWare: Full > Incremental
- Stop: after X hours > after Y hours > until full backup completed ( where X < Y)
- Schedule type: Daily > Weekly > Monthly > Custom
- Creation order
Examples:
- If there are 2 backup schedules with Full backup type and with Stop after 2 hours and 4 hours respectively. The backup schedule with Stop after 2 hours will be run.
- For backup sets with backup schedules Daily and Weekly, the Daily backup schedule will be run.
Continuous Backup (Windows only)
The Continuous Backup page allows you to backup selective data whenever a change is made. This is disabled by default.
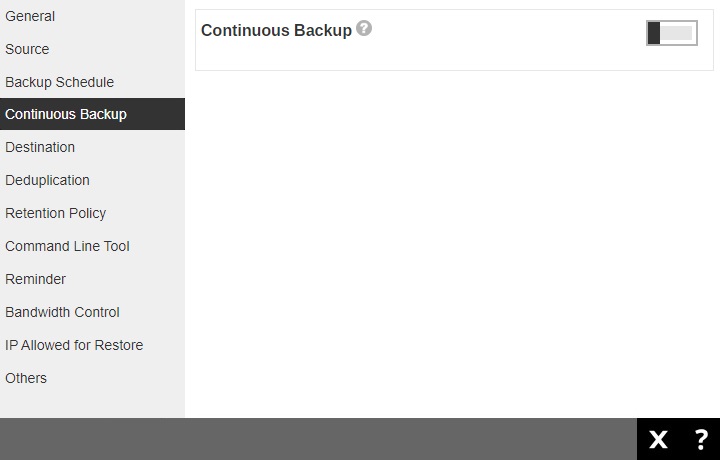
Slide the lever to the right to turn on the “Continuous Backup” setting.

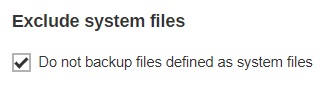
It is recommended to select this option to avoid backing up files that are marked as system files.
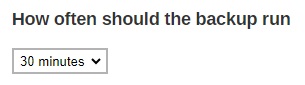
Click the drop-down button to define how often the continuous backup job will run. The backup time interval can be set from 1 minute to 12 hours.
This option applies the continuous backup on small regular update files. The file size can range from 25MB to unlimited MB.
 For large file size, the continuous backup may not run with a short time interval. You may need to adjust the continuous backup time interval (in step 3).
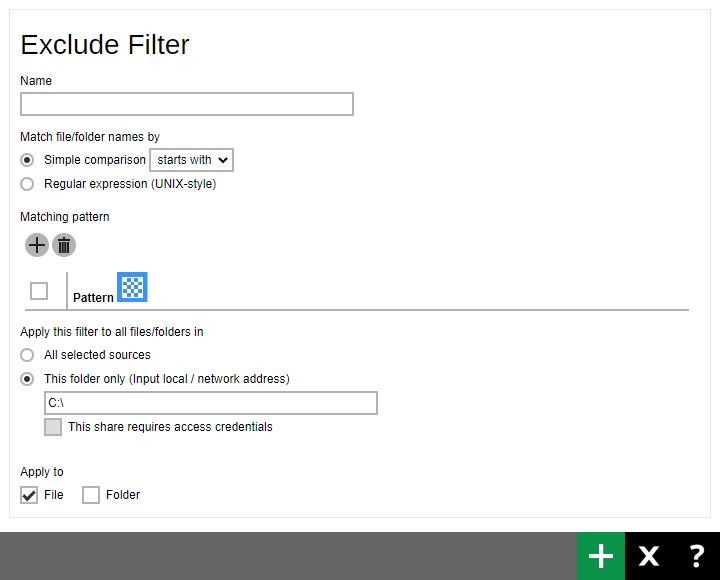
This allows the user to create an exclude filter to exclude files and/or folders from the backup job. Click the Create button to create an exclude filter.
If an exclude filter is created, click the Addbutton to save the created exclude filter.
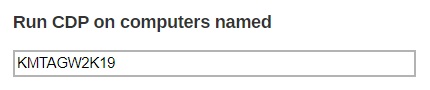
Enter the name of the computer where the continuous backup will run.
- Click Save to save the configured continuous backup settings.
Destination
The Destination page allows you to select a backup mode and add storage destination.
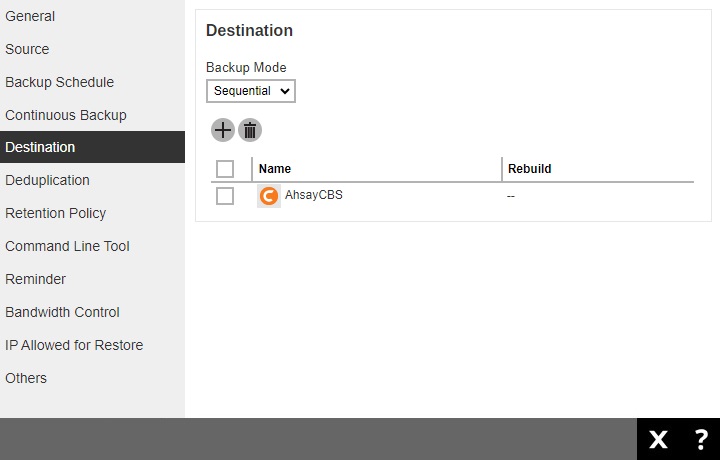
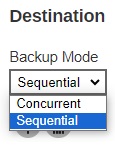
There are two (2) types of backup mode:
Sequential
This is the configured backup mode by default. This backup mode will run a backup job to each backup destination one by one.
Concurrent
This backup mode will run a backup job to all backup destinations simultaneously.
Comparison between Sequential and Concurrent backup mode
| Backup Mode | Pros | Cons |
|---|---|---|
| Sequential | Takes less resources in the local machine (e.g., memory, CPU, bandwidth, etc.) to complete a backup job. | Backup job is slower than in concurrent mode since the backup job will upload the backup data to the selected backup destinations one at a time. |
| Concurrent | Backup job is faster than in Sequential mode. Maximum number of concurrent backup destinations can be configured. | Requires more resources in the local machine (e.g. memory, CPU, bandwidth, etc.) to complete a backup job. |
To modify the backup mode, follow the steps below:
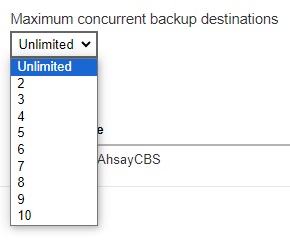
Click the drop-down button to select a backup mode.
If Concurrent is selected, click the drop-down button to select the number of maximum concurrent backup destination.
- Click Save to save the selected backup mode.
To add a new storage destination, follow the steps below:
Click the Create button to add a destination.

Select the backup destination by ticking the box beside the destination that you want to add. Multiple destinations may be added.
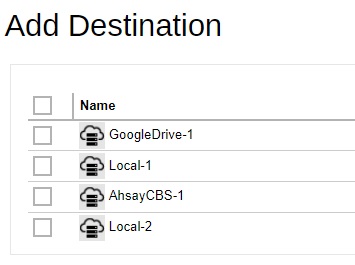
- Click the Save button to save the added storage destination.
Deduplication
Starting with AhsayOBM v9.1.0.0 or above, the In-File Delta feature (i.e., Incremental, Differential and Full) will be replaced with Deduplication. This feature is On (enabled) by default.
When this feature is On (enabled) for the backup set, a checksum verification of each backup file which was split into several blocks of varying size will be performed to compare its content and identify which block is duplicated, thus will perform deduplication of data.
When this feature is Off (disabled) for the backup set, a checksum verification of each backup file will not be performed, thus the duplicated data will NOT be removed or deduplicated during a backup job.

There are two (2) types of Deduplication scope:
Same file path within the same backup set
Deduplication will be applied to the duplicated contents within a file during the current backup job.
All files within the same backup set
Deduplication will be applied across different files in the backup set.
To configure the Deduplication settings, follow the steps below:
Select the “Deduplication scope”.

Click the drop-down button to select the block size that will be used for the deduplication data block.
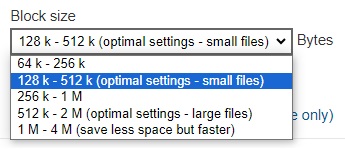
The 128 k – 512 k block size is the optimal setting for small files which is good for frequently changed source data, as this is the block size deduplication will use to compare and determine if the data is new and should be uploaded or discarded as duplicate. The larger the deduplication block size, the less efficient it would be but faster as there are less blocks of data to create. Frequent changes to this setting is not advisable since all data may need to be reuploaded because the previous block size and new block size are now different.
Optional: Tick the checkbox if you want the existing data to be migrated to the latest version during a backup job.

- Click the Save button to save the modified Deduplication settings.
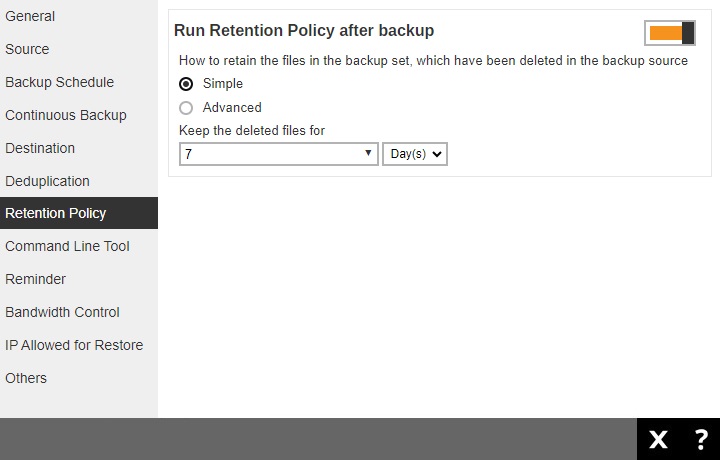
Retention Policy
The Retention Policy page allows you to configure the retention policy settings. By default, it uses the Simple setting which keeps the deleted files for 7 days in the Retention Area.
Files and/or folders will be moved from the data area to the Retention Area if they were deleted, updated or have permission/attributes updated during a backup job. So the Retention Area is used as a temporary destination to store these files and/or folders. Files and/or folders in the Retention Area can still be restored.
While Retention Policy is used to control how long these files and/or folders remain in the Retention Area before they are removed which can be set in number of days, weeks, months or backup jobs. Retained data within all backup destinations (e.g. AhsayCBS, local drive, SFTP/FTP and cloud storage) are cleared by the Retention Policy job.
The Retention Policy job will be run whenever a backup job is performed as long as this is enabled for the backup set. It will also be run when Space Freeing Up is performed.
There are two (2) types of Retention Policy:
Simple
A simple Retention Policy is a basic policy where the retained files (in the Retention Area) are removed automatically after the user specifies the number of days or backup jobs.
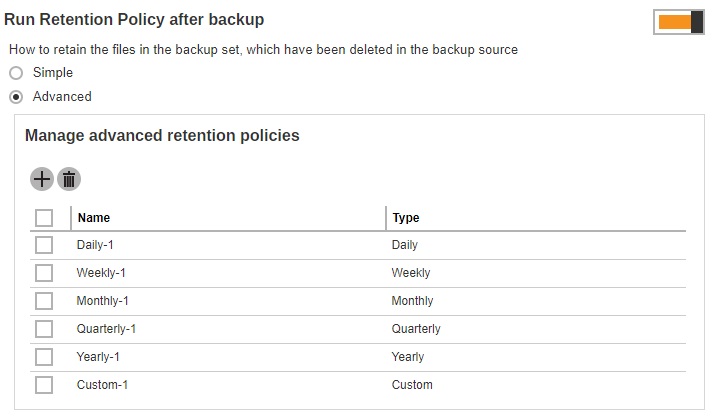
Advanced
An advanced Retention Policy defines a more advanced and flexible policy where the retained files (in the Retention Area) are removed automatically after a combination of user defined policy.
Comparison between Simple and Advanced Retention Policy
| Control | Simple | Advanced |
|---|---|---|
| Backup Jobs | Can keep the deleted files within 1 to 365 backup job(s) | Not applicable |
| Days | Can keep the deleted files within 1 to 365 day(s) | Can keep the deleted files within 1 to 365 day(s) |
| Type | Not applicable |
|
| User-defined name | Not applicable | Applicable |
To configure a Simple Retention Policy, follow the steps below:
Select Simple from the option.

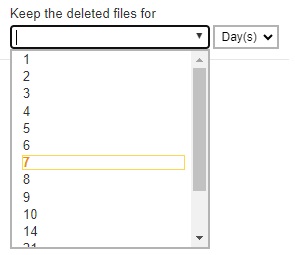
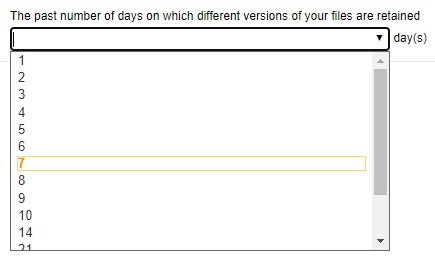
Click the drop-down button to select the number of day(s) or job(s) the deleted files will be retained or you may manually enter it.
- Click Save to save the retention policy setting.
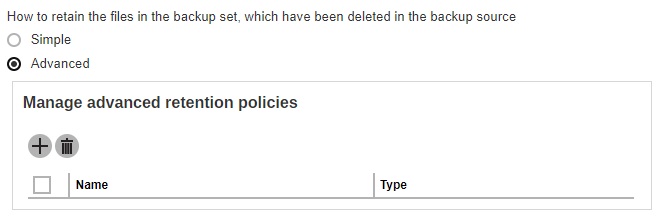
To configure an Advanced Retention Policy, follow the steps below:
Select Advanced from the option. Click the Create button to add a retention policy.
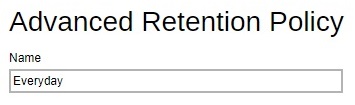
Enter a name for the retention policy.
Click the drop-down button to select the retention type.
Click the drop-down button to select the number of days the deleted files will be kept in the retention area.
- Click Add to add the retention policy then click Save to save the settings.
For further details about how to configure an advanced Retention Policy for each type (i.e. Daily, Weekly, Monthly, Quarterly, Yearly, Custom) refer to the examples below:
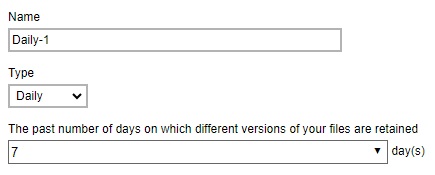
Example No. 1: To keep the retention files for the last seven (7) days
Example No. 2: To keep the retention files for the last four (4) Saturdays

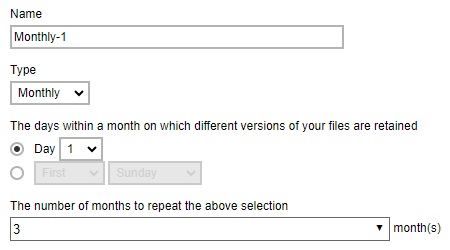
Example No. 3: To keep the retention files for the 1st day of each month for the last three (3) months
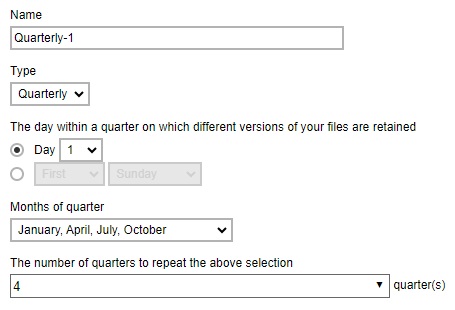
Example No. 4: To keep the retention files for the 1st day of each quarter for the first four (4) quarters
Example No. 5: To keep the retention files for the 1st day of each year for the last seven (7) years

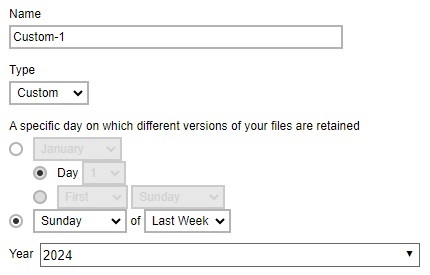
Example No. 6: To keep the retention files on the last Sunday of the last week of a particular year
Multiple Advanced Retention Policy can be created.
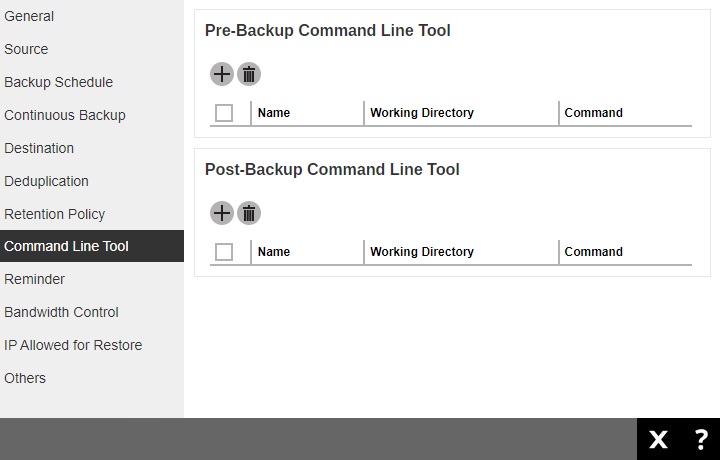
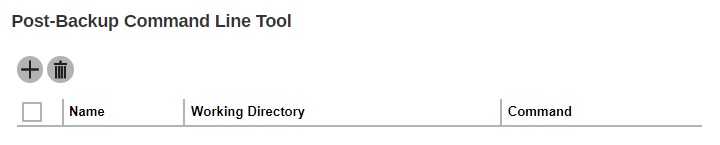
Command Line Tool
The Command Line Tool page allows you to configure a pre-backup or post-backup command which can be an operating system level command, a script or batch file, or third-party utilities to run before and/or after a backup job.
Here are some examples:
- Connecting to a network drive and disconnecting a network drive
- Stopping a third-party database (not officially supported by Ahsay) to perform a cold backup
- Restarting a third-party database after a backup
Requirements and Best Practices
Error and Exception Handling
Each pre-backup command or batch file should have an error and exception handling. If a prebackup command contains an error, although an unhandled error may not hinder the backup job process, and the backup job is successful, it will result to a status indicating completed backup with warning(s).
Command or Basic File Compatibility
Make sure that each command (pre-backup and post-backup) are tested thoroughly before including them to the backup job.
Scheduled Backup
If the scheduled backup job is set to stop after x no. of hours, make sure that the duration of the running backup job will not be affected. You may need to adjust the number of hours in the backup schedule configuration.
Pre-backup Command Limitation
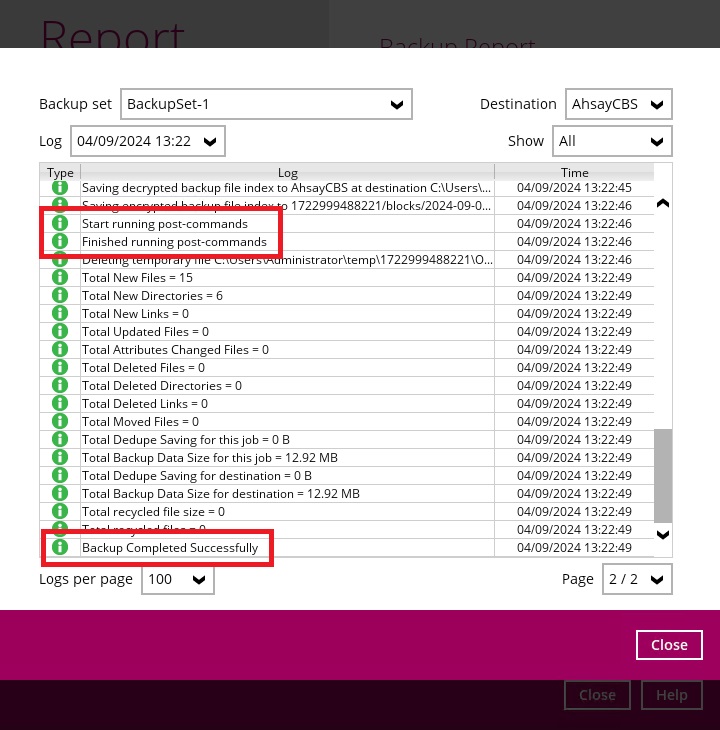
A Windows reboot or shutdown must not be used in the pre-backup command. Otherwise, the machine will shut down immediately that will result to a status indicating “Backup not yet finished”, which can be viewed in the Report page.
Post-backup Command Recommendation
It is recommended to include a timeout for a post-backup command to shut down the machine. The timeout must be adjusted until when AhsayOBM/AhsayACB sends the backup job status to AhsayCBS. In this example, the configured post-backup command is to shut down the machine that has a timeout set to ninety (90) seconds. The machine will shut down automatically after the specified time.
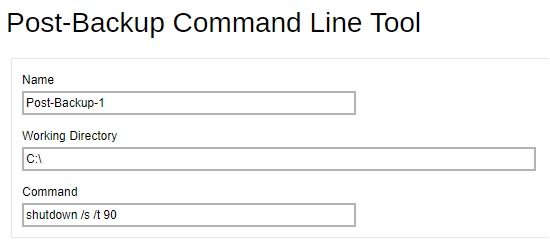
This is to ensure that AhsayOBM/AhsayACB has enough time to complete the backup process in order to send the backup job status to AhsayCBS before the machine shuts down. See screenshot below:
There are three (3) fields in the command line tool:
- Name - user-defined name of the pre-backup or post-backup command.
- Working Directory - location in the local machine which the pre-backup or post-backup command will run at, or the location of the command or created batch file.
- Command - pre-backup or post-backup command which can be defined as a native command or command to execute a batch file, command, or a VBScript (exclusively for Windows).
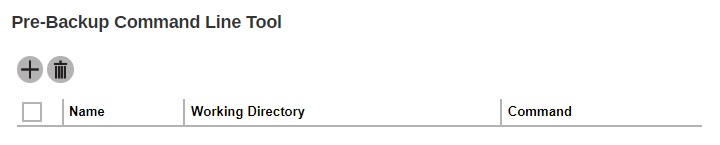
Pre-backup Command
A pre-backup command is used to execute an action or process before the start of a backup job.
To create a pre-backup command, follow the steps below:
Click the Create button to create a pre-backup command.
Enter the name.

Enter the working directory. This is the location in the local machine where the pre-backup command will run or it can also be the location of the command or created batch file.

Enter the command to be run before a backup job. In this example, the pre-backup command will connect to a network drive before the backup process.

- Click Add to create the pre-backup command then click Save to save the settings.
Post-backup Command
A post-backup command is used to execute an action or process after a backup job. To create a post-backup command, follow the steps below:
Click the Create button to create a post-backup command.
Enter the name.

Enter the working directory. This is the location in the local machine where the post-backup command will run or it can also be the location of the command or created batch file.
Enter the command to be run after a backup job. In this example, the post-backup command will disconnect a network drive after the backup process.

- Click Add to create the post-backup command then click Save to save the settings.
- You can check if the Pre-backup and Post-backup commands was run successfully from the backup report log once a backup job was completed.
- Multiple Pre-backup and Post-backup commands can be created in the Command Line Tool.
- Errors from Pre-backup and Post-backup commands will only be flagged as a warning and will not cause an error. The warning may be viewed in the logs.
- To trigger a job warning, Pre-backup and Post-backup commands must output a message to stderror. It is not possible to cause a job “Error” message to be logged.
Reminder (Windows only)
The Reminder page allows you to set a reminder to run a backup during Windows log off, restart or shut down. You can also set a reminder to run a backup when the latest backup job is over the configured tolerance period. A backup confirmation dialog box will appear once this is enabled. This is disabled by default.
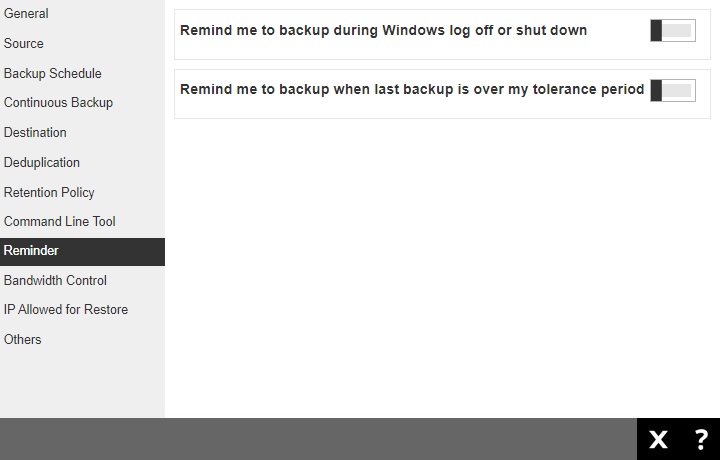
To configure the Reminder settings, follow the steps below:
Slide the lever to the right to enable the reminder to start a backup during Windows log off, restart or shut down. Enter the computer name where the backup set will run.

Slide the lever to the right to enable the reminder when last backup is over the tolerance period.

This will allow you to set the tolerance period by selecting the number of day(s) or hour(s). You may select from 0 – 31 days or 0 – 23 hours. When this option is enabled, the default tolerance period is 1 day.

Enter the computer name where the backup set will run.

Enter the working directory. This is the location in the local machine where the pre-backup command will run or it can also be the location of the command or created batch file.
- Click Save to save the settings.
- This feature is only supported on Windows 7 (and older) and Windows Server 2008 (and older). Due to limitation on Windows where the shutdown screen overrides the backup prompt, the feature is removed on Window 8/Windows Server 2012 or above.
- The dialog box will only appear if there is a backup set with On (enabled) Reminder setting.
- During Windows log off or shut down, the confirmation prompt will only be displayed for four (4) seconds.
- If there are multiple backup sets displayed, you cannot select one (1) backup set to back up. It is recommended to only enable the Reminder setting for the backup sets you regularly back up.
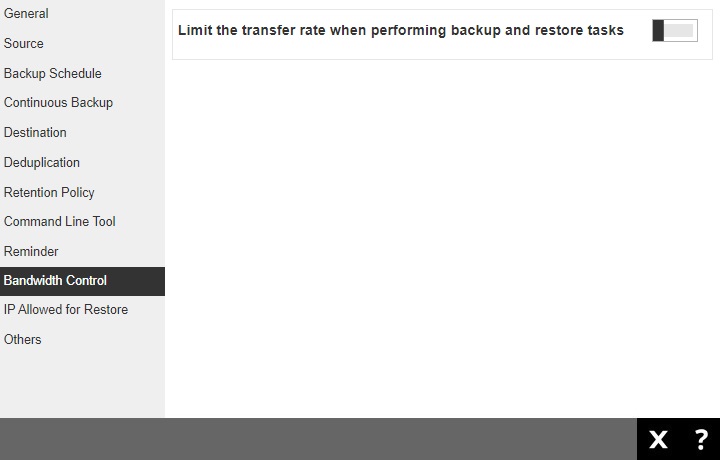
Bandwidth Control
The Bandwidth Control page allows you to limit the amount of bandwidth used by backup traffic during specified times. This is disabled by default.
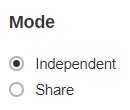
There are two (2) different modes in assigning a bandwidth control:
- Independent - each backup and restore has its assigned bandwidth.
- Share - all backup and restore operations share the same assigned bandwidth.
To configure the Bandwidth Control settings, follow the steps below:
Slide the lever to the right to turn on bandwidth control.

Select the mode.
Click the Create button to create a bandwidth control.

Enter the name.

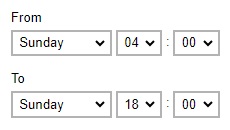
Select the type, this is the enforced bandwidth control period.
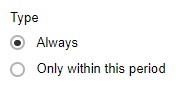
If Only within this period is selected, specify the period when bandwidth control will be enforced.
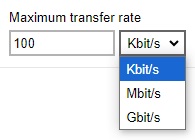
Enter the maximum transfer rate, select if in Kbit/s, Mbit/s or Gbit/s.
- Click Add to create the bandwidth control then click Save to save the settings.
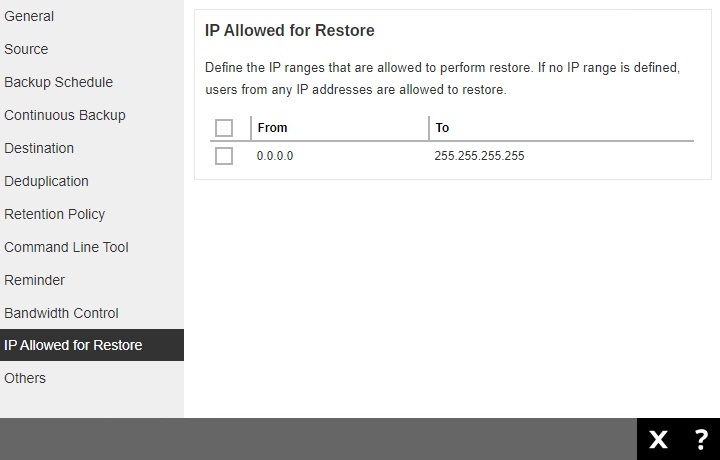
IP Allowed for Restore
The IP Allowed for Restore page lists the IP ranges that will be allowed to perform a restore of the backup set. If no there is no IP range defined, then users can restore from any IP address
Others
The Others page allows you to configure the following:
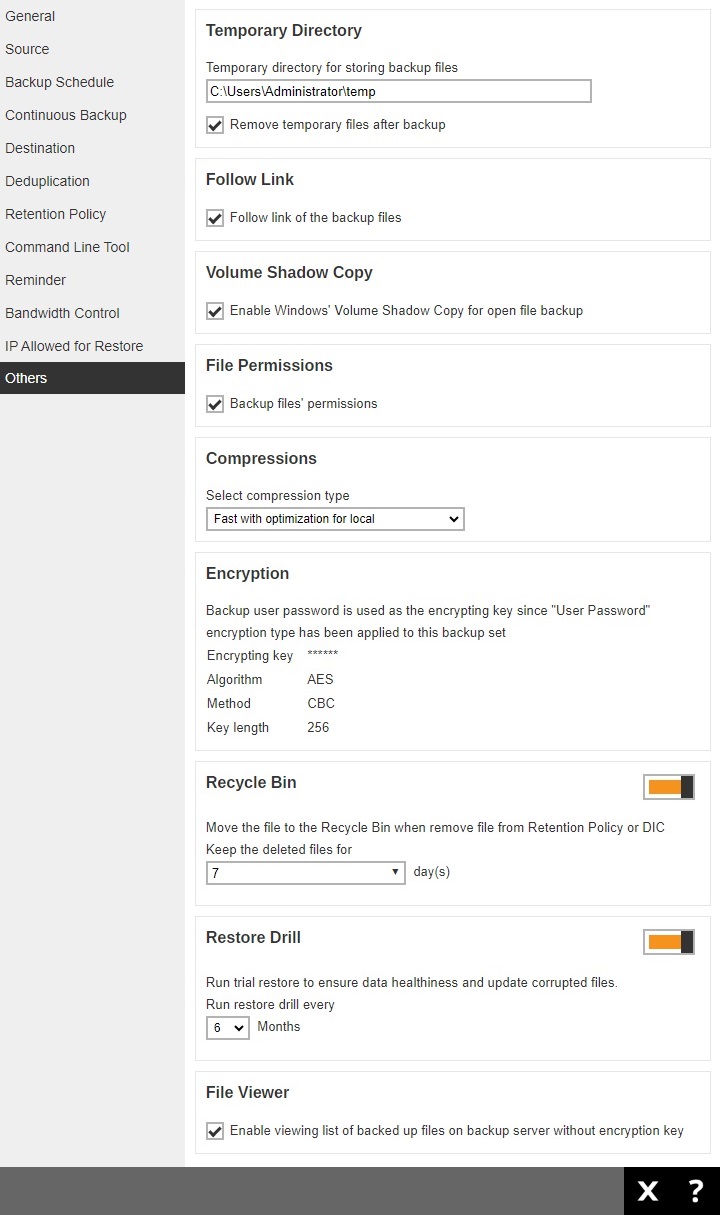
Temporary Directory
Temporary Directory is used for both backup and restore operations.
For a backup job, it is used to temporarily store backup set index files. An updated set of index files is generated after each backup job. The index files are synchronized to each individual backup destination at the end of each backup job.
For a restore job, it is used to temporarily store temporary restore files.
For best practice, the temporary directory should be located on a local drive for optimal backup and restore performance.
It should NOT be located on:
- The same partition as the OS, because if the OS partition becomes filled up, it can cause the system to crash. Better to use a different partition with enough space to handle the backup and restore job.
- A network drive, as it could affect both backup and restore performance.
It is recommended to select the “Remove temporary files after backup” option on the backup set to keep the temporary drive clear.
To change the temporary directory, follow the steps below:
Enter the new temporary directory path.

Optional: Tick the Remove temporary files after backup checkbox.

- Click Save to save the settings.
Follow Link
The Follow Link determines if the NTFS junction or symbolic link will be kept during a backup job. This is ticked by default.

Volume Shadow Copy (Windows only)
Volume Shadow Copy uses the Windows Volume Shadow Copy service to create a snapshot of the selected files and/or folders on the local drive(s) of the machine, so that AhsayOBM/AhsayACB can continue to back up files even if they are opened and/or have been updated by the user.

- This is only applicable for File Backup Sets on Windows platform only.
- To use the Volume Shadow Copy, the license module must first be enabled on your backup user account. Otherwise, just enabling this setting on the AhsayOBM will not activate this feature and can result in possible backup errors if the backup job encounters an open file. Please contact your backup service provider for more details.
- Volume Shadow Copy does not support open file backups on network drives.
File Permissions
File Permissions determines whether to back up the operating system file permission of the data selected as backup source. This is ticked by default.

Compressions
Compressions allow you to compress all the files before it is backed up to the backup destination(s). For newly created backup set(s), Fast with optimization for local is selected by default.

There are four (4) compression types:
- No Compression - file will not be compressed before backup.
- Normal - compression is comparable to gzi Normal compression ration.
- Fast (Compressed size larger than normal) - compression will be faster but with less compression and lower CPU usage compared to Normal.
- Fast with optimization for local - uses Snappy compression library when backing up to local destination only, otherwise setting will default to gzip if backing up to other destinations. Has the lowest CPU usage, very high speed and reasonable compression but compressed file size may be larger than Fast.
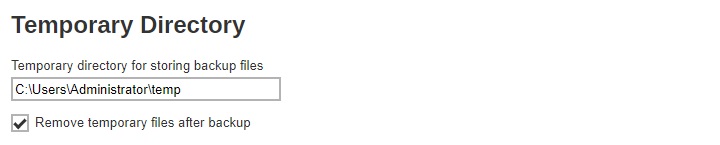
Encryption
Encryption allows you to view the current encryption settings. The encryption settings can only be configured during the creation of backup set.
There are three (3) encryption types available which can be set during backup set creation:
- Default - an encryption key with 44 alphanumeric characters will be randomly generated by the system.
- User Password - the encryption key will be the same as the login password of your AhsayOBM at the time when the backup set is created. Please be reminded that if you change the AhsayOBM login password later, the encryption keys of the backup sets previously created with this encryption type will remain unchanged.
- Custom - you can customize your encryption key, where you can set your own algorithm (Twofish, DESede or AES), encryption key, method (ECB or CBC), and key length (128-bit or 256-bit).
Encryption settings can only be configured during backup set creation. It cannot be changed once the backup set is created. If you need to enable (or disable) after the backup set is created, then you will need to create a new backup set with the desired settings.
For best practice on managing your encryption key, refer to the following article: Best Practices for Managing Encryption Key on AhsayACB and AhsayOBM.
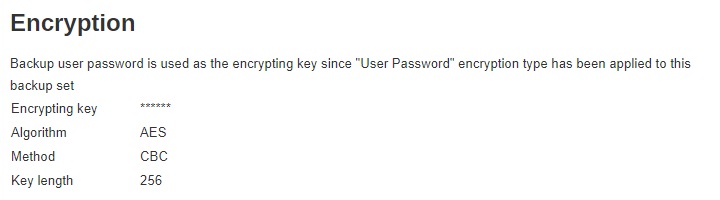
Recycle Bin
The Recycle Bin is used for protection of the BAK (block) files stored in the Backup Set’s destination, allows the user to set the number of days BAK files that were deleted due to Retention Policy or Data Integrity Check, will be held under Recycle Bin as added protection. This is enabled by default and set to 7 days.
Here are the features of the Recycle Bin:
- Data in the Recycle Bin will consume Quota.
- It does not move the data in another location within the storage, instead the index tracks the xxxxxx.bak files and the remaining time in the Recycle Bin.
- If the index is reverted to a previous timestamp, the settings of the Recycle Bin in the reverted index will be followed.
- Recoverability of data is not affected when the Recycle Bin is alternately enabled or disabled.
- When enabled, it will only check if the data inside the Recycle Bin is still within the set number of days. Once it is beyond the set number of days it will only be deleted when the following operations are run: Backup, Space Freeing Up, Data Integrity Check and Delete Backup Data.
- When disabled, if there are already deleted files it will not automatically delete the data inside the Recycle Bin. It will remain in the Recycle Bin even if it is beyond the set number of days. It will only be deleted when the following operations are run: Backup, Space Freeing Up, Data Integrity Check and Delete Backup Data.
- Once the Recycle Bin is disabled, deleted files will be removed immediately and will not be moved in the Recycle Bin.
- The setting applies to all destinations for the backup set.
- Viewing Recycle Bin contents is not available.
- Recycle Bin cleanup is done at the start of the backup job process.
Recovering from Recycle Bin requires reverting the index.
When reverting index, new data will be lost.
To set the number of days, follow the steps below:
Enable the Recycle Bin by sliding the switch to the right.

Select the number of days the deleted files will remain in the Recycle Bin. There is a dropdown box available for selection, but the number of days can also be entered manually.

- Click Save to save the settings.
Restore Drill
The Restore Drill is used to run a trial restore to detect corrupted data. Depending on the setting by the administrator, an email report will be sent to the user. This will inform the user the status of the backup data so that if there are corrupted data found, the user may do a manual or scheduled backup to delete the corrupted data and create a new backup file.
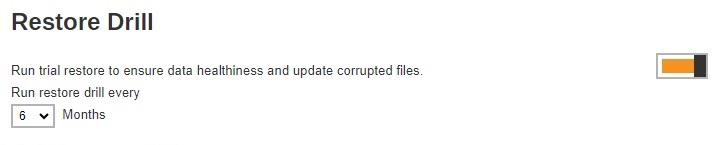
To configure the Restore Drill, follow the steps below:
Enable the Restore Drill by sliding the switch to the right.

Select the interval in months when the restore drill will run.
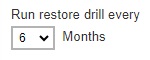
- Click Save to save the settings.
File Viewer
File Viewer will allow the user to view the list of backed up files for each backup set if the backup destination used is AhsayCBS. It may be accessed from Backup / Restore > Users, Groups & Policies > Backup User > %Backup User Name% > File Viewer. This is unticked by default.

Settings
The Settings page allows the user to log optional events, besides AhsayOBM/AhsayACB logs, using the Windows event log.
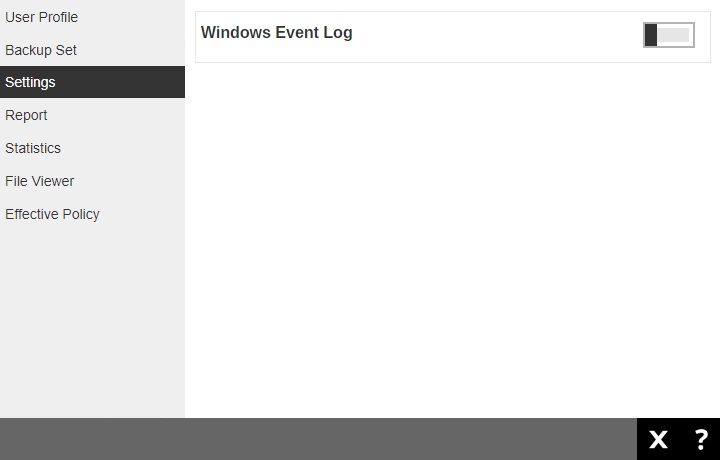
The following shows the options on the Settings page.
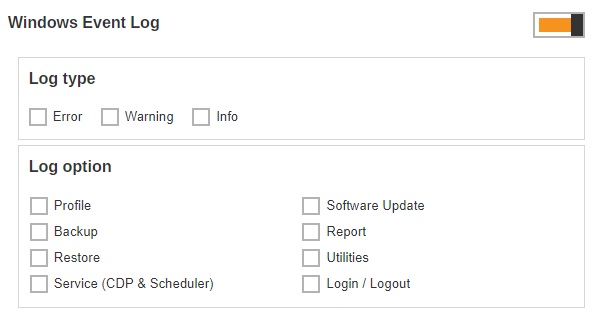
There are two (2) groups of settings under Windows Event Log:
Log Type
There are three (3) log types available: Error, Warning, and Info. You can select any combinations of the 3 log types, and the messages will be logged in the Windows event log.
Log option
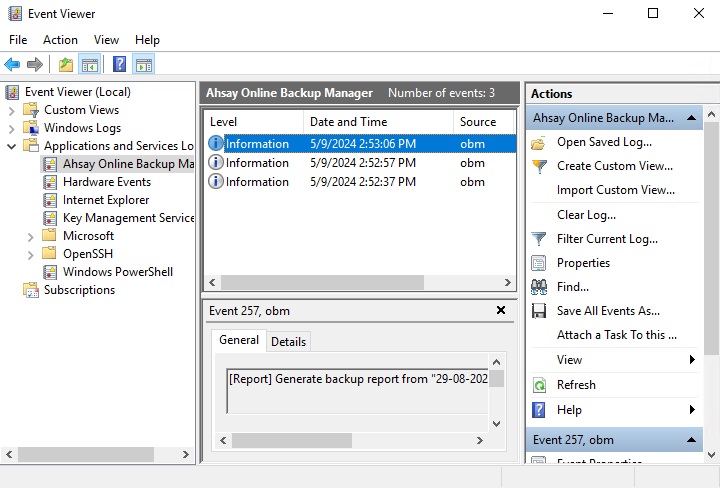
Select the log option by which particular action will be captured in the Windows event log. Currently there are eight (8) different log options that can be selected: Profile, Backup, Restore, Service (CDP & Scheduler), Software Update, Report, Utilities, and Login/Logout.
The events are logged in the Windows event log and can be viewed from the "Event Viewer":
Report
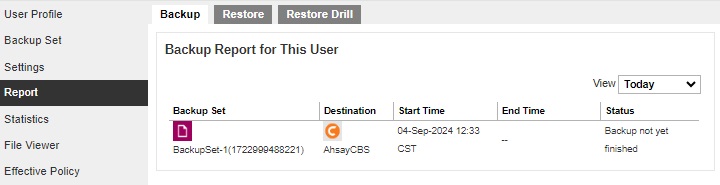
The Report page allows you to check the Backup, Restore and Restore Drill report of backup, restore and restore drill jobs ran in agent-based (AhsayOBM/ AhsayACB / AhsayOBR) and agentless (AhsayCBS User Web Console) type.
Backup Report
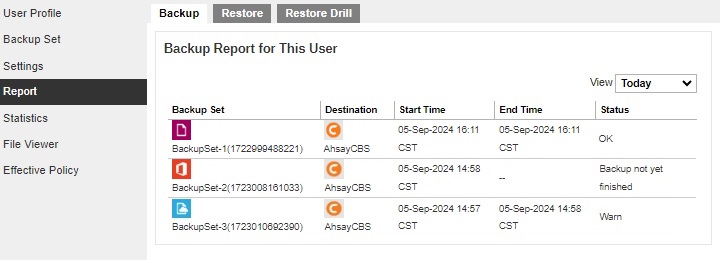
A list of backup reports for the AhsayCBS user can be found on the Backup tab. Click on the desired report to get more details on the report.
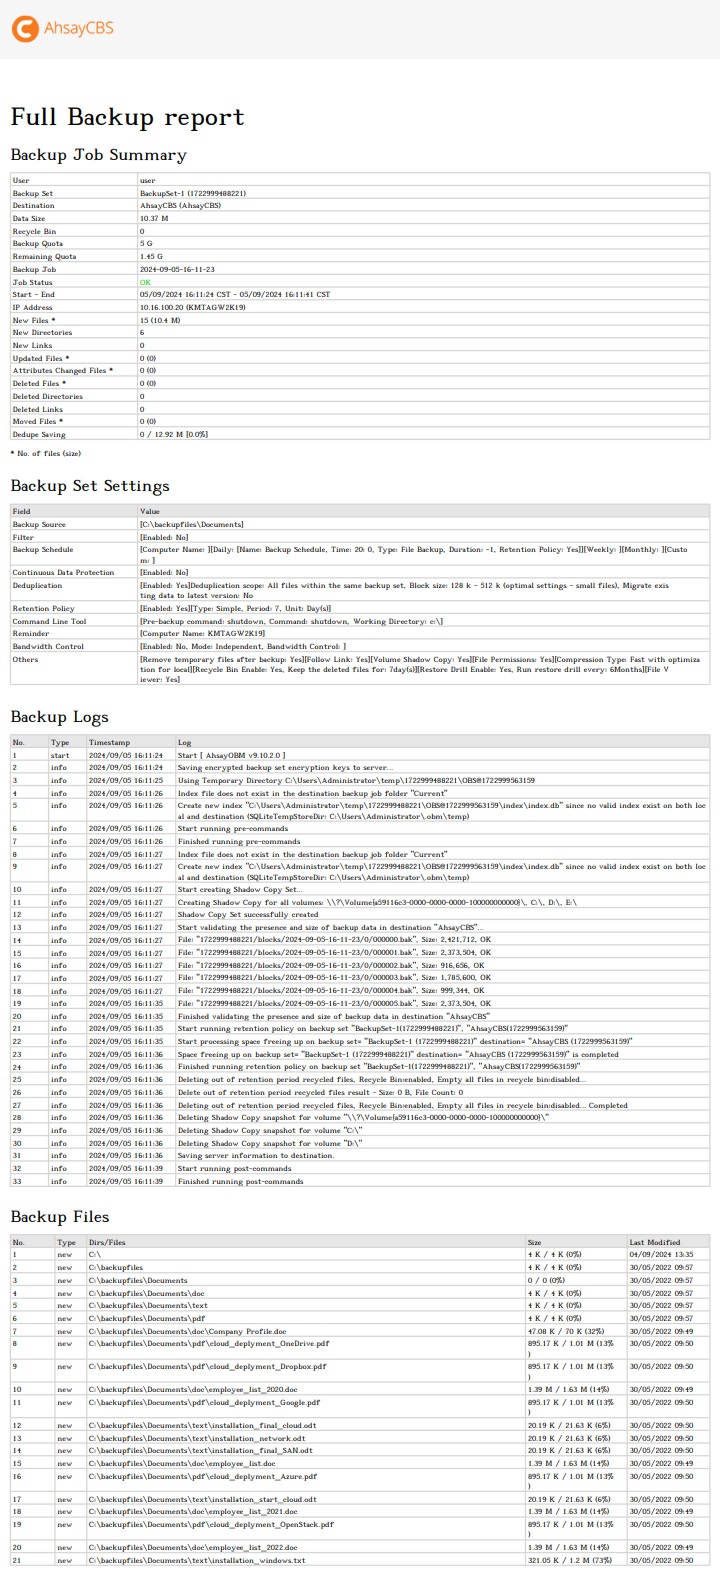
Click the Download report button at the bottom to download the complete report in PDF format. The backup report will be available around 15 to 20 minutes after a backup job has finished.
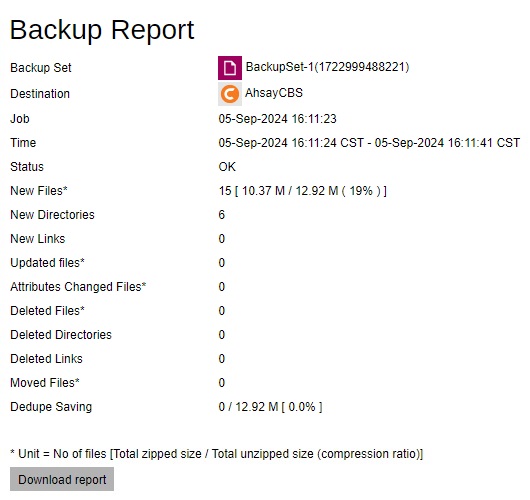
You can view the detailed backup job summary, backup set settings, backup logs and backup files on this report.
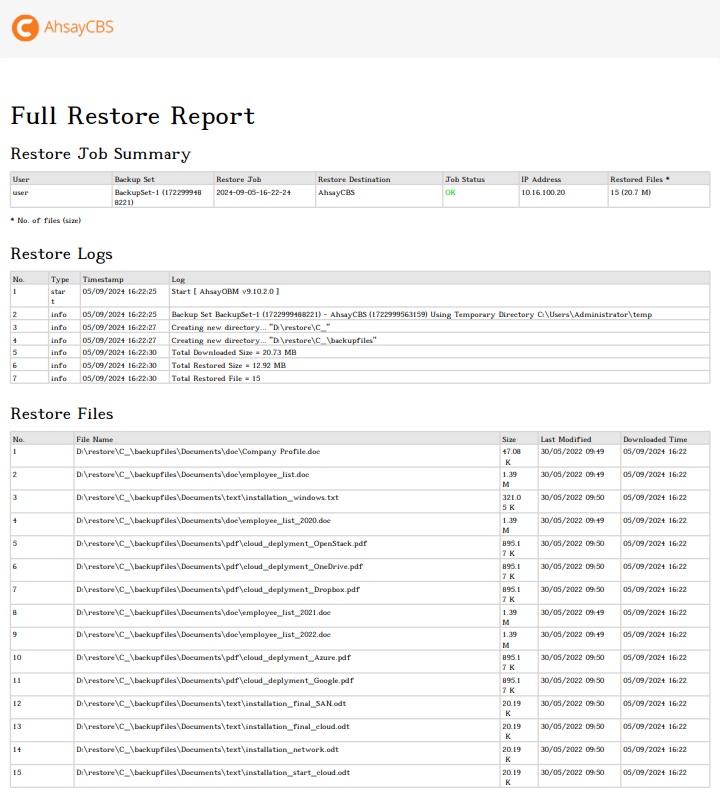
Restore Report
A list of restore reports for this AhsayCBS user can be found on the Restore tab. Click on the desired report to get more details on the report.
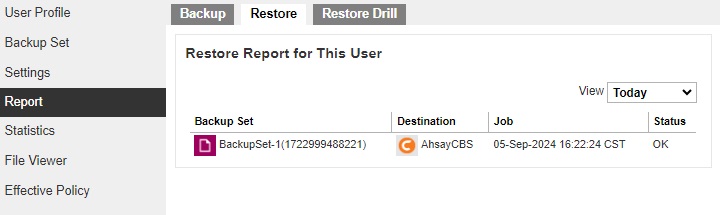
Click the Download report button at the bottom to download the complete report in PDF format. The restore report will be available around 15 to 20 minutes after a restore job has finished.
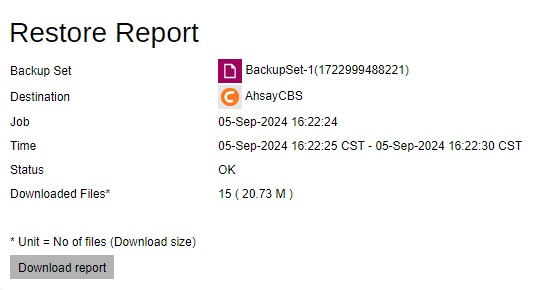
You can view the detailed restore job summary, restore logs and restore files on this report.
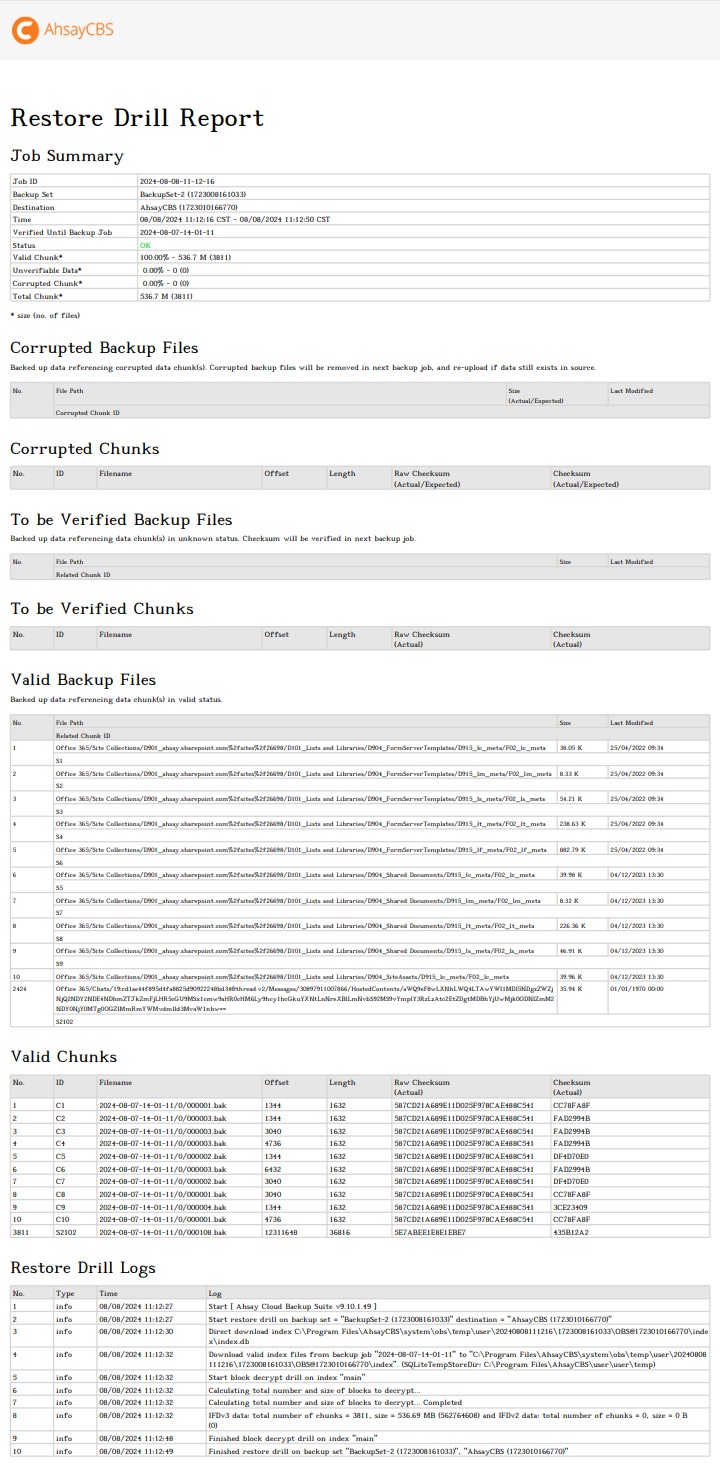
Restore Drill Report
A list of restore drill reports for this AhsayCBS user can be found on the Restore Drill tab. Click on the desired report to get more details on the report.
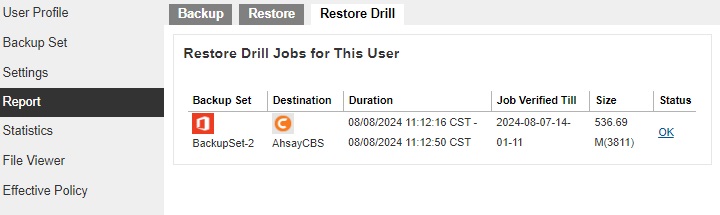
Click the Download Log button at the bottom to download the complete log in PDF format. The restore drill log will be available around 15 to 20 minutes after a restore drill job has finished.
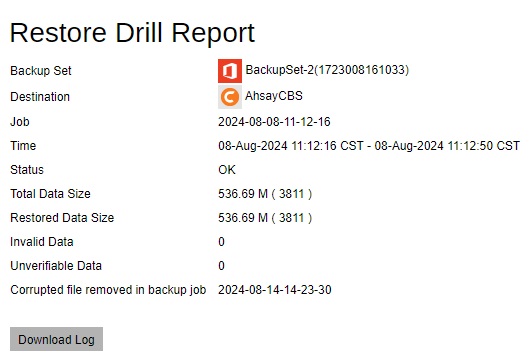
Or you can directly download the complete log in PDF format by clicking the status.
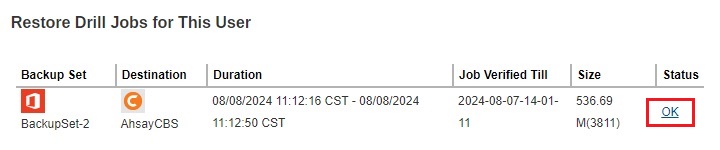
The different job status that may be returned are the following:
OK
No corrupted file detected, completed without error.
Warn
Restore drill job finished but with minor issues detected.
User Interrupted
Restore drill process was stopped by the user before completion. To fix this, user just needs to run the restore drill again and wait for it to finish.
Unverifiable Detected
For files that were backed up using versions below v9, it is possible to get the Unverifiable Detected status during initial run of the restore drill, this means that it cannot determine if the backup data are correct or not. This can happen when a file that stores needed information used for comparison is not available. A backup job needs to be run to correct this.
Invalid Detected
There are corrupted backup data detected. In order to fix this, a backup job must be run to generate and replace the corrupted backup data.
Error
Restore drill process was not completed due to some error. To correct this depends on the type of error received. For example, if space is running out then make sure that there is enough space in the temporary directory for the restore drill to run.
You can view the detailed restore drill job summary, corrupted backup files, corrupted chunks, to be verified backup files, to be verified chunks, valid backup files, valid chunks and restore drill logs in this report.
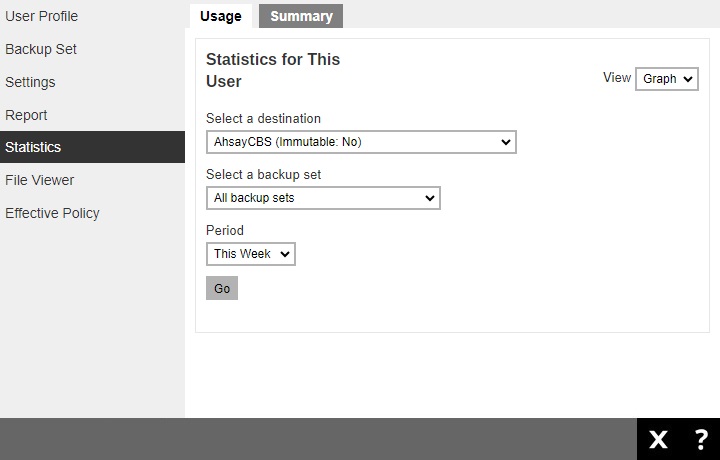
Statistics
You can generate a graph of storage statistics for the user by modifying a few factors such as the backup destination, backup set and the period of the backup.
The statistics shows the storage capacity of different backup sets on different dates. Only restorable files in the data and retention area for each backup set are included in the calculation of storage statistics.
Storage statistics of a backup set are updated every time the following functions are run:
- Backup job
- Data Integrity Check (DIC)
- Periodic Data Integrity Check (PDIC)
- Space Freeing Up
- Delete Backup Data
Usage
The following options are configurable for generating statistics in your desirable view:
- Select a destination – select the backup destination of your choice
- Select a backup set – you can choose a specific backup set or all backup sets
- Period – select the period of time during which backups were performed
- View – you can choose the view, graph or table
Graph view
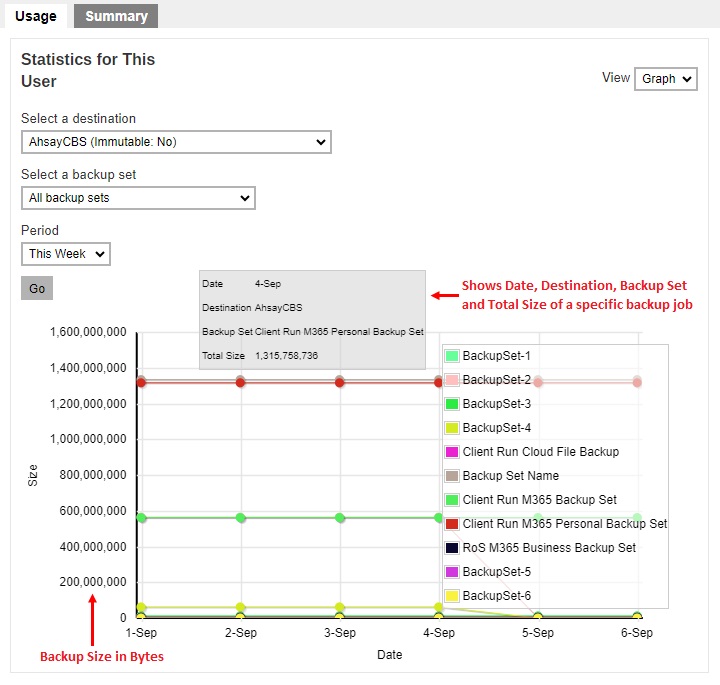
Table view

Summary
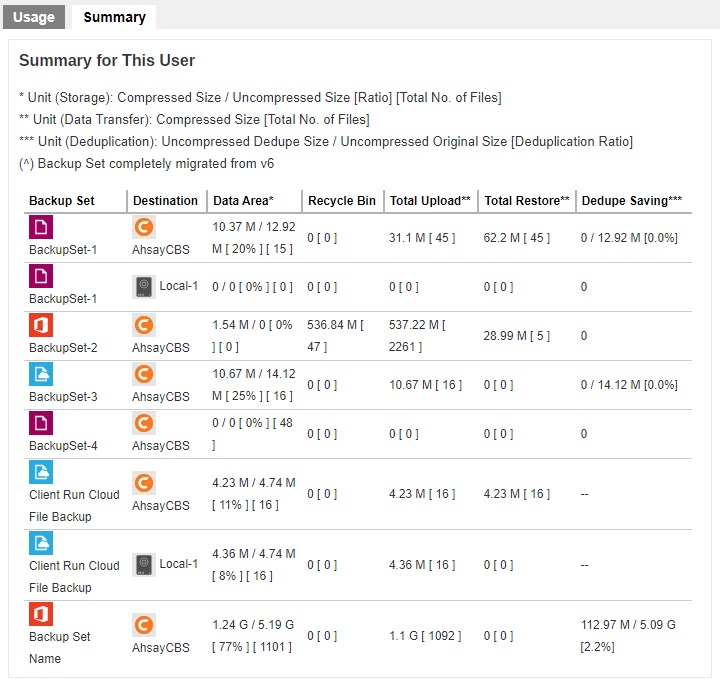
There are five (5) columns showing the following information for each backup set.
Data Area
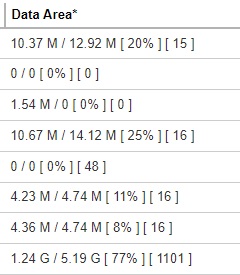
Format:
[Compressed Size] / [Uncompressed Size] [Compression Ratio in %] [Total umber of files]
Example: 1.24 G / 5.19 G [ 77% ] [ 1101 ]
The Data Area also include files that are in the Retention Area. The data interpreted as the backup set has 1101 files in the data area; the files compressed, and uncompressed sizes are 1.24 G and 5.19 G respectively; the compression ratio is 77%.
Recycle Bin
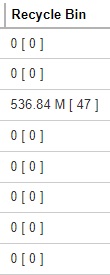
Format:
[Compressed Size] [Total number of files]
Example: 536.84 M [ 47 ]
The data interpreted as the backup set has 47 files in the Recycle Bin with a compress size of 536.84 M.
Total Upload
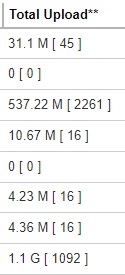
Format:
[Compressed Size] [Total number of files]
Example: 1.1 G [ 1092 ]
There is a total of 1092 files with a size of 1.1 G uploaded for this backup set.
The Total Upload is a lifetime counter, computed by adding up all the New Files, New Directories, New Links, Uploaded Files, Attributed Changed Files, Deleted Files, Deleted Directories, Deleted Links and Moved Files.Total Restore
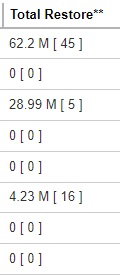
Format:
[Compressed Size] [Total number of files]
Example: 28.99 M [ 5 ]
There is a total of 5 files with a size of 28.99 M restored for this backup set.
The Total Restore is a lifetime counter, computed by adding up all the New Files, New Directories, New Links, Uploaded Files, Attributed Changed Files, Deleted Files, Deleted Directories, Deleted Links and Moved Files.Dedupe Saving
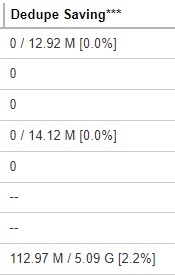
Format:
[Uncompressed Dedupe Size] / [Uncompressed Original Size] [Deduplication Ration in %]
Example: 112.97 M / 5.09 G [ 2.2% ]
The files uncompressed dedupe size and original size are 112.97 M and 5.09 G respectively; the dedupe saving is 2.2%.
File Viewer
The File Viewer page allows users to view the list of backup sets. The files that were backed up for each backup set can be viewed here only if the backup destination used is AhsayCBS. Also, this can only be used for viewing of backup files, if you want to restore a file, a link to the Ahsay Restorer is provided.
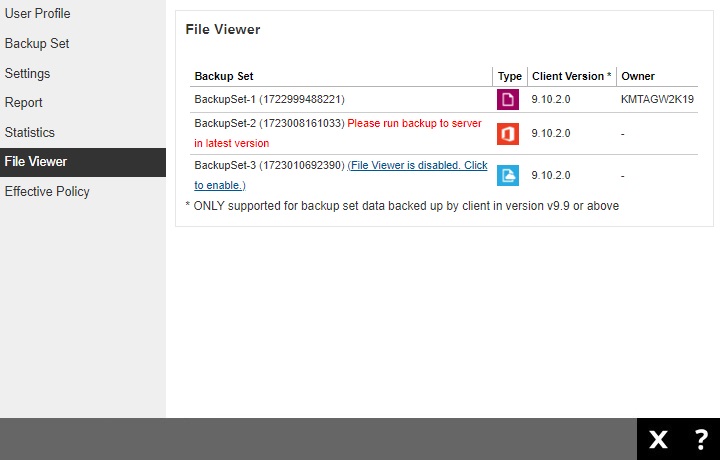
Make sure that the “Enable viewing list of backed up files on backup server without encryption key” checkbox is ticked.

You can access this by clicking the link provided or go to Backup / Restore > Users, Groups & Policies > Backup User > %Backup User Name% > Backup Set > %Backup Set Name% > Others > File Viewer on Backup Server. After ticking the checkbox, run a backup job to access the backed up files and avoid getting this message “Please run backup to server in latest version”. This message will also be displayed if the backup destination used for the backup set is not AhsayCBS.
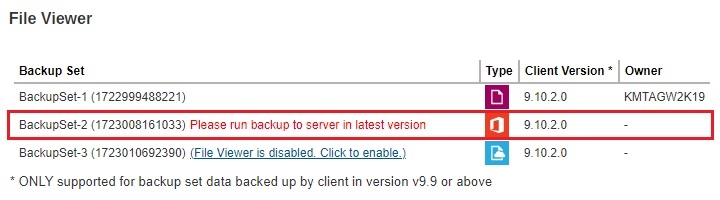
Click on the backup set to view the backed up files.
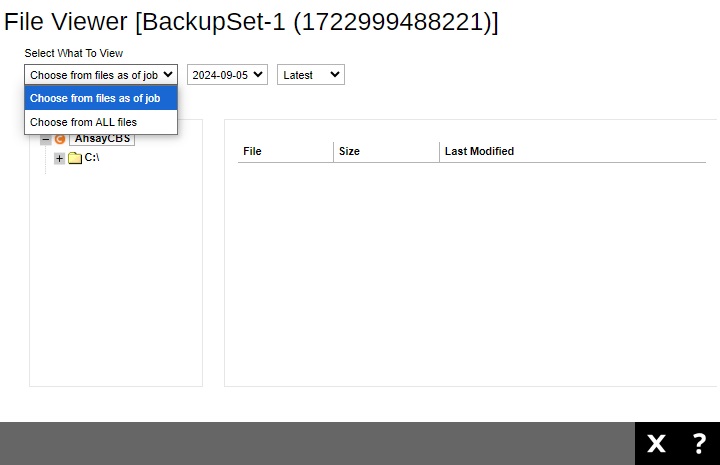
You can select what to view from Choose from files as of job or Choose from ALL files, just like when you are performing a restore.
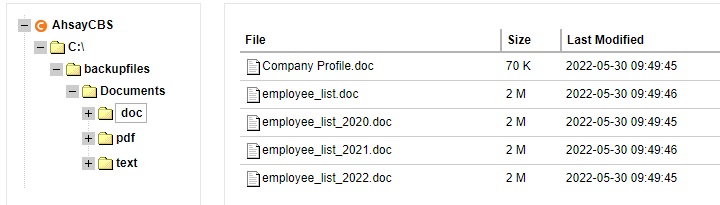
Click the file tree to expand and display the backed up files.
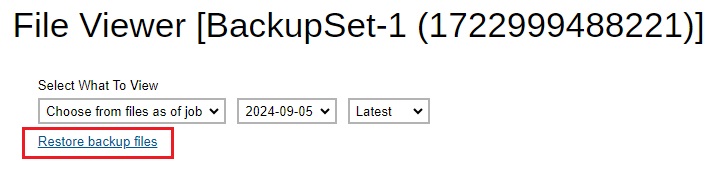
A “Restore backup files” link is provided which you can click to download the Ahsay Restorer. You need to install it in order to restore your files, for more information please refer to the Restore User Guide.
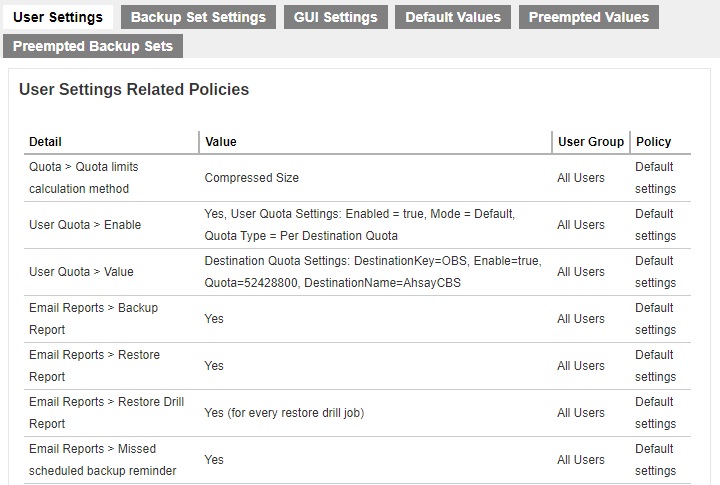
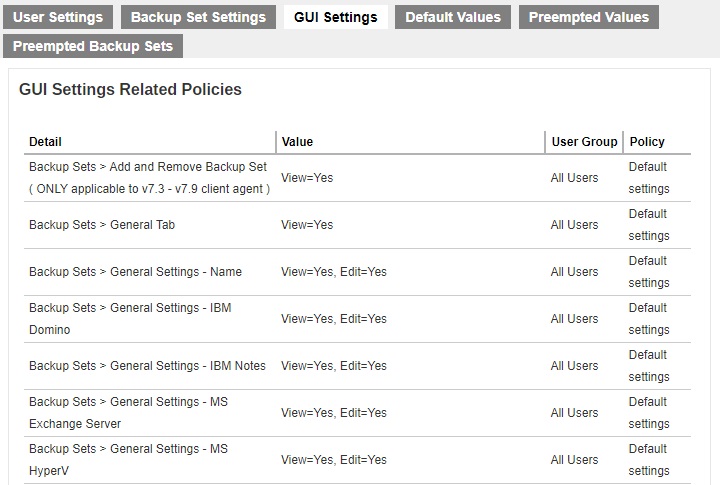
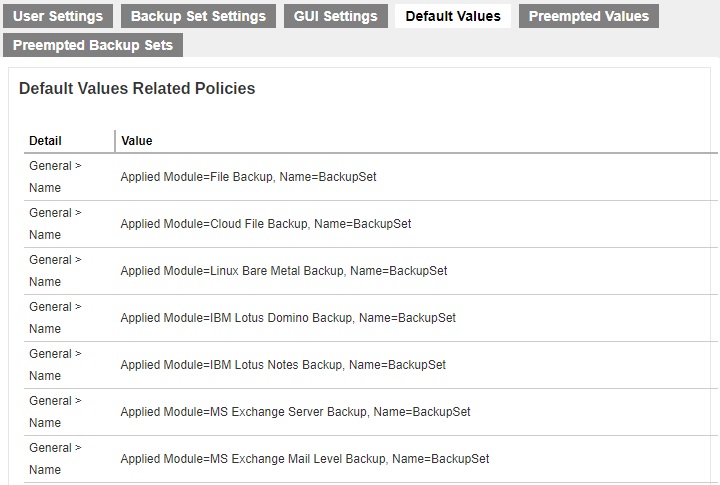
Effective Policy
The Effective Policy page shows the policies that will be applied to the backup user account.
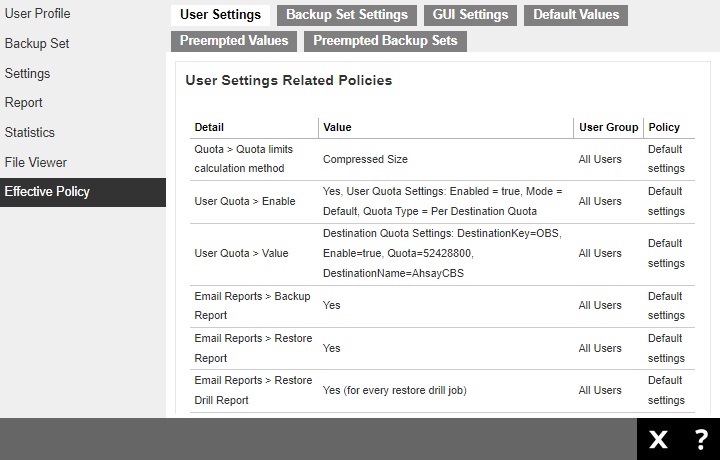
It is divided into six (6) tabs containing different groups of policies:
User Settings
The effective policies on user settings are displayed here.
Backup Set Settings
The effective policies on backup set settings are displayed here.

GUI Settings
The effective policies on AhsayOBM or AhsayACB GUI settings are displayed here.
Default Values
The effective policies on default values used in the backup set are displayed here.
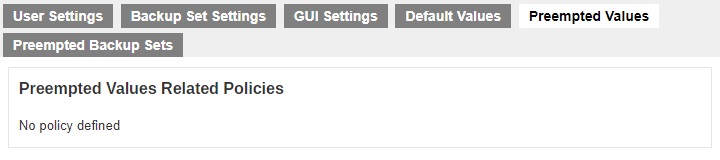
Preempted Values
The effective policies on preempted values used in the backup set are displayed here.
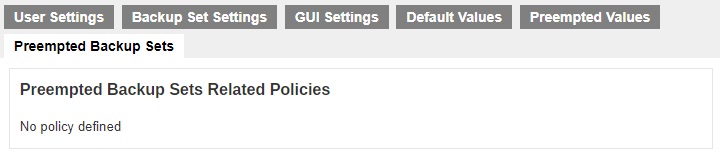
Preempted Backup Sets
The effective policies on preempted backups sets are displayed here.
Run Direct
The Run Direct menu allows the user to instantly power up a VM by running it directly from the backup files in the backup destination so that the VM can be put into production immediately.

For more information on how to restore a VM using Run Direct, please refer to the Run on Server Backup and Restore part.
Online Help
The Online Help is used to check brief descriptions and instructions of each module.
Click the Help button to view the online help.
You can also print it by clicking the Print button.