
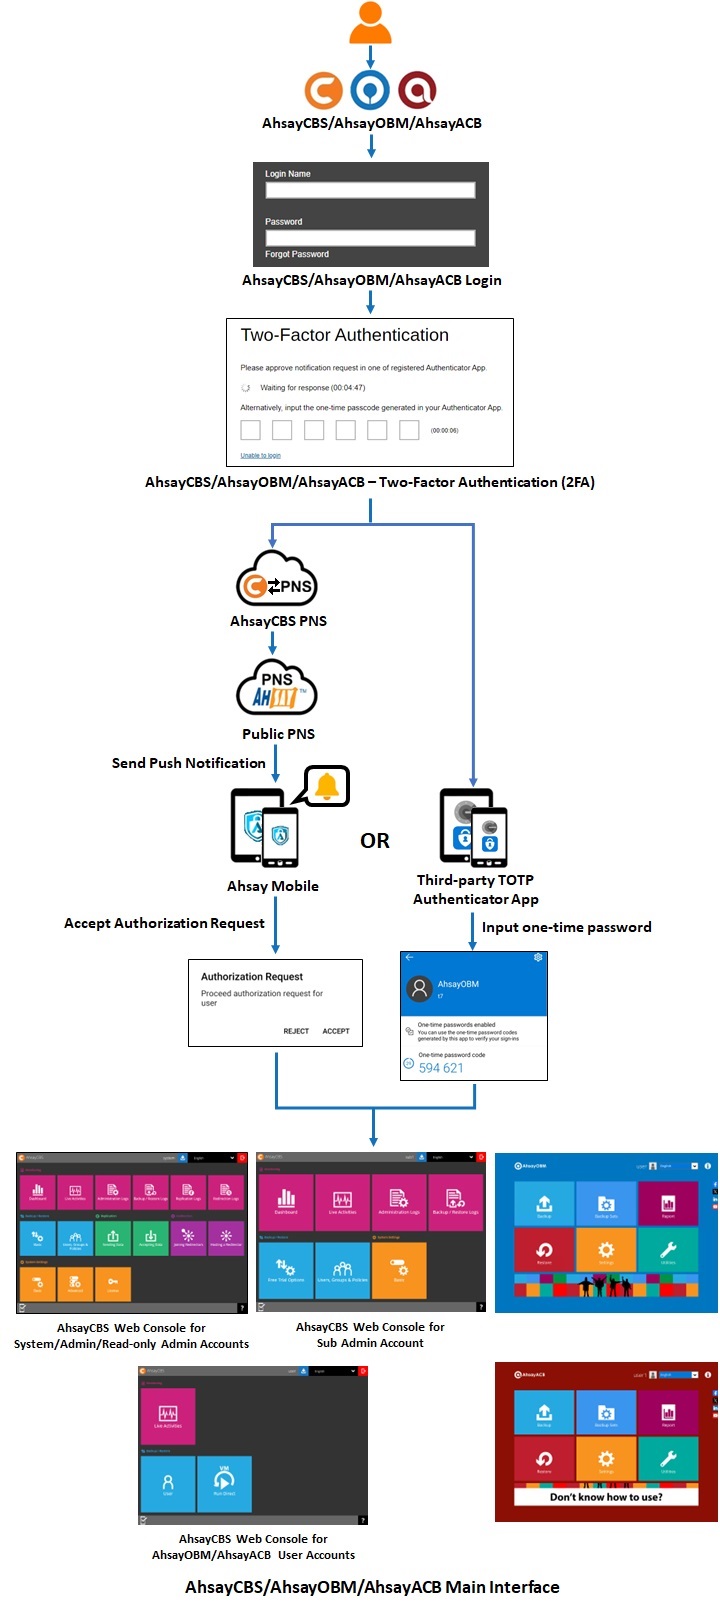
 FAQ
FAQSystem Settings
Administrators can create sub-admin or reseller accounts so that they can manage the backup users by themselves. In addition, non-admin operator accounts with read only permission can be created to help backup service administrator to monitor daily backup and restore jobs, as well as system activities.
Manage License
Verify License Connectivity
The AhsayCBS server is required to access the Internet and to connect to the Ahsay License Server (lic.ahsay.com) using https protocol for license activation, daily license checks, and license CAL updates. Make sure your firewall settings are configured to allow outbound connections to lic.ahsay.com via port 443 using TLSv1.2. For more information, please refer to the Network and Firewall Settings.
To verify Ahsay license connectivity you can:
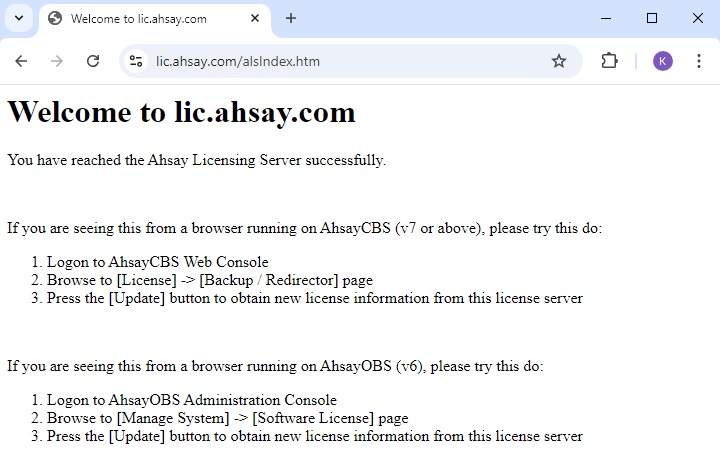
Windows
Open a web browser on your AhsayCBS and enter the following URL https://lic.ahsay.com the following message is displayed when the connection is successful.
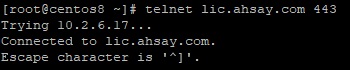
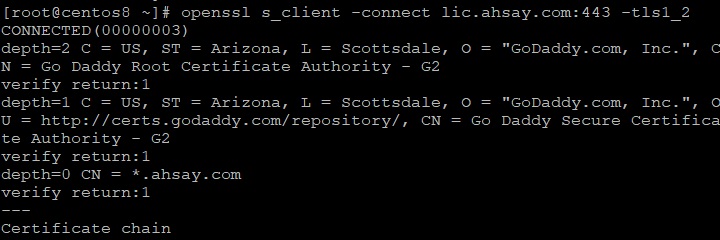
Linux
Use the telnet command to check the connection on your AhsayCBS server. If the connection is successful, you will see the following message.
Use the openssl s_client command to check whether TLSv1.2 is enabled. The following output is for illustration purposes only.
FreeBSD
Use the fetch command to check the connection to the Ahsay license server. If the connection is successful, you will see the following message.

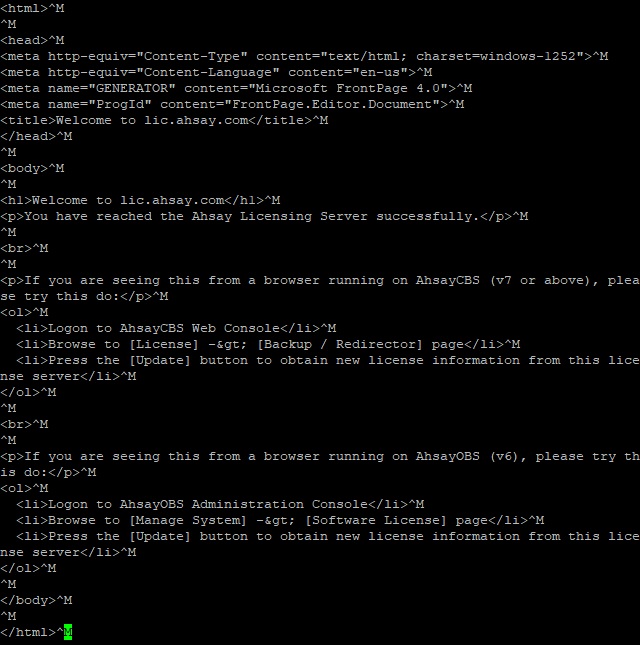
You also need to open the alsIndex.htm to verify the contents. You can open it by using a text editor like vi.
Manage License Key
To manage your AhsayCBS backup server and redirector license keys, do the following:
Click the License icon under System Settings from your AhsayCBS web management console.
There are two tabs on the license page. The Backup tab is for backup server license, while the Redirector tab is for redirector license. You can activate the software on these tabs.
Please make sure that the AhsayCBS license key is applied on the Backup tab. If you have purchased a Redirector license key, you need to enter the key in the Redirector tab. Do NOT enter the AhsayCBS license key on the Redirector tab or vice versa.
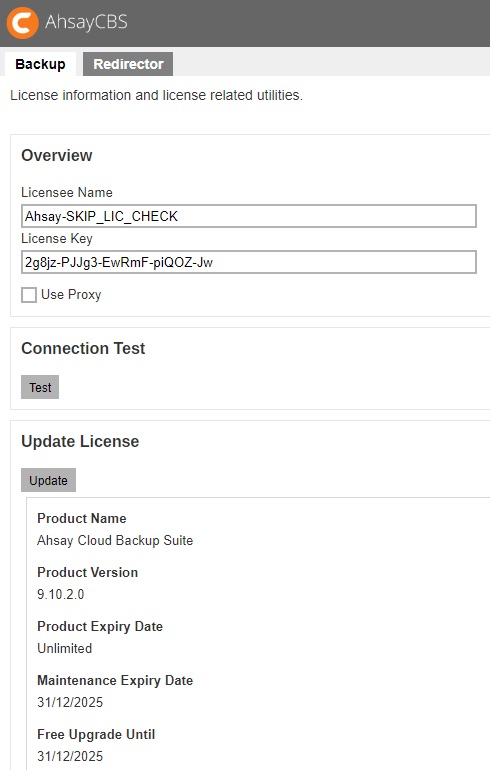
- Enter your “Licensee Name” and “License Key” on the Backup server license page. Both fields are case sensitive. Please enter them exactly as stated in your software receipt.
- If you are using the evaluation license, you will be able to evaluate the AhsayCBS for 60 days. Just accept the default Licensee Name and License Key on the page to activate the license.
- If you have already purchased a license, copy and paste the licensee name and license key into the relevant fields to activate the license.
- If a proxy server is required to access the Internet from AhsayCBS, tick the Use Proxy checkbox. Refer to the Proxy section for information on how to set up the proxy server.
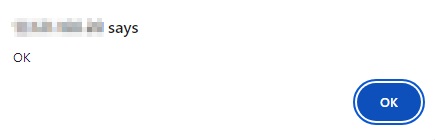
Click the Test button under “Connection Test” section to test the connection with the license server. You get a dialog box with the testing result. Click OK.
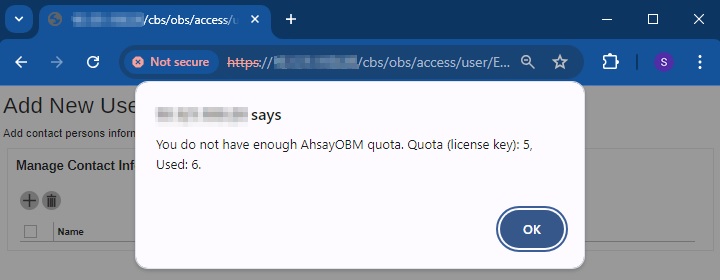
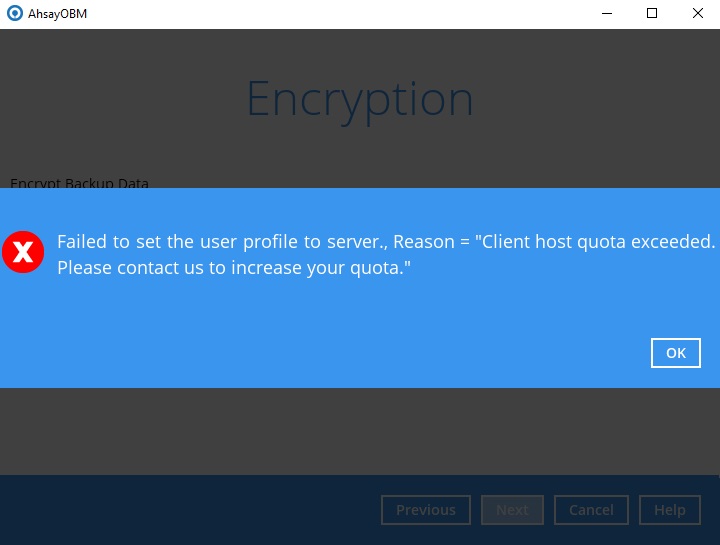
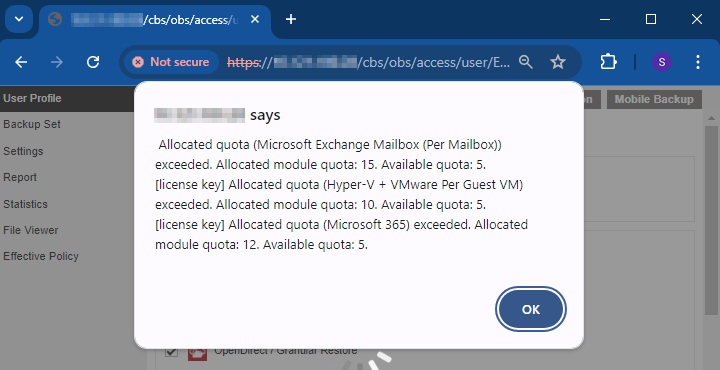
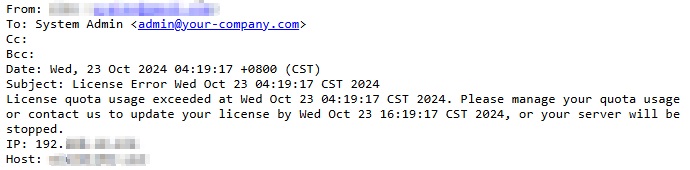
After upgrading AhsayCBS to v9.1.0.0 and above, any actions that may lead to quota exceeded will be blocked, i.e. generate a new backup user, creating a new backup set from AhsayCBS or v6/ v7/ v8 AhsayOBM/ AhsayACB, importing users in AhsayCBS, updating license in AhsayCBS, update user, and so on. If there is a license error, there will be an email to alert about the license error.
Below screenshot show about blocked actions:
Generate a new AhsayOBM user.
Generate a new AhsayACB user.
Create a new backup set from AhsayCBS or v6 / v7 / v8 AhsayOBM / AhsayACB.
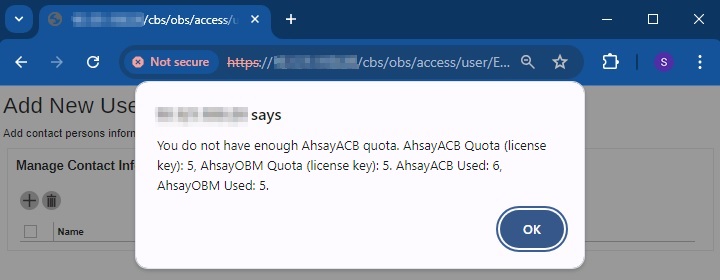
AhsayCBS license quota assigned for each sub admin user beyond the range between sub admin user’s current usage and license quota limit.
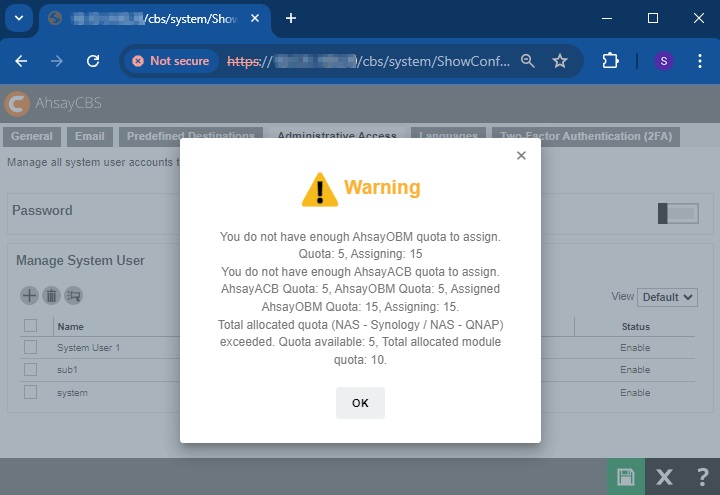
Update user with module quota exceeded.
Below screenshot shows the email alert.
License Summary and Requirements
The “License Details” section on the Backup Server license page shows a summary of the quota used and licenses available for each of the modules you have subscribed.
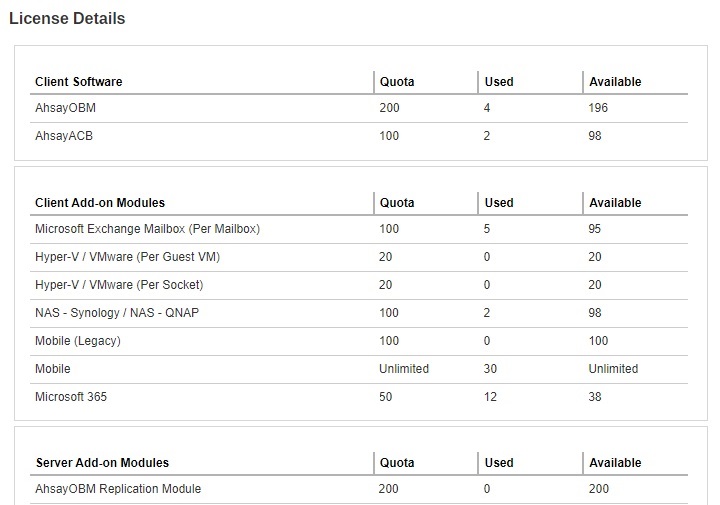
- Client Software - License quota and availability for client backup agents (AhsayOBM & AhsayACB)
- Client Add-on Modules - License quota and availability for add-on modules for AhsayOBM & AhsayACB.
- Server Add-on Modules - License quota and availability for server add-on modules, e.g. Replication module, AhsayUBS, AhsayCBS, etc.
- Support Languages - Supported languages for UI display. The availability of support languages is subject to your license key. For license related inquiries, please contact the Sales team at Ahsay by email at sales-kb@ahsay.com or call our International Sales Hotline +852 3580 8091.
If a Meter license is used for AhsayCBS, then an additional tab will be available which is the Usage tab. This page shows the detail of each user.
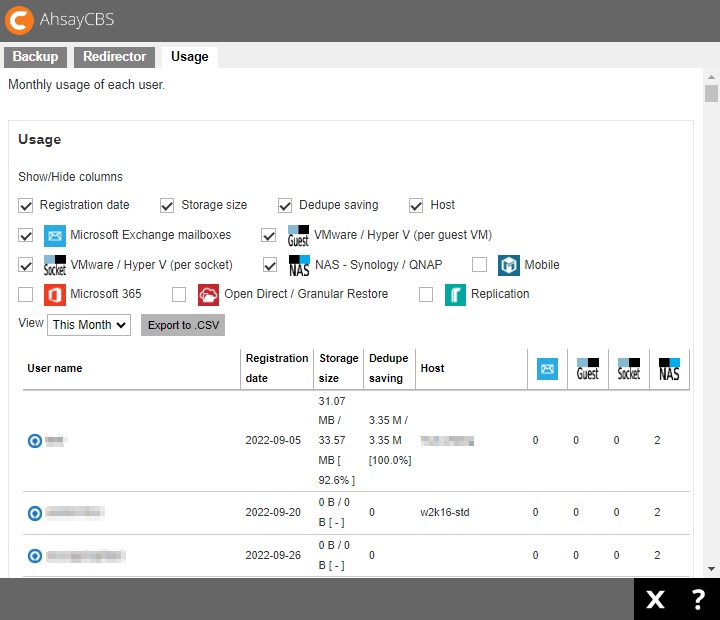
The details displayed for the user may be customized which are the following:
- Registration date – date when client software was registered.
- Storage size – displays the largest total value of backup storage size for the selected month.
- Dedupe saving – displays the largest total value of dedupe saving for the selected month.
- Host – hostname of the backup device.
- Microsoft Exchange mailboxes – number of Microsoft Exchange mailboxes add-on module assigned to the user.
- VMware / Hyper V (per guest VM) – number of VMware and/or Hyper V (per guest VM) add-on module assigned to the user.
- VMware / Hyper V (per socket) – number of VMware and/or Hyper V (per socket) add-on module assigned to the us.
- NAS - Synology / QNAP – number of Synology and/or QNAP add-on module assigned to the user.
- Mobile – number of Mobile add-on module assigned to the user.
- Microsoft 365 – number of Microsoft 365 add-on module assigned to the user.
- Open Direct / Granular Restore – number of Open Direct and/or Granular Restore add-on module assigned to the user.
- Replication – number of Replication add-on module assigned to the user.
Upgrade from AhsayOBS v6 or AhsayCBS v7/v8 to v9 and above
If you are upgrading from AhsayOBS v6, you need to purchase one extra AhsayCBS license module for each of your existing v6 backup server license. Make sure you have valid maintenance before you perform the upgrade/migration.
If you upgraded AhsayCBS from v6 to v9 without purchasing AhsayCBS module and the quota exceeded, then there will be a grace period of 60 days to allow sufficient time to resolve the license related problems.
If you upgraded AhsayCBS from v6/v7/v8 to v9 with purchasing AhsayCBS module and the quota exceeded, then there will be a grace period of 12 hours for you to manage the quota usage. If quota usage issue was not solved within the grace period, the server will be stopped after the grace period. After log in to AhsayCBS system console, the web console will redirect to the “To Dos” page and the license error will be shown on the top.
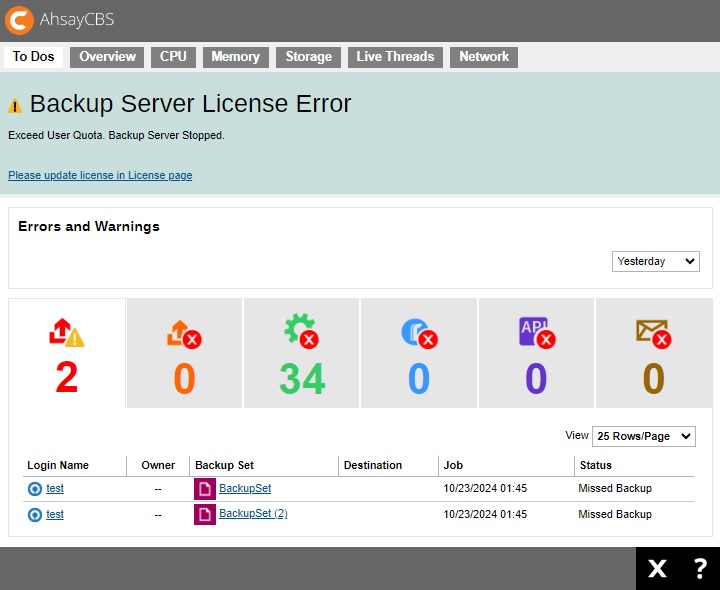
If there is any license error, there will be email to alert about the license error.
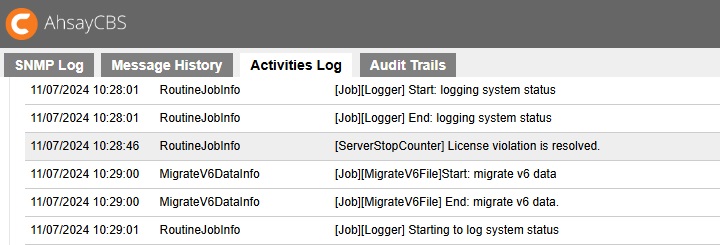
The server stop counter will start in the last hour of grace period. There will be log showing the process of server stop.
Server stop counter starts.
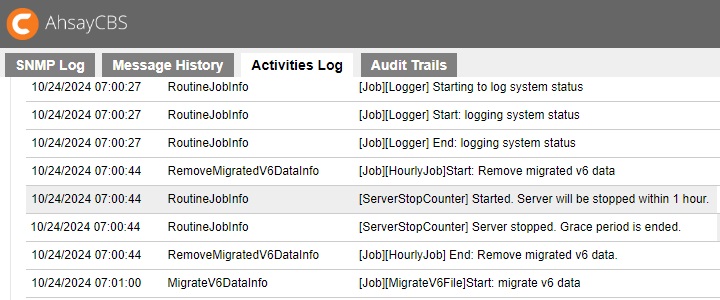
Quota usage issue solved and the server stop counter stopped.
Quota issue not solved within the grace period and server stopped.

If you utilize only one AhsayOBM across multiple physical/virtual devices in previous v6 version, you will need to purchase supplement AhsayOBM when you upgrade to v9.
In v9 VMware and Hyper-V license modules are based on a per guest VM or per CPU socket basis. For existing v6 or v7 VMware and Hyper-V backup sets using per guest VM licenses, upgrading to v9 will not be affected.
Extra License for Replication Server
If you are going to replicate the Backup Server to another Replication Server, you need to purchase additional AhsayCBS license module for the replication server. Please refer to the Replication section for further information.
License for Standalone Redirector
Since the AhsayCBS Redirector license does not come with an AhsayCBS module, for a standalone AhsayCBS Redirector, you will need to purchase one extra AhsayCBS license module with a Backup Server license. Please refer to the Redirection section for further information.
License Requirements for Software and Modules
Software
- AhsayCBS - per running instance.
- AhsayOBM - per device to back up.
- Ahsay Mobile - per AhsayOBM/AhsayACB account that needs to back up mobile device. Ahsay Mobile licenses are free of charge and each license key has unlimited quota. However, each individual AhsayOBM/AhsayACB user account support a maximum of 10 mobile backup device licenses.
- AhsayACB - per device to back up.
- AhsayUBS - per installation.
Module
- VMware Backup Module - per Guest VM to back up and per CPU socket.
- Hyper-V Backup Module - per guest VM to back up and per CPU socket.
- Microsoft 365 Backup Module - per account to back up.
- MS Exchange Individual Mailbox Backup Module - per mailbox to back up.
- OpenDirect / Granular Restore - per backup set.
- NAS – Synology / NAS – QNAP Backup Module - Per AhsayOBM account that needs to back up Synology / QNAP NAS device.
- Replication Module for AhsayOBM - per device to replicate.
- Replication Module for AhsayACB - per device to replicate.
- Redirection Module - per device to redirect.
Automatic License Renewal
If the AhsayCBS is under a monthly leasing plan (meter key), the license key will have an expiry date of 30 days from the current date, the license key is renewed automatically.
In the event of any problems during the license renewal process, i.e. AhsayCBS is not able to connect to the Ahsay License server, the expired license key will have a grace period of 14 days. AhsayCBS can still function normally using the expired license for an extra 14 days before the service is automatically shut down. The 14-day grace period is to allow sufficient time to resolve any license related problems.
License Evaluation Expiry
After the evaluation period expires (60 days after activation), the AhsayCBS service will automatically stop working. Although the service is still active, the AhsayOBM and AhsayACB clients will not be able to connect to perform any backups or restores.
Offline License Activation
Offline License Activation is used to activate the license keys on AhsayCBS servers that do not have an Internet connection.
Open the License page of AhsayCBS. The two relevant sections are: “Offline License Request” and “Import License”.
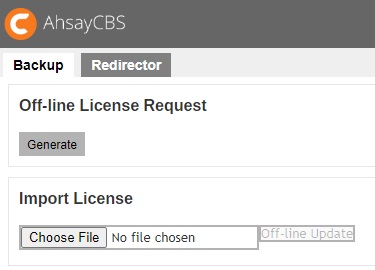
- Click the Generate button to generate an offline license request file, req.olr.
- The req.olr file is an encrypted file that contains all the information required for the activation process, for example, MAC address and local IP address. The system will prompt for the location to save the offline license request file.
- When the offline license request file is ready, please send it to Ahsay Support team. An offline license file, license.olr, will be generated and sent back to you. This file is used to activate offline the license key of your AhsayCBS server.
- After you have received the offline license file, you would need to import it to the AhsayCBS server to complete the offline activation process.
- Click the Choose File button under the “Import License” section to select the offline license file (license.olr) from AhsayCBS system home. Click the Off-line Update button to complete the license activation process.
License Management Portal
The Ahsay License Management Portal is for partners to:
- Consolidate purchased Backup Server licenses into License Pool(s).
- Flexibly generate and update Backup Server license(s) as requirements change.
- Improve efficiency on use of Backup Server licenses by sharing CALs (Client Access License) in license pool among multiple Backup Server instances.
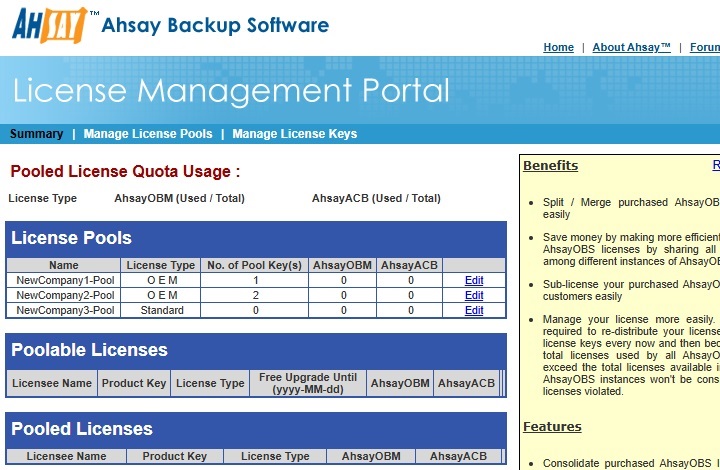
With the Ahsay License Management Portal, partners can place purchased Backup Server licenses (Poolable License) into a pool to be shared among multiple Backup Server instances. This process is called converting Poolable License into Pooled License.
Example:
If you have the following 2 licenses:
- LICENSE001 – 50 AhsayACB and 80 AhsayOBM
- LICENSE002 – 20 AhsayACB and 30 AhsayOBM
You can put these 2 licenses into a single license pool so that you can generate a new license with a maximum of 70 ACB and 110 OBM license CALs or any number of new licenses within these available license CALs.
For more information about the Ahsay License Management Portal, please refer to the following articles and video:
- Ahsay License Management Portal Overview
- How to create a Pool Key from a License Pool?
- How to provision a Pool Key for AhsayCBS backup server?
Active Pool Key
After you applied a pool key on your AhsayCBS server, please make sure your AhsayCBS server has an Internet connection and is able to connect to the Ahsay License Server at (https://lic.ahsay.com). If AhsayCBS service cannot connect to the Ahsay License Server after 14 days, the license key will be deactivated and the AhsayCBS service will be automatically stopped.
Basic Backup Server Configuration
To manage your AhsayCBS basic backup server configurations, simply click the Basic icon under “System Settings” from your AhsayCBS environment.
![]()
You can perform the following basic configurations on your Backup Server:
- Manage general setup for AhsayCBS.
- Manage email settings and general email reports.
- Define destinations to store backup or replication data.
- Manage Administrator accounts for the MSPs (Managed Service Providers).
- Customize languages available to users on AhsayCBS and User Web Console.
- Configure two-factor authentication.
There are 6 tabs under basic server configuration, each of which is described below:
- General
- Predefined Destinations
- Administrative Access
- Languages
- Two-Factor Authentication
General
The following shows the “General” tab under System Settings > Basic. It is used for general setup of AhsayCBS. There are several groups of settings under the General tab, and they are described below.

Host
This is the host name of your AhsayCBS.

- Select the protocol to use, whether http or https.
- Enter the domain name of your AhsayCBS in the format: <www.mybackup.com> or <IP address>.
- Select the port number.
System Home
This is the system home location of your AhsayCBS. This path is set to your installation home by default.
Here are examples for the different OS:
Windows

Linux / FreeBSD

AhsayUBS

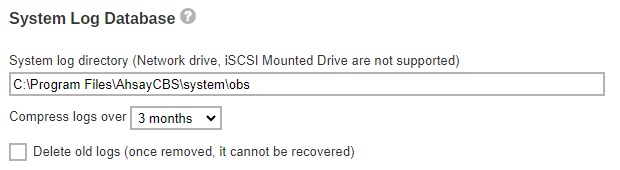
System Log Database
This is the system log database location of your AhsayCBS. This path is set to your installation home by default.
You can select when to compress the logs and if you want to delete old logs.
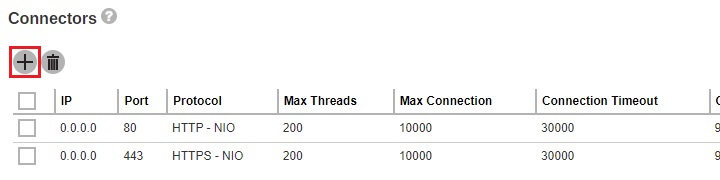
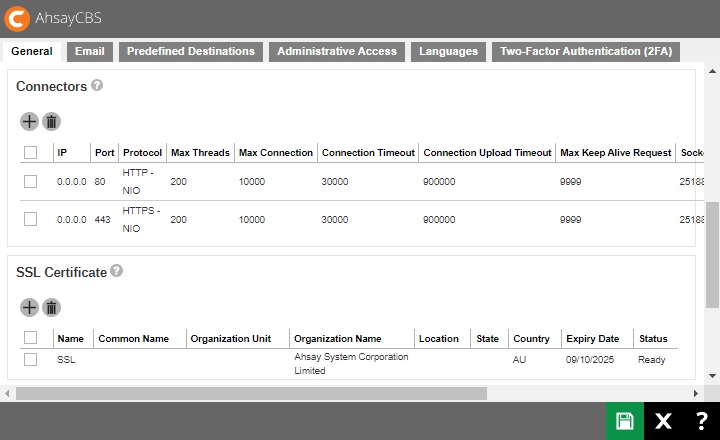
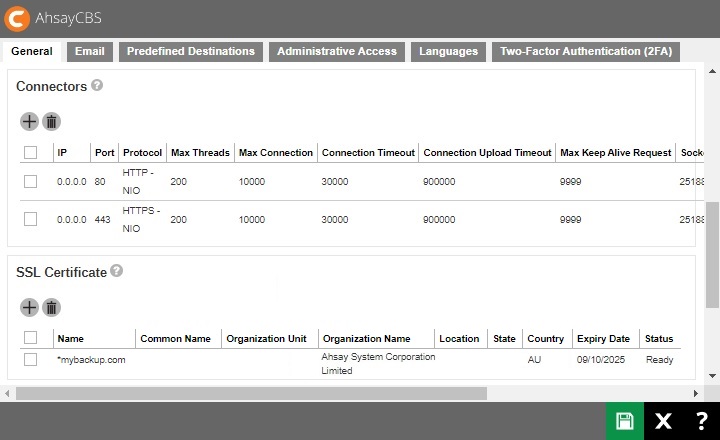
Connectors
Listening to non-standard TCp?IP port
If you like to run your own web server, or some other services using port 80 and 443. On your AhsayCBS server, you can change the listening TCP/IP port of AhsayCBS from port 80 and 443 to some other port numbers such as port 8080 and 8443.
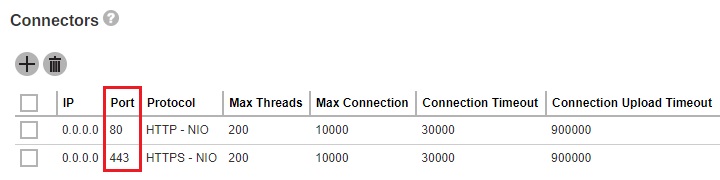
You can modify the connector settings from the AhsayCBS management console System Settings > Basic > General > Connectors and modify your new port in the connector settings. If you do this, it can affect how your clients connect to AhsayCBS. You may also need to open appropriate firewall to allow the connection.
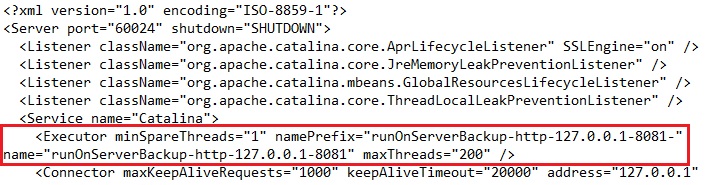
The port range 8081 to 9080 can be used by the connector dedicated for agentless Microsoft 365 and Cloud File backup. This is automatically setup upon installation, so no additional setup is needed to be done. It is not visible from System Settings > Basic > General > Connectors but can be checked from the server.xml file which is in the conf folder located in $APPLICATION_HOME\conf.
Listening to a single IP address
If the backup server has more than one network interface installed or has more than one IP address bind to a single network interface, you can configure AhsayCBS to use only a single IP address for backup services (by default the TCP port of all IP addresses available within the system are used and open). This has the benefits of sparing other IP addresses for other applications, e.g. Apache Web Server or Microsoft Internet Information Server (IIS).
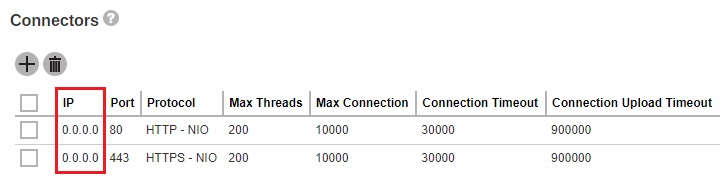
You can modify the connector setting from the AhsayCBS management console System Settings > Basic > General > Connectors and modify the IP address in the connector settings. This is the default settings upon fresh installation of v9.1.0.0 or above.
The AJP – APR protocol is an optimized binary version of HTTP that is used to allow Tomcat to communicate with an Apache web server. It maintains permanent connection between servers to reduce the time it takes to establish a connection. It is dedicated to a particular request and then maintained for the next request to be tunneled down, rather than each session causing a session to be created and broken.
The HTTP – NIO/HTTPS – NIO are used to support a higher number of concurrent connections to the AhsayCBS server.
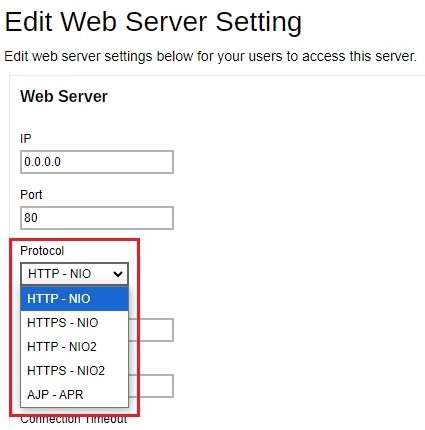
It is advisable to create another connector to be used to access the AhsayCBS web console to avoid a slow connection. To create another connector:
Click the Create button.
Enter the IP and Port.
- Select the Protocol.
- Change the following if needed:
- Max Threads, default value is 200.
- Max Connection, default value is 10000.
- Connection timeout, default value is 30000.
- Connection Upload Timeout, default value is 900000.
- Max Keep Alive Request, default value is 1000.
- Socket Receive Buffer Size, default value is 25188.
- Socket Send Buffer Size, default value is 43800.
- Click OK once done.
- Click Save to save the settings.
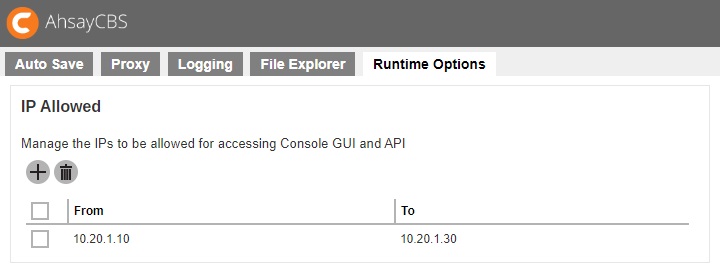
Restricting access to system page by IP address
For better security, you can restrict access to the AhsayCBS management console by IP addresses. To do so, please add IP restriction in your AhsayCBS management console System Settings > Advanced > Runtime Options > IP Allowed. You can enter a range of IPs or a specific IP in the IP Allowed settings.
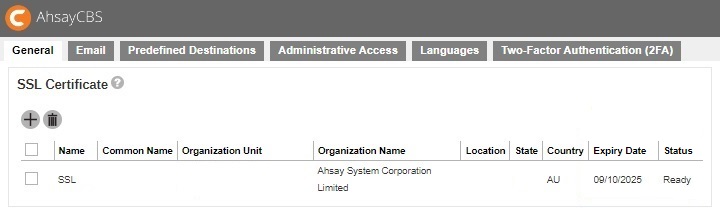
SSL Certificate
Installing a trusted SSL Certificate
Default installation of AhsayCBS enables SSL (Secure Socket Layer) support using a dummy certificate. For your own security, you are advised to replace the pre-installed dummy SSL certificate with a secure SSL certificate from a trusted CA (Certificate Authority). For details, please refer to the following article Trusted Certificate Authority (CA) List for version 9.
Furthermore, to use Two-Factor Authentication with https protocol, a valid SSL certificate from a trusted CA must be installed on AhsayCBS. Otherwise, you will have to use http instead which means all AhsayOBM/AhsayACB users with Two-Factor Authentication enabled will need to connect using http as well.
Please note that only RSA SSL certificate is supported. To replace the non-secure dummy SSL certificate with a secure SSL certificate, you need to generate a CSR (Certificate Signing Request) and submit the CSR to your CA. Please perform the following in your AhsayCBS.
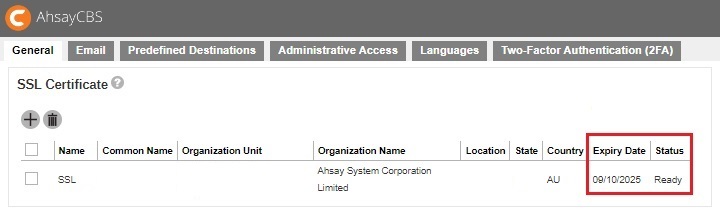
Navigate to System Settings > Basic > General > SSL Certificate, click the Create button.

Enter the CSR details, then click the Next button to proceed.
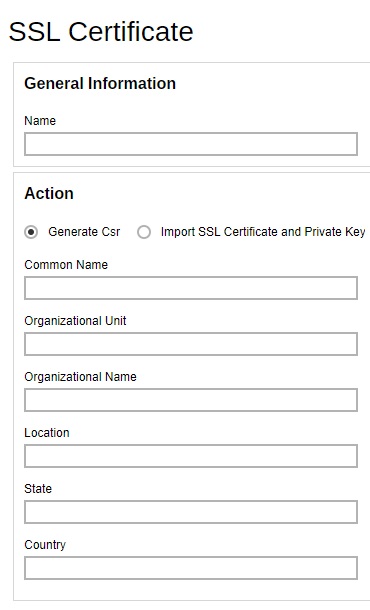
Generate a CSR to apply the SSL certificate from your trusted CA.
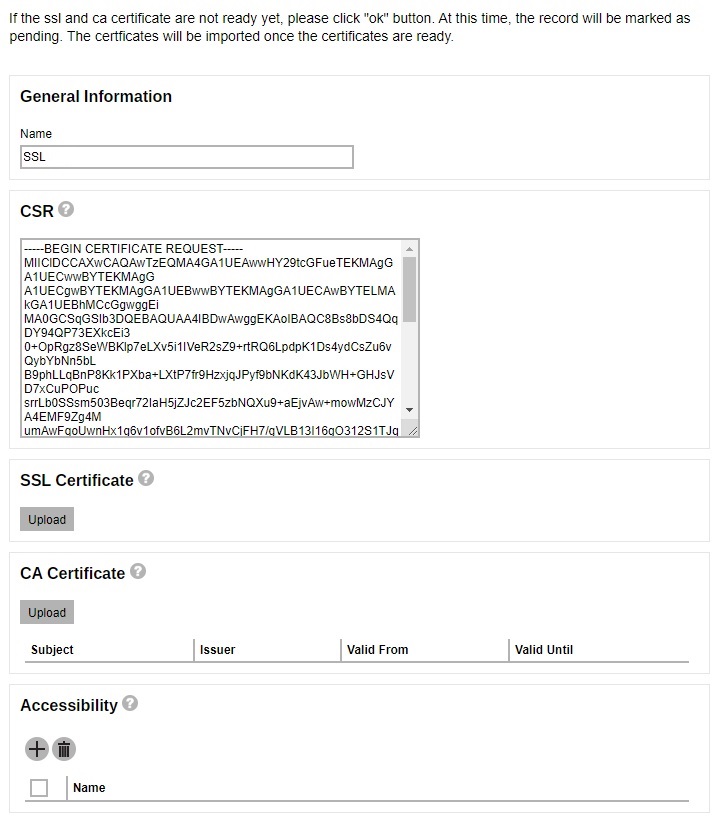
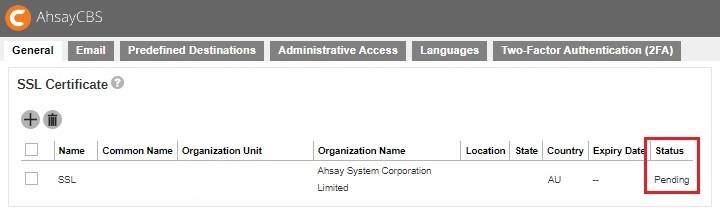
You will see a "Pending" status in the SSL Certificate page.
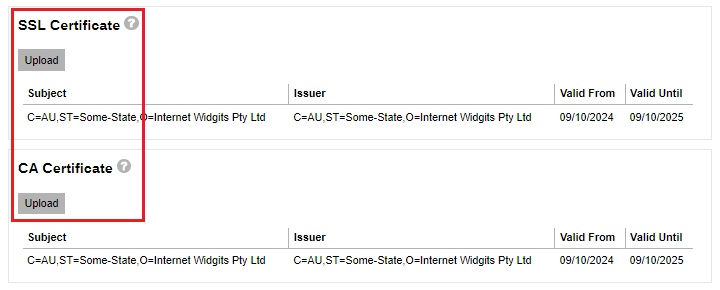
When the SSL certificate is ready, click into the certificate entry and import the SSL certificate and CA certificate.
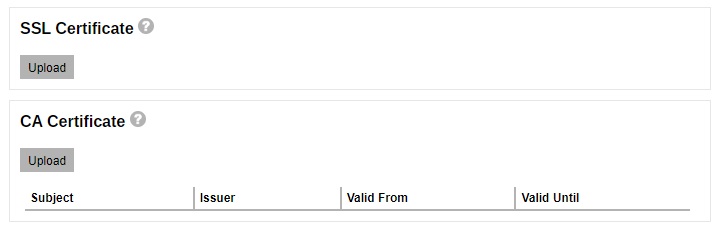 If the Certificate Authority provided bundled CAs, these bundled intermediate certificates must be uploaded to AhsayCBS. If uploading the bundled CAs does not work, upload the root and intermediate certificates separately.
You will be able to see the status of the certificate as “Ready” and a valid “Expiry Date”.
To apply the SSL certificate to your connector, click the HTTPS entry.
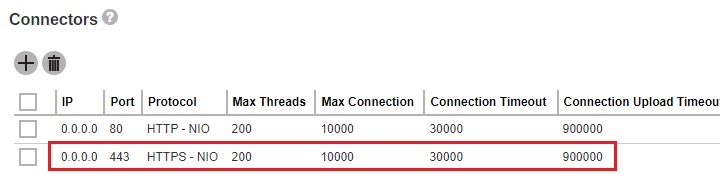
Add the SSL certificate to this connector as shown below.
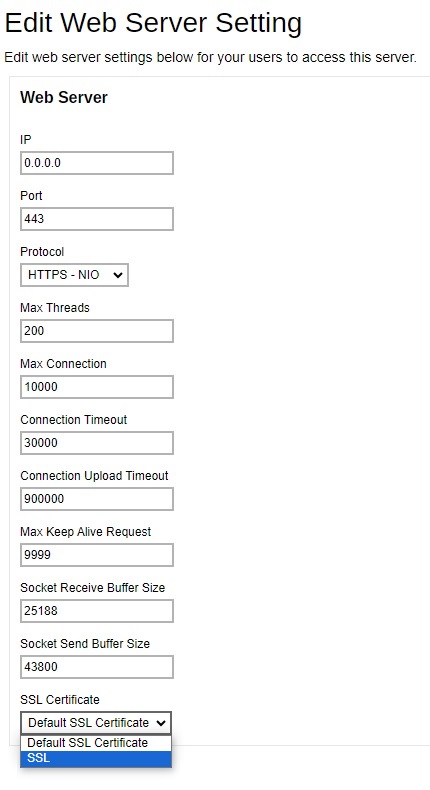
Click the Save button to save the settings.
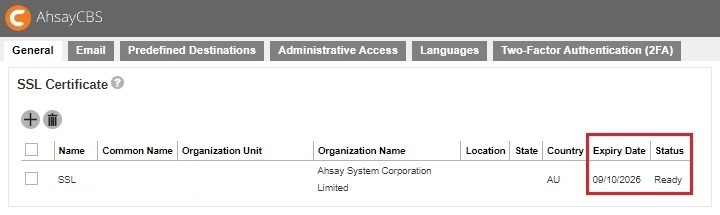
Renew a trusted SSL Certificate
When your SSL certificate is due to expire, you can renew your SSL cert via your CA’s website. Your CA may ask you to use the existing CSR that you submitted previously or submit a new CSR.
- If you decided to use a new CSR, most likely the information on the old CSR is not up-to-date. Most CA will not consider this as a renew process and you need to start from the beginning of a certificate process described in the previous section.
- If you purchase a renew SSL certificate with the existing CSR, wait for your CA to sign the renew SSL certificate.
The import step of a renewed SSL certificate is similar to the installation of a SSL certificate. Please perform the following in your AhsayCBS.
Go to System Settings > Basic > General > SSL Certificate.
- Click the certificate entry.
Import the SSL certificate and CA certificate.
 If the Certificate Authority provided bundled CAs, these bundled intermediate certificates must be uploaded to AhsayCBS. If uploading the bundled CAs does not work, upload the root and intermediate certificates separately.
You will see the date in “Expiry Date” is extended.
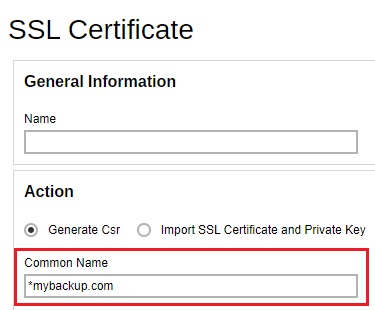
Wild Card SSL Certificate With Redirector Setup
In the Redirector with a number of Backup Servers setup scenario, you need to apply a wild card certificate for all your AhsayCBS servers. The application of the wild card certificate is the same as a normal certificate except for the common name, enter *.backup.com instead. To apply a wild card certificate for all your AhsayCBS servers, please perform the following:
- In the AhsayCBS with the Redirector role, go to System Settings > Basic > General > SSL Certificate.
Generate a CSR with the common name set to, for example *.mybackup.com, and apply the SSL certificate from your trusted CA.
- When the SSL certificate is ready, import the SSL certificate.
Copy the SSL certificate, private key and the CA certificate file from your AhsayCBS_HOME/conf/cert folder and transfer to your AhsayCBS with Backup Server role. They are named similar as the following:
1449049185371.crt
1449049185371.key
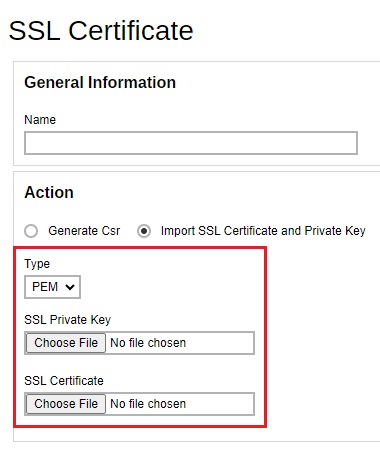
1449049185371.ca- Import these 3 certificate files in one of your AhsayCBS (Backup Server role) in the System Settings > Basic > General > SSL Certificate, click on the Createbutton.
Select the Import SSL Certificate and Private Key radio button. Select the “Type” and then import the SSL Private Key, SSL certificate and the CA certificate.
To apply the SSL certificate to your connector, click the HTTPS entry.
Add the SSL certificate to this connector.

Click Save to save the settings.
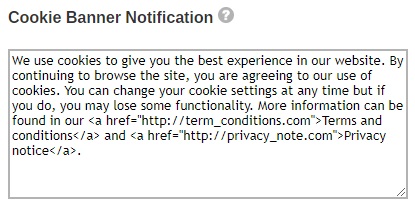
Cookie Banner Notification
To comply with the new General Data Protection Regulation (GDPR) requirements, a banner will be displayed stating the organizations cookie policy upon log in to the AhsayCBS server. This will also apply to the AhsayCBS web console.
Administrator can configure a notification banner to be displayed on the AhsayCBS web console (displayed at the login interface), and the contents of the banner can be configured on the AhsayCBS web console. Also, HTML codes can be used for content of the banner.
The following shows the “Email” tab under System Settings > Basic. This is used for defining the various email settings that AhsayCBS uses to generate email reports to backup system administrator and backup users.
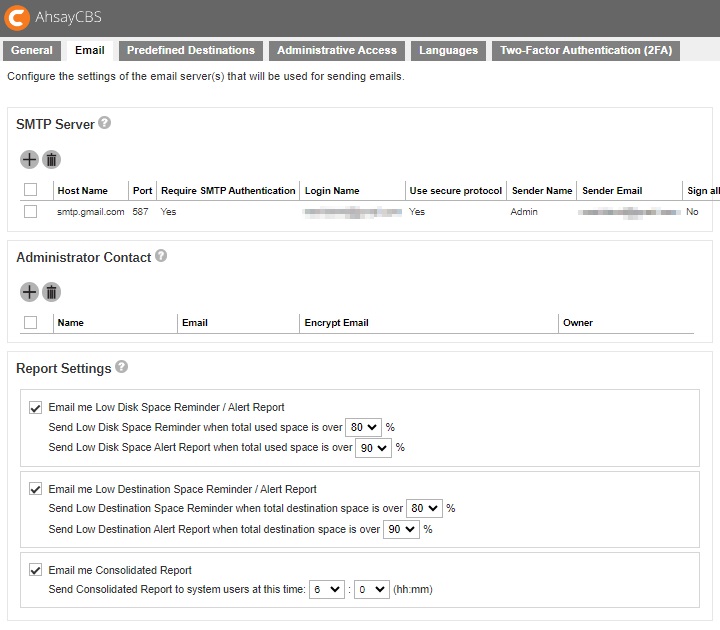
There are several groups of settings under the Email tab.
SMTP Server - multiple SMTP servers can be setup for AhsayCBS. If the first SMTP server is unavailable, the next SMTP server will be used. To avoid your report emails being filtered by the SMTP server or mail client, you need to enter a valid report sender in the email settings.
AhsayCBS supports SMTP servers which use either TLS v1.0, v1.1 or v1.2.
If you do not have a SMTP server, you can consider using a free SMTP such as Gmail. In order to use Gmail, you will need to enable App Password on your Google account, then use the App Password when configuring SMTP settings in AhsayCBS.
- Administrator Contact - this entry defines the administrative contact of AhsayCBS. AhsayCBS will send usage, error and all critical system alerts to all email addresses defined here.
- Report Settings - this setting allows the AhsayCBS administrator to define the threshold for email reminder / alert low disk space on AhsayCBS and backup destinations. The default settings are 80% and 90% respectively:
- Low Disk Space Reminder / Alert Report for AhsayCBS user home and system home drives:
Send Low Disk Space Reminder when total used space is over 80%.
A Low Disk Space Reminder email is sent to the administrator 15 minutes after the disk usage has exceeded the preset threshold.
A Low Disk Space Alert email is sent to the administrator every 15 minutes when the disk usage has exceeded the preset threshold. - Low Destination Space Reminder / Alert Report for OneDrive and Google Drive destinations only:
Send Low Destination Space Reminder when total destination space is over 80%.
Send Low Destination Alert Report when total destination space is over 90%.
A Low Destination Space Reminder email is sent to the administrator at 6:00 AM daily when the destination disk usage has exceeded the preset threshold.
A Low Destination Alert email is sent to the administrator at 6:00 AM daily when the destination disk usage has exceeded the preset threshold. - Consolidated Report
A Consolidated Report email is sent to the administrator at the specified time. Default time is 6:00 AM daily.
- Low Disk Space Reminder / Alert Report for AhsayCBS user home and system home drives:
Set up SMTP Server
Configure the SMTP Server so that you can receive reports from AhsayCBS.
Click Create to add a SMTP Server. The following screen appears:
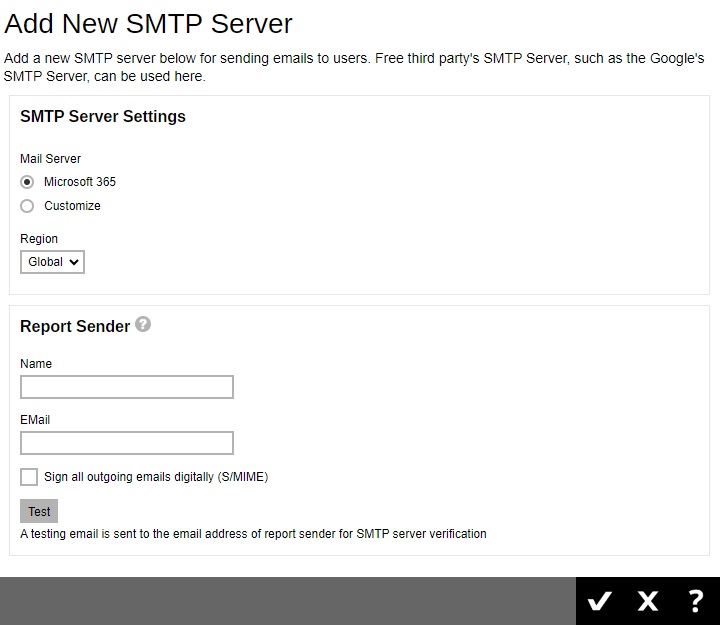
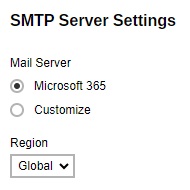
Select the mail server that will be used, choices are: Microsoft 365 and Customize. By default, Microsoft 365 is selected.
- The fields that will be displayed will depend on the mail server selected.
If Microsoft 365 is selected, select the Region.
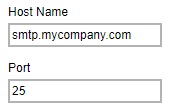
If Customize is selected, enter the SMTP mail server settings in the "Host Name" and "Port" fields.
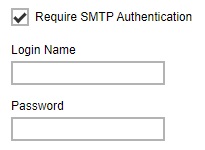
If authentication is required, tick the checkbox next to Require SMTP Authentication and then enter the “Login Name” and “Password”.
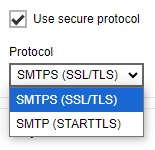
Optional: Tick the checkbox Use secure protocol if required. Select the type of “Protocol” from the drop-down box.
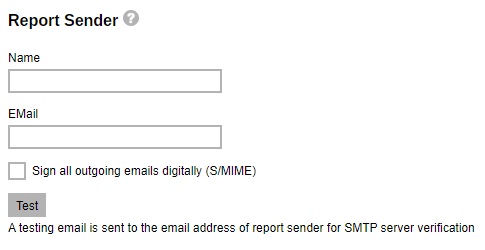
Enter the report sender’s name and email address. Then click Test.
Authorize access.
The following will only be displayed if the mail server selected is Microsoft 365, otherwise skip to step 7.
Click Authorize to continue.

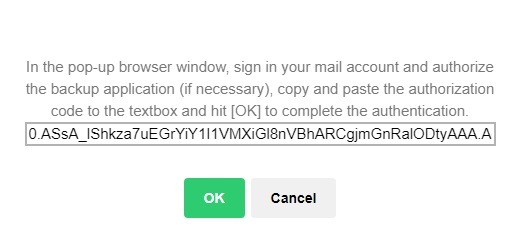
Sign in to your account and accept the permission request.
Copy the authorization code.
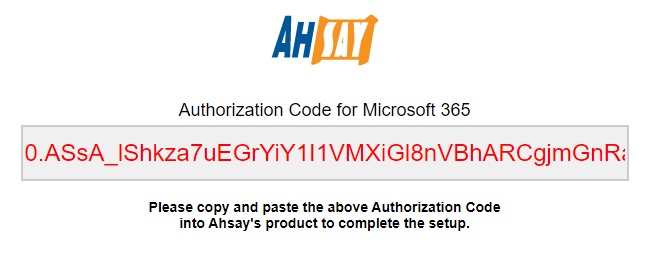
Paste it in AhsayCBS then click OK.
Click OK to continue.
- Click OK to add the SMTP settings.
- Click Save to save the settings.
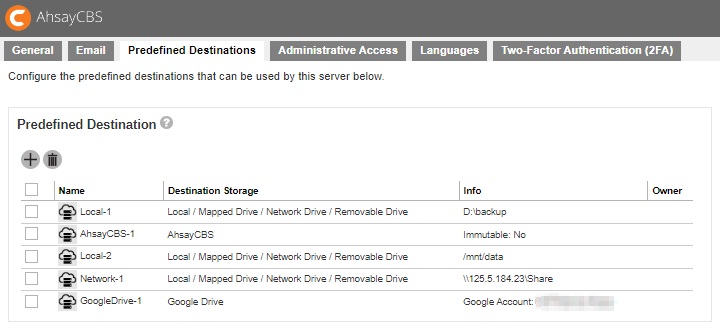
Predefined Destination
The following shows the “Prefedined Destinations” tab under System Settings > Basic.
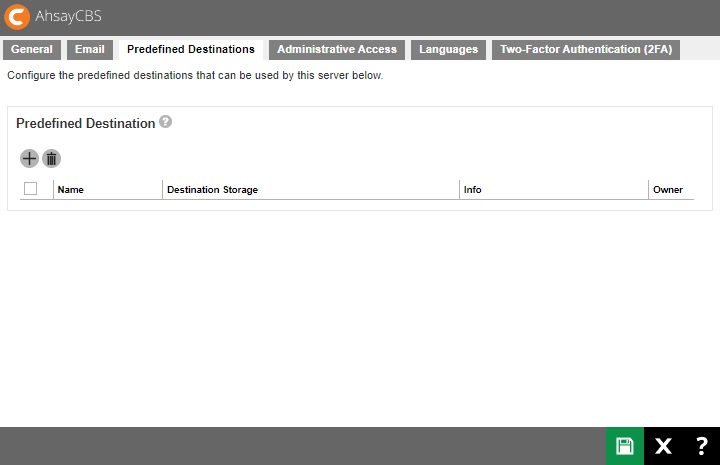
Predefined destination defines a list of local destinations, FTP or cloud storages in which the AhsayCBS server, users and sub admin can use to store backup data. Predefined destination makes it easy to add extra cloud storage for current or new client and also makes the backup destination redundancy in cloud storage to double the stability. Predefined Destination can also be used to customize frequently used backup destination as visible optional destination choice for backup sets.
Predefined destination can also be used to replicate the AhsayCBS database and backup data to cloud destination which ensures single failure of AhsayCBS database will not influence the subsequent backup and restore jobs.
You can set predefined destination on the following destination storage:
- Local / Mapped Drive / Network Drive / Removable Drive
- 阿里云
- CTYun
- Amazon S3
- AWS S3 Compatible Cloud Storage
- Wasabi
- Backblaze
- Google Cloud Storage
- Google Drive
- Microsoft Azure
- OneDrive
- OneDrive for Business
- Rackspace
- OpenStack
- Dropbox
- FTP
- SFTP
- AhsayCBS
- AhsayCBS Receiver
Set up Immutable Predefined Destination
Starting with AhsayCBS v9.7, certain predefined destinations may be configured as immutable destination. Once a destination is setup as immutable, you cannot delete or overwrite backup data saved in the destination.
Here are the destinations that supports immutable storage destination:
- AhsayCBS
- Amazon S3
- AWS S3 Compatible Cloud Storage
- Backblaze
- Google Cloud Storage
- Microsoft Azure
- Wasabi
An “Immutable” checkbox is provided to be able to create an immutable predefined destination. One of the requirements for setting up immutable destination is the system user account must have a device registered for 2FA. Another requirement only for cloud destinations is that the user account must not have delete permission.
The following are the feature of immutable destination:
- Immutable destination is only supported in AhsayCBS v9.7 or above.
- Both Predefined and Standard AhsayCBS destinations may be set up as immutable.
- Predefined AhsayCBS destination may be set up as immutable in the Predefined Destination tab and/or Preempted Values.
- Standard AhsayCBS destination may be set up as immutable only in Preempted Values.
- Predefined cloud destinations may be set up as immutable only in the Predefined Destination tab.
- An “Enable deletion temporarily until” checkbox is provided to allow users to delete or overwrite backup data from the immutable storage.
- Deletion of backup data temporarily in Predefined cloud destination can only be enabled and set up in Preempted Values.
- When deleting backup data in immutable storage, this will only be allowed if the date specified in “Enable deletion temporarily until” is not expired.
- When performing DIC in immutable storage, this will only be allowed if the date specified in “Enable deletion temporarily until” is not expired.
- When performing Space Freeing Up in immutable storage, this will only be allowed if the date specified in “Enable deletion temporarily until” is not expired.
- For backup users who have backup sets that are older than v9.7 and have upgraded to AhsayCBS v9.7, they should be added in the default User Group named “Non-Immutable Destination Group” to ensure that their backup and restore will work properly.
- Immutable storage destination is not supported in Replication.
Here are the behavior of AhsayCBS and cloud destination with the different settings in Predefined Destination and Preempted Values:
| Destination | Predefined Destination | Preempted Value | Behavior |
|---|---|---|---|
| AhsayCBS | AhsayCBS will work as immutable. | ||
| AhsayCBS will work as immutable. | |||
| AhsayCBS will not work as immutable. | |||
| Deletion will be allowed, as long as the date in Predefined is not expired. | |||
| Deletion will be allowed as long as the date is not expired. If set dates are different for Predefined and Preempted, the date in Preempted will be followed. | |||
| Deletion will be allowed as long as the date in Preempted is not expired. | |||
| Deletion will not be allowed. | |||
| Cloud Destination | N/A | Predefined cloud destination will work as immutable. | |
| N/A | Predefined cloud destination will not work as immutable. | ||
| N/A | Deletion will be allowed as long as the date is not expired. | ||
| N/A | Deletion will not be allowed. |
There are two ways to set up an immutable destination, through:
- Predefined Destination tab in System Settings > Basic > Predefined Destination
- Preempted Values in Backup / Restore > Users, Groups & Policies > Policy Group > %Policy_Group_Name% > Preempted Values > Destination > Immutable
Predefined Destination Tab
- Go to System Settings > Basic > Predefined Destination. Click Create to add an immutable predefined destination.
Select AhsayCBS from the "Destination Storage" dropdown box.
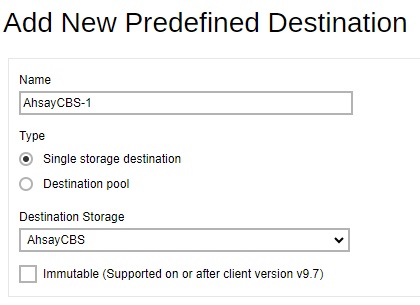
- Enter the name of the backup destination. In our example, the name is AhsayCBS-1.
- Select Single storage destination as the type of predefined destination.
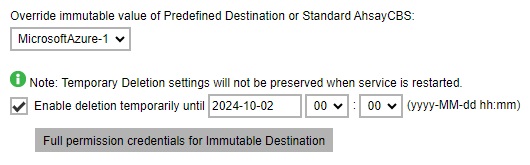
Tick the Immutable checkbox.
There is an option to allow temporarily the deletion or overwriting of backup data from the immutable storage. To allow this, tick the Enable deletion temporarily until checkbox and specify the date.

Click Add to continue.
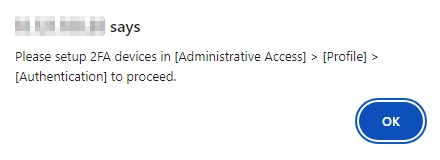
If 2FA is not enabled, this message will be displayed and you cannot proceed to add the immutable predefined destination.
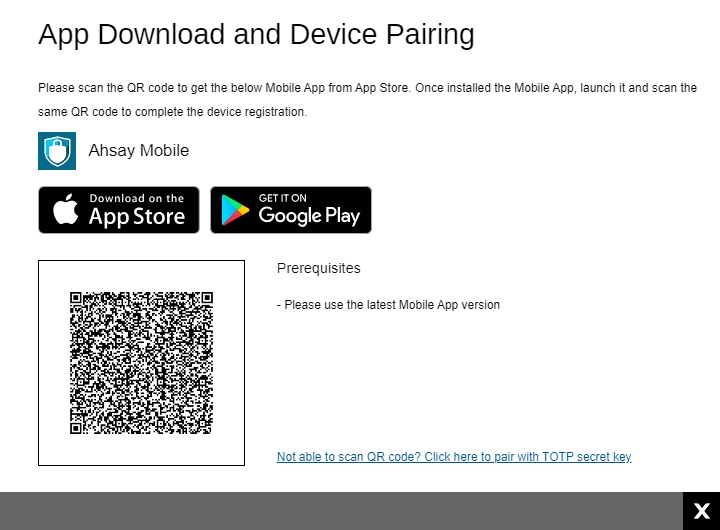
If 2FA is enabled but the system user does not have a device registered, the user will be redirected to the “App Download and Device Pairing” screen instead before the immutable predefined destination can be added.
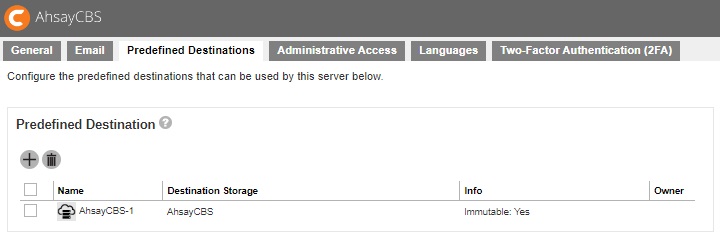
You can see the newly created predefined storage AhsayCBS-1 appears in the “Predefined Destination” page.
- Click Save to save.
Preempted Values
Go to Backup / Restore > Users, Groups & Policies > Policy Group > %Policy_Group_Name% > Preempted Values > Destination > Immutable to set the preempted value.
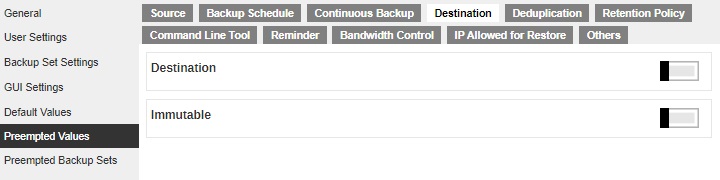
Slide the switch to the right to enable “Immutable”. Click the Create button.

Enter the name for the setting and select the destination, in this case we will select the Standard AhsayCBS which is AhsayCBS.
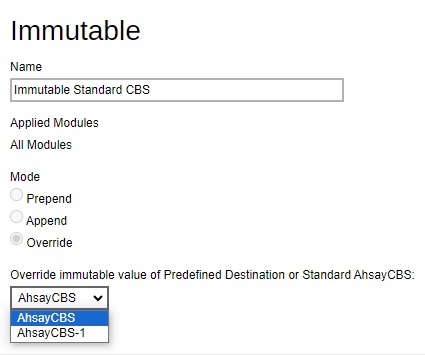
Tick the Immutable checkbox. If you want to enable deletion temporarily, tick the Enable deletion temporarily until checkbox and specify the date and time.

- Click Add then Save to save.
The “Immutable” checkbox will only be visible if the selected destination is an AhsayCBS Predefined or Standard CBS destination.
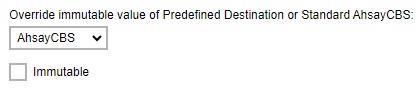
If a cloud Predefined Destination is selected instead, it will only display the “Enable deletion temporarily until” checkbox.
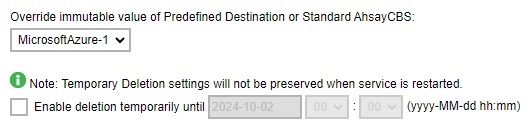
Once it is ticked, a “Full permission credentials for Immutable Destination” button will be displayed where the user should provide the credentials for the cloud storage that has delete permission to enable it to delete backup data, perform space free up and data integrity check.
Set up Predefined Destination on Local / Mapped Drive / Network Drive / Removable Drive
AhsayCBS allows setting a backup destination on local hard drive, mapped drive, network drive and removable drive. The setup method is similar for the different drives. In the following example, we will show you how to set up a predefined destination for Network Drive. The steps for other destination storages are similar.
Click Create to add a predefined destination.
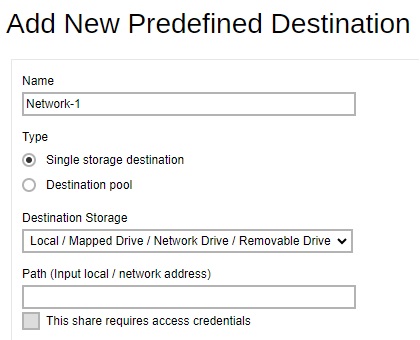
- Select Local / Mapped Drive / Network Drive / Removable Drive from the “Destination Storage” dropdown box.
- Enter the name of the backup destination. In our example, the name is Network-1.
- Select Single storage destination as the type of predefined destination.
Enter the path of the drive.
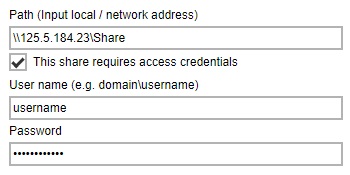
- The “This share requires access credentials” check box will be enabled once a network address is detected. Check the box if access credentials are required to connect to the network drive. Then enter the username and password.
- Click Add to continue.
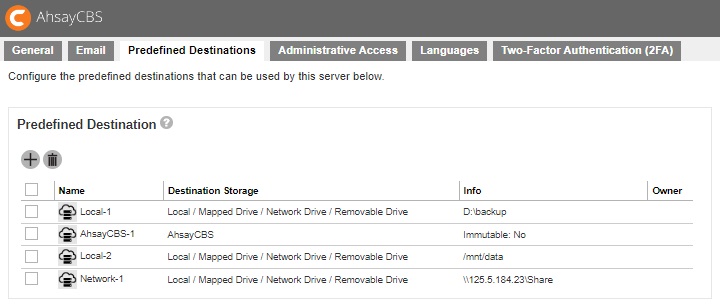
You can see the newly created predefined storage Network-1 appears under the “Predefined Destination” page.
- Click Save to save.
Set up Predefined Destination on Cloud Storage
AhsayCBS allows setting a backup destination on some common cloud storage, local hard disk and FTP servers. The setup method is similar on different cloud storage. In the following example, we will show you how to set up a predefined destination for Google Drive. The steps for other destination storages are similar.
Click Create to add a predefined destination.
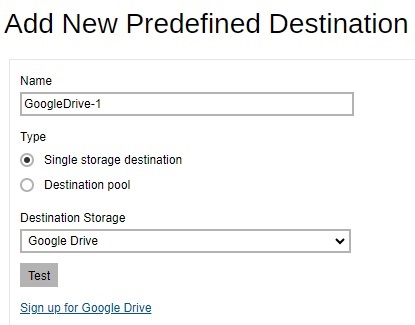
- Select Google Drive from the “Destination Storage” dropdown box.
- Enter the name of the backup destination. In our example, the name is GoogleDrive-1.
- Select Single storage destination as the type of predefined destination.
- If you do not have Google Drive, please click the link Sign up for Google Drive to create a Google account.
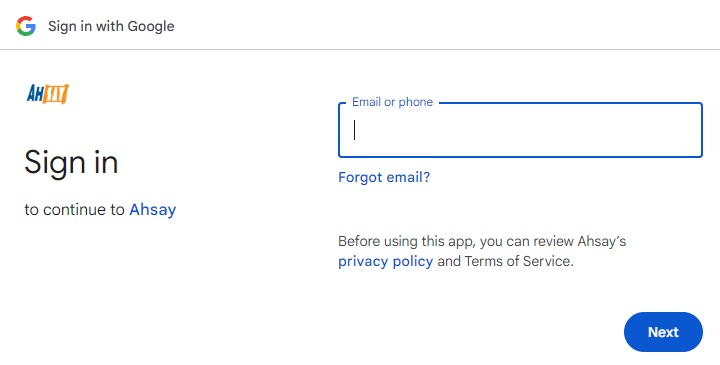
- Click Test to continue. AhsayCBS will forward to Google Drive page.
Enter your login credential for Google Drive.
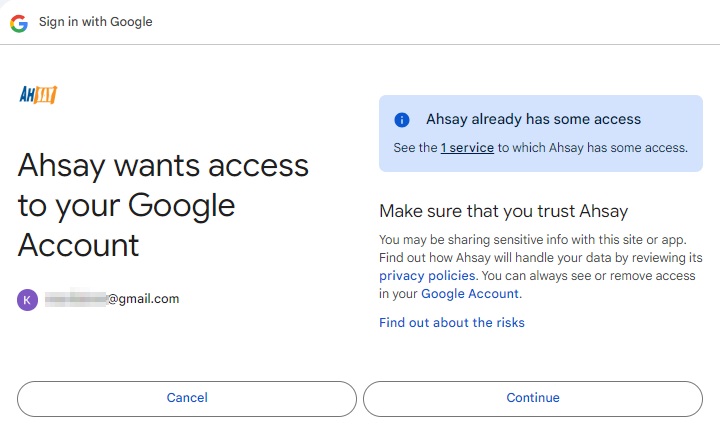
A browser pops up and Google asks for your permission to access the storage. Click Allow.
On the browser, a code is displayed. Copy this code, then switch to AhsayCBS to paste the code.
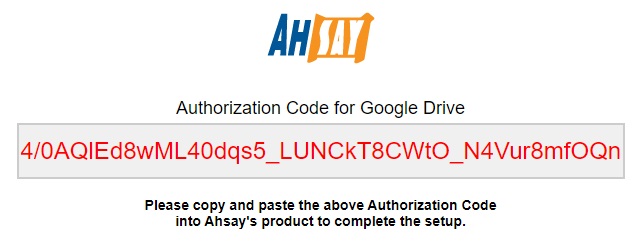
Paste the code to the “Authorization code” field on the “Add New Predefined Destination” page in AhsayCBS. Click Add to continue.

You can see the newly created predefined storage GoogleDrive-1 appears under the Predefined Destination page.
- Click Save to save.
For more examples on setting up other cloud storage, refer to this article: Set Up Cloud Storage.
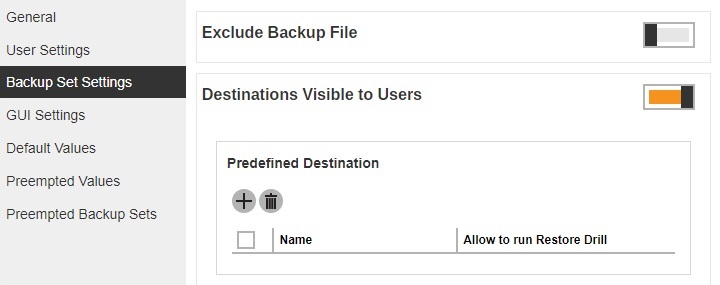
You need to make the destination you created visible in the list of predefined destination before this can be made available when creating a backup set for a user. You can do this by going to Backup / RestoreUsers, Groups & Policies > Policy Group tab. Click Default settings and go to Backup Set Settings. In “Destinations Visible to Users”, click the Create button under “Predefined Destination”.
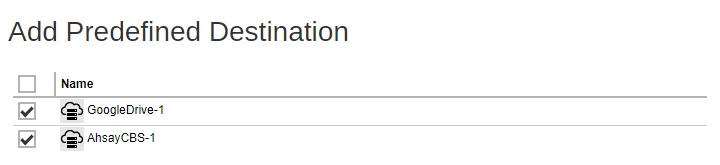
Check the box beside the predefined destination you just created. Click Add to continue.
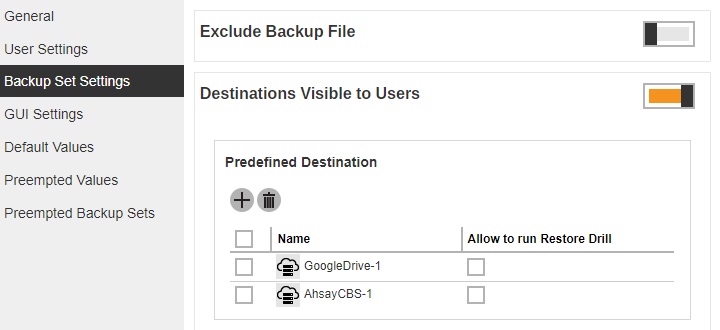
Click Save to save the settings.
Administrative Access
The following shows the “Administrative Access” tab under System Settings > Basic.
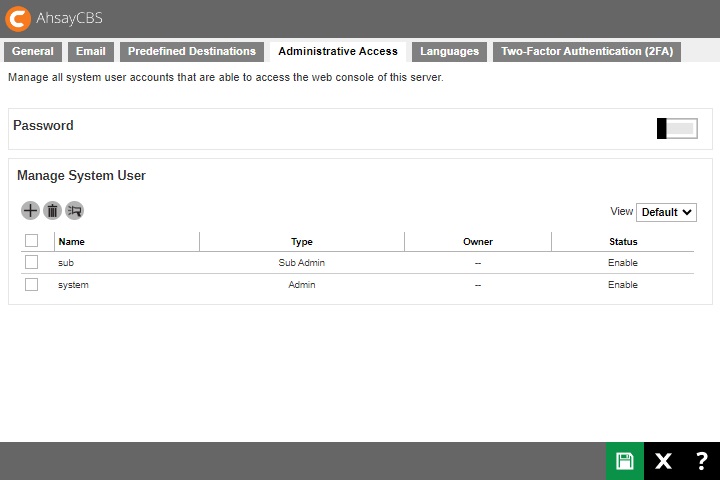
You can set the system password complexity and manage your system user accounts on this page.
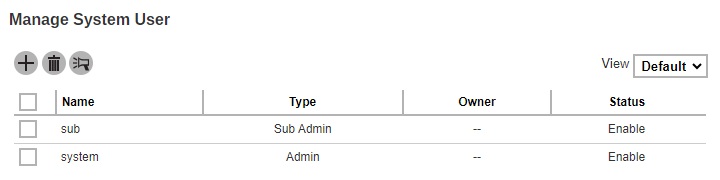
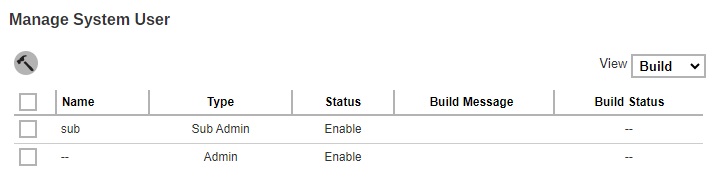
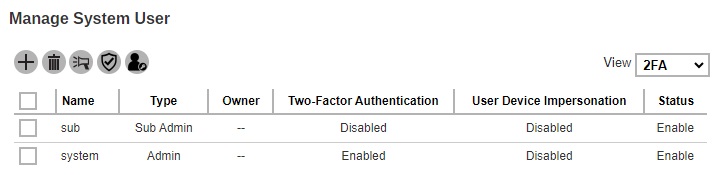
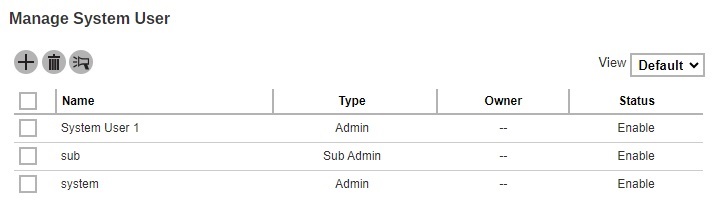
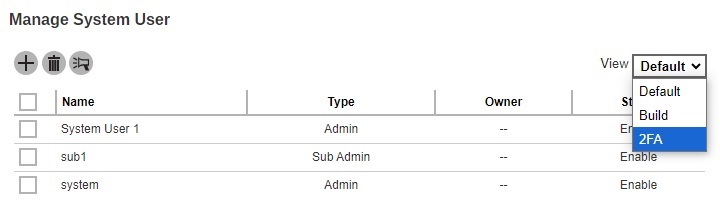
There will be three views available in this tab, Default, Build and 2FA.
This is the Default view where it shows the “Name”, “Type”, “Owner” and “Status”.
This is the Build view where it shows the “Name”, “Type”, “Status”, “Build Message” and “Build Status”. The Build Branded Client button will only be displayed in this view.
Partners with multiple Sub Admins each with different branding can build AhsayOBM/AhsayACB installers by selecting the required Sub Admin(s) or all Sub Admins in one go.
While the 2FA view will only be available if Two-Factor Authentication has been enabled and setup in System Settings > Basic > Two-Factor Authentication (2FA) tab. This view shows the “Name”, “Type”, “Owner”, “Two-Factor Authentication”, “User Device Impersonation” and “Status”. The Enable / Disable Two-Factor Authentication and Enable / Disable User Device Impersonation buttons will only be displayed in this view.
- Name - name of the system user.
- Type - role type of system user. There are five types: Admin, Read-only Admin, API User, Read-only API User and Sub Admin.
- Owner - ownership of the system user.
- Status - account status of the system user. There are three statuses: Enable, Suspended and Locked.
- Build Message - the progress of building the branded installers.
- Build Status - status of building the branded installers. There are two statuses: building and finished.
- Two-Factor Authentication - 2FA status of the system user. There are three statuses: Enabled, Disabled and Enforced.
- User Device Impersonation - user device impersonation status of the system user. There are two statuses: Enabled and Disabled.
Password
System users upon initial login will be required to change their password for enhanced security. Further access will not be allowed until the “system” user password has been changed. To set up the password complexity that the user has to follow, you can configure this in System Settings > Basic > Administrative Access.
Here are the following conditions where the system user needs to change the password:
- Logs in as default system user for the first time.
- Password of default system user was changed back to “system”. Refer to this article for more information on Recover AhsayCBS System Account Password.
- System user password has expired.
Set Up Password Complexity Requirement of System User
Switch on Password, by default it is switched off.
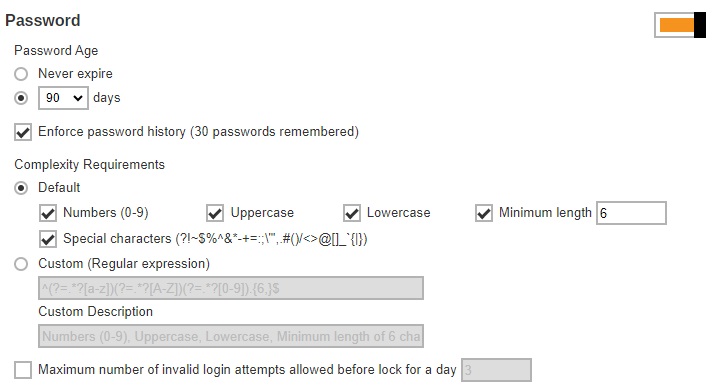
- Select the “Password Age”, this defines the period of time when the login password of a system user expires. By default, it is set to expire every 90 days. Once it expires, system user is required to change their password before they can continue using AhsayCBS.
- Also configure “Enforce password history”. By default it is set to remember the last 30 login passwords used by each system user which they cannot use again as a new password.
- Select the “Complexity Requirements”. There are 2 choices:
- Default – this is selected by default. You can further customize this by specifying here what type of characters will be accepted for the new password. If the password will require numbers, uppercase letters, lowercase letters, the minimum length of the password and special characters that can be used.
- Custom – you can specify the regular expression and/or custom description that can be used for the new password.
- Click Save once done setting the password complexity requirement.
Manage System User
On daily operation, you may need to assign your operators or administrators to work on your AhsayCBS. You may have programmers to write API for your applications with the AhsayCBS. You may also want to hire some resellers so that you can expand your business. You will need to setup different system users with different role/privileges to work on AhsayCBS.
The following are the operations you can do with your system users:
- Add a new system user
- Configure settings of a system user
- Build branded installers for system user
- Export/Import system user
- Delete a system user
- Send a broadcast to system user
- Enable two-factor authentication of system user
- Enable user device impersonation of system user
ADD A NEW SYSTEM USER
Click Create under “Manage System User” to add a new system user.
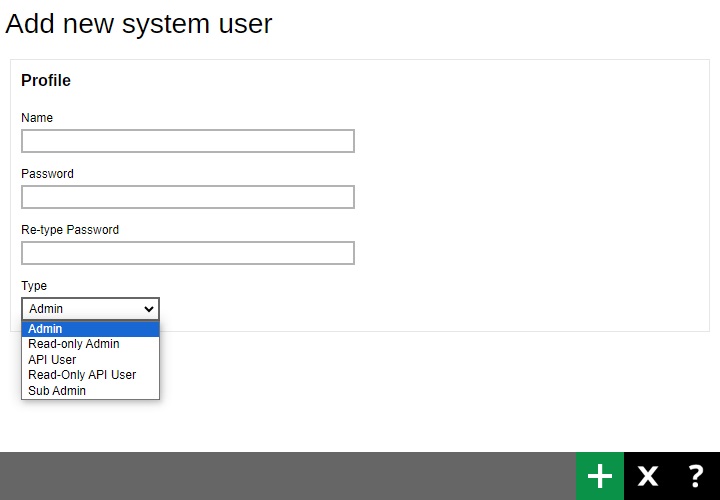
- Enter the “Name” of the system user.
- Enter the “Password” of the system user. Enter the same password again in the “Re-type Password” field.
Select the system user type from the “Type” dropdown box. There are five types of system users:
Admin
The Admin role has the same privilege as the built-in system account. For example, you can assign this account for your administrator(s) to configure or administer the AhsayCBS for you.
AhsayCBS allow Admin role user account to independently disable or enable Sub Admin user account access right to the branding pages.
Read-only Admin
The Read-only Admin role shares similar accessibility as its creator with Admin role, except with read permission only.
API User
The API role has full access right to the system; it has the same privilege as the built-in system account. This account is created for external application developers who can use this for API login authentication purposes.
Read-only API User
The Read-only API user role shares similar accessibility as the API role except with read permission only. This account is created for users who need to collect reports via API.
Sub Admin
The Sub Admin (Reseller) role has the full access right:
- to create AhsayOBM/AhsayACB backup users.
- to manage the backup and restore jobs or activities of AhsayOBM/AhsayACB backup users it has created.
- to manage the backup and restore jobs or activities of AhsayOBM/AhsayACB backup users it has created.
For detailed steps on how to create the Sub Admin (Reseller) user please refer to Create a Sub Admin (Reseller) user discussion.
The following table provides a summary of the permissions of different system users in AhsayCBS.
Permission Admin Read-only Admin API User Read-only API User Sub Admin Read permission ✔ ✔ ✔* ✔ ✔ Write permission ✔ ✖ ✔* ✖ ✔ Log in AhsayCBS ✔ ✔ ✖ ✖ ✔ Create new system users ✔ ✖ ✔* ✖ ✔ Profile page ✔ ✔ ✖ ✖ ✔ Backup User Settings page ✔ ✖ ✖ ✖ ✔** Rebrand Web Console page ✔ ✖ ✖ ✖ ✔ Rebrand Client page ✔ ✖ ✖ ✖ ✔ Export/Import profile ✔ ✖ ✖ ✖ ✔ * API role has full access to the AhsayCBS which is similar as the Admin role through the API call, except log in to the AhsayCBS interface.
** Sub Admin role has full access to the settings (except the Backup User Settings page) and users under this sub admin user only.
Click Add to add. The newly-created system user, System User 1, appears on the page.
- Click Save to save.
Configure Settings of a System User
You can modify the setting of your system user by clicking the system user’s name.
You will see 4 tabs, which will be described below:
- Profile
- Backup User Settings
- Rebrand Web Console
- Rebrand Clients
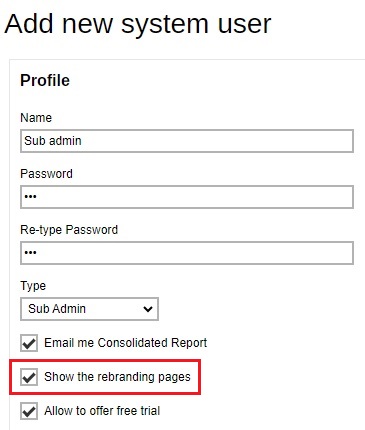
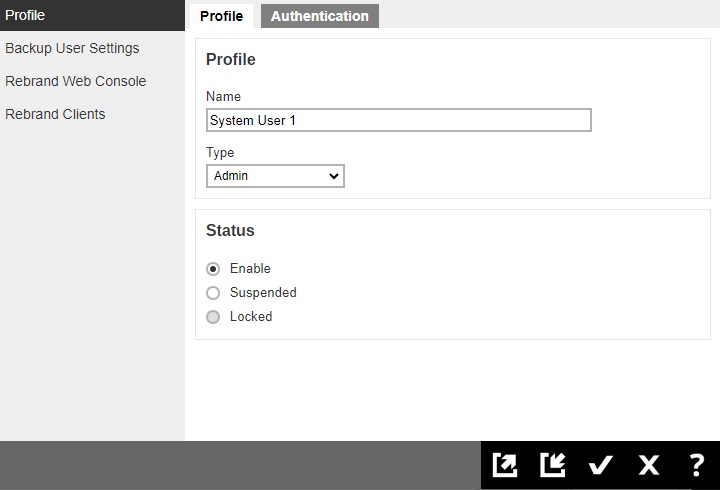
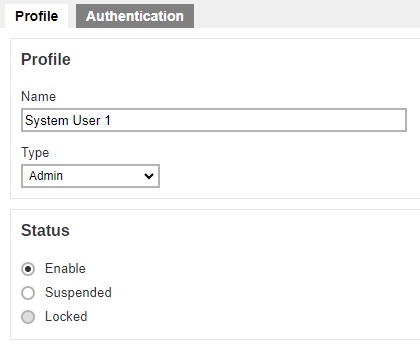
Profile
The Profile page is available to all Admin, Read-Only Admin, and Sub Admin users after they log in.
In the “Profile” page of our example, “System User 1”, the type of user is Admin. You can change the "Name", "Type" and "Status" of the user in this page.
The Profile page contains more settings for Sub Admin users. For more details on this please refer to Configure a Sub Admin (Reseller) user.
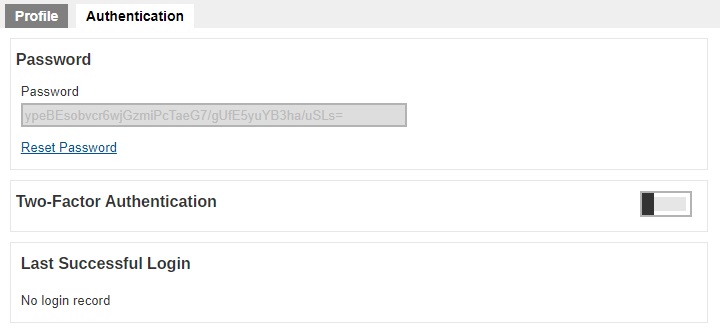
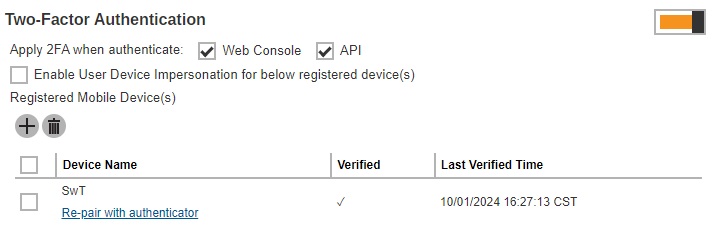
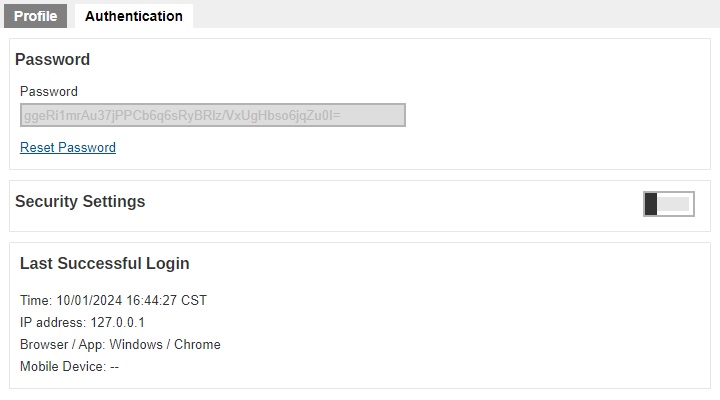
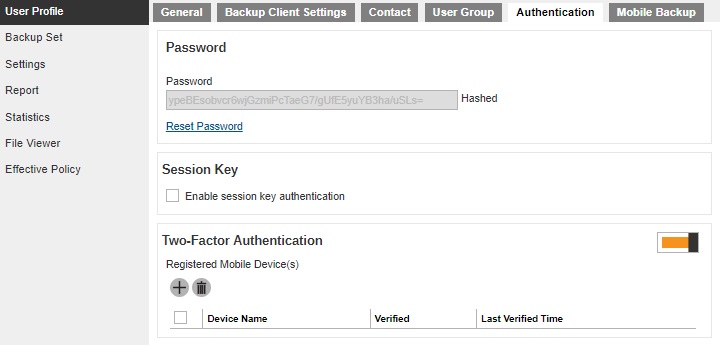
The Authentication page is available to all types of users. Password of system users may be reset here, and details of last successful login may be viewed here. However, Two-Factor Authentication of system users can be set up here only for Admin, Sub Admin and Read-only Admin users. By default it is not enabled, to enable it slide the switch to the right.
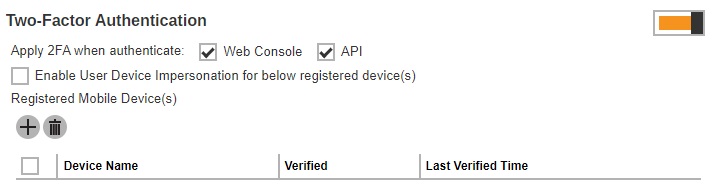
Both checkboxes for “Apply 2FA when authenticate” are enabled by default.
- Web Console – if ticked, this will require the system user to use 2FA upon log in to AhsayCBS. If unticked, the system user can log in to AhsayCBS without 2FA even if the “Two-Factor Authentication” is enabled.
- API – this will require the user to provide a passcode to authenticate API calls.
The User Device Impersonation will allow system users to login to the backup user account that they manage. This may be enabled by ticking the Enable User Device Impersonation for below registered device(s) checkbox. By default it is not enabled.
Once this is enabled, if the backup user has their Authentication enabled, these are the behaviors:
- Ahsay Mobile – both system user and backup user will simultaneously be notified. Everytime a backup user tries to login, the system user will also get the authentication request if Ahsay Mobile is used. The authentication request that will be received will not indicate which backup user is trying to login.
- Third-Party authenticator – a screen asking for the one-time passcode will be displayed. Use the passcode generated by the authenticator app to login.
- Both types – if both Ahsay Mobile and third-party authenticator are configured, an authentication request will be sent (default behavior) to Ahsay Mobile.
Only enable this feature if needed to avoid getting unnecessary authentication requests when backup users are trying to login using Ahsay Mobile.
Below is a table showing system users that can be enabled with this feature:
| System User | Feature Available |
|---|---|
| Admin | ✔ |
| Read-only Admin | ✔ |
| Sub Admin | ✔ |
| Read-only Sub Admin | ✔ |
| User Management Sub Admin | ✔ |
| API User | ✖ |
| Read-only API User | ✖ |
If the User Device Impersonation of a system user is enabled and there is a mobile device registered for that system user, then 2FA will be required to login. The backup user will be required to register a device for 2FA before the system user can login.
2FA will not be required if there is no registered mobile device for both the system user and end user even if the User Device Impersonation is enabled.
The feature “Re-pair with authenticator” will only be available if Ahsay Mobile app is used for 2FA. If the registered device used for 2FA was damaged, lost or missing; the backup content of the device can be migrated to the new device by using AhsayOBM/AhsayACB. For instructions on how to do this please refer to the Ahsay Mobile User Guide for Android and iOS. Once the migration is finished, the new device must be re-paired with the Ahsay Mobile app to enable log in using push notification and disable the one in the original device.
Reset the Password
- Click Reset Password to reset the password.
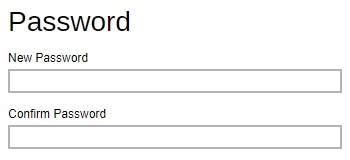
Enter the new password and confirm the password.
- Click Save to save.
Add a Device
Click Create to add a device.
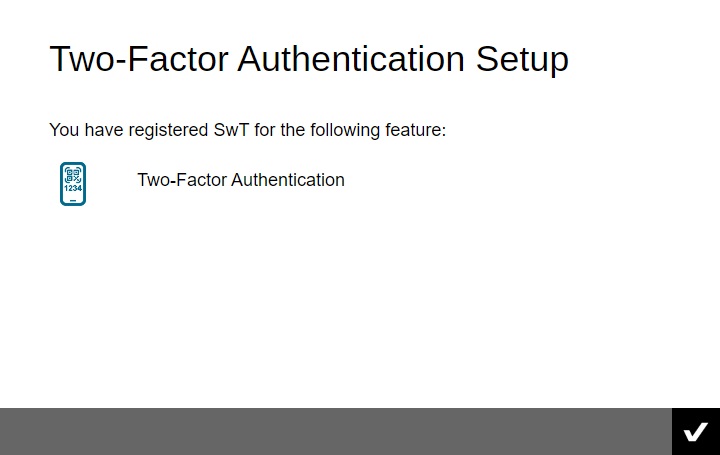
The screen that will be displayed here will depend on the Authenticator App selected in the Mobile Authentication settings. The authenticator app that will be used as an example is the Ahsay Mobile app. Download the Ahsay Mobile app then scan the QR code to pair the device.
When pairing is completed, click OK then Save to save the changes.
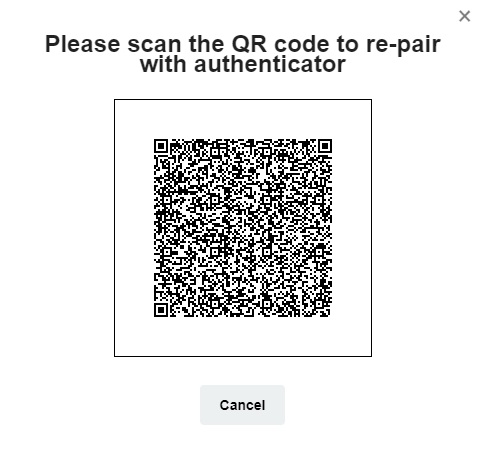
Re-pair a device with Ahsay Mobile
Click Re-pair with authenticator link.
Scan the QR code using authenticator app. Once pairing is finished system user will be added again in the authenticator app.
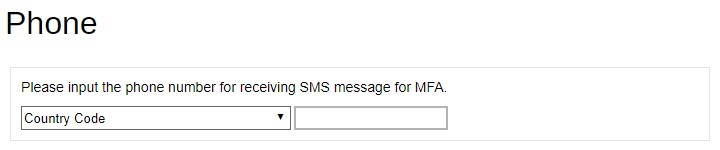
For old system user accounts with Twilio Credentials Verification enabled, this will be the screen displayed. By default the Security Settings is not enabled, to switch it on slide the switch to the right.
Click Create to add a phone number. Select the country code and enter the phone number of the user where the passcode will be sent and click OK.
After doing the modifications, click OK then Save to save the changes.
Backup User Settings
The Backup User Settings tab is available to admin and sub admin users after they log in, although sub admin users will have read-only access.

For admin users, only the Bandwidth Control page is available. The admin can limit the maximum transfer rate that will be used during backup and restore jobs.
- To limit the maximum transfer rate during backup, click the box in front of Max transfer rate for backup. Enter the value and select the unit of measurement either Kbit/s, Mbit/s or Gbit/s.
- To limit the maximum transfer rate during restore, click the box in front of Max transfer rate for restore. Enter the value and select the unit of measurement either Kbit/s, Mbit/s or Gbit/s.
There are more pages available for sub admin users, for more details about this please refer to Configure a Sub Admin (Reseller) user.
Rebrand Web Console
The Rebrand Web Console tab is available to admin and sub admin users after they log in. Both admin and sub admin user can use this feature to rebrand the images on the AhsayCBS web console when accessed by the sub admins hostname.
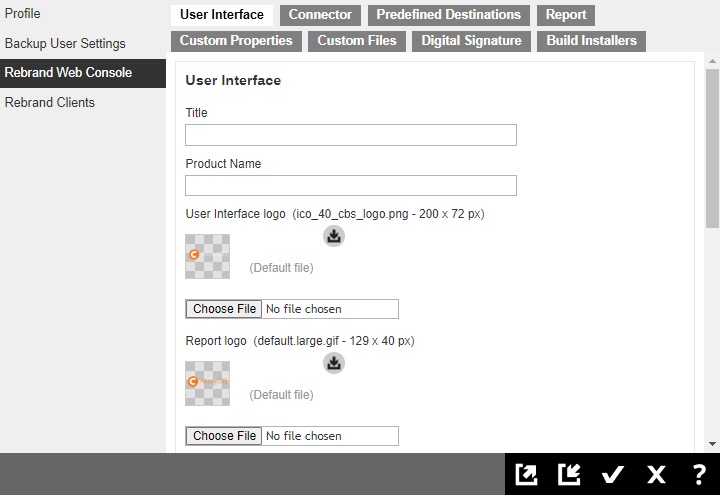
For more details on how to do the branding for AhsayCBS, please refer to the Branding section.
Rebrand Clients
The Rebrand Clients tab is available to admin and sub admin users after they log in. Both admin and sub admin user can use this feature to rebrand the AhsayOBM and AhsayACB.
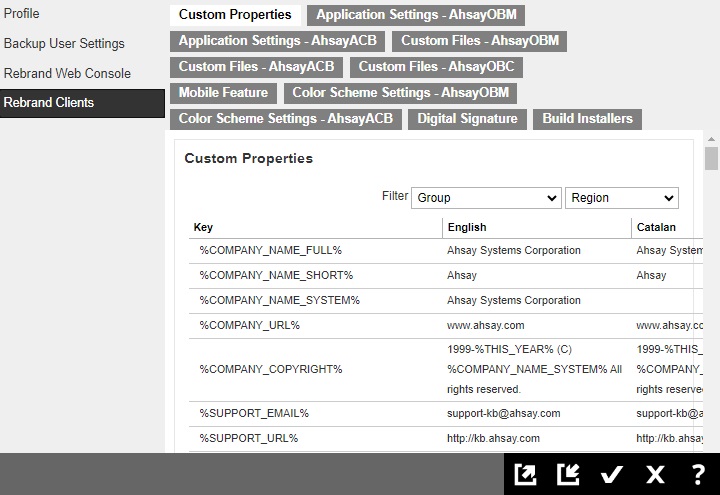
For more details on how to do the branding for AhsayOBM/AhsayACB, please refer to the Branding section.
If you want to build branded installers at one go, please refer to the Branding section for instructions on how to do this.
Export/Import System User
The export function can export the branded images, and branded properties that is set in the Rebrand Web Console and Rebrand Clients into a JSON format file. If you need to apply the branding to other Sub Admin users, you may import the branded JSON file back to the user.
The Import and Export buttons are available to Admin and Sub Admin users only. They are found at the bottom right corner of the screen.
Import button

Export button

Delete a System User
Check the box in front of the system user to be deleted.
- Click Delete, in the message prompt that will appear click OK to delete the system user.
- Click Save to save.
Send Broadcast to System User
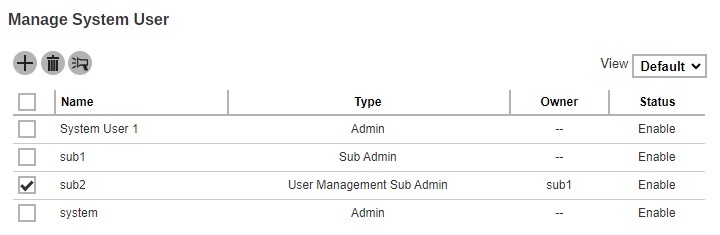
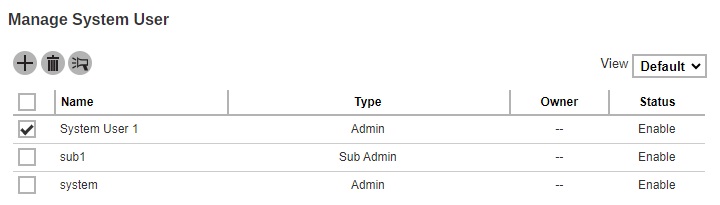
Select the system user(s) to whom you need to send the broadcast message. In our example, System User 1 is selected.
Click the Broadcast button.
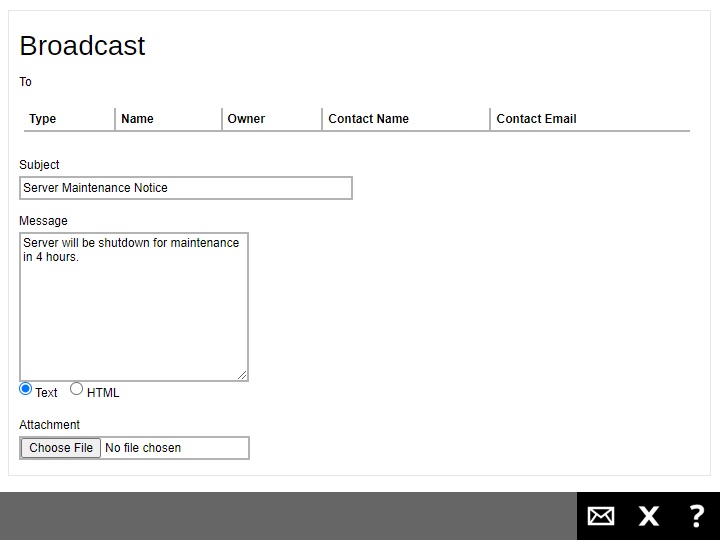
Enter the “Subject” and “Message” for the broadcast message.
- You can select Text or HTML for the message body.
- If you want to include an attachment, click Choose File and browse to the desired location to select the file you want.
Click the Send button to send the broadcast message. Click Close to exit.
Enable Two-Factor Authentication of System User
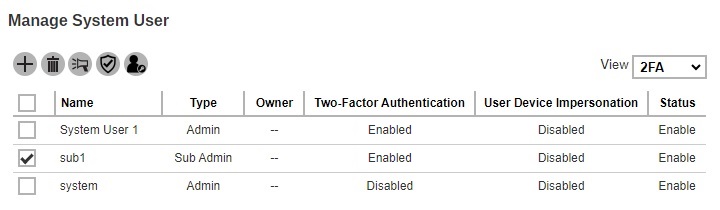
Select 2FA in the “View” filter. This option is only available if Two-Factor Authentication has been enabled and setup in System Settings > Basic > Two-Factor Authentication (2FA) tab.
Select the system user you want to enable 2FA.
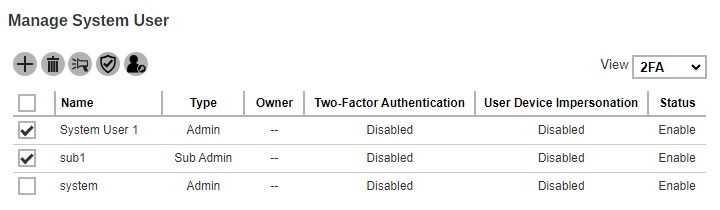
Click the Enable / Disable Two-Factor Authentication button.
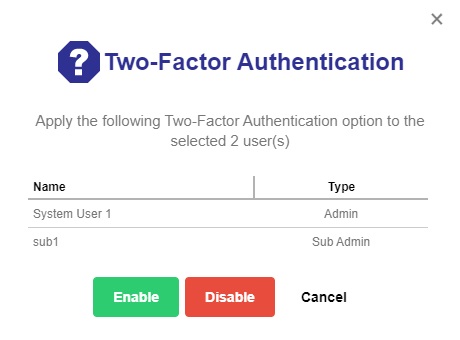
- Click the Enable button then the Save button to save the settings. Click Cancel to exit.
Enable User Device Impersonation of System User
Select 2FA in the “View” filter. This option is only available if Two-Factor Authentication has been enabled and setup in System Settings > Basic > Two-Factor Authentication (2FA) tab.
Select the system user you want to enable the User Device Impersonation.
Click the Enable / Disable User Device Impersonation button.
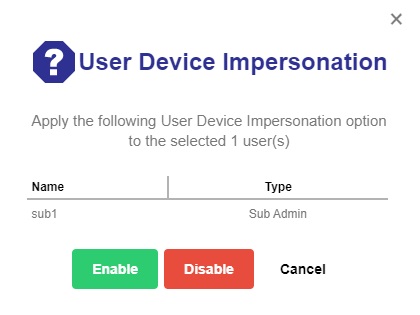
- Click the Enable button then the Save button to save the settings. Click Cancel to exit.
Languages
The following shows the “Languages” tab under System Settings > Basic. You can select the language(s) available to your users.
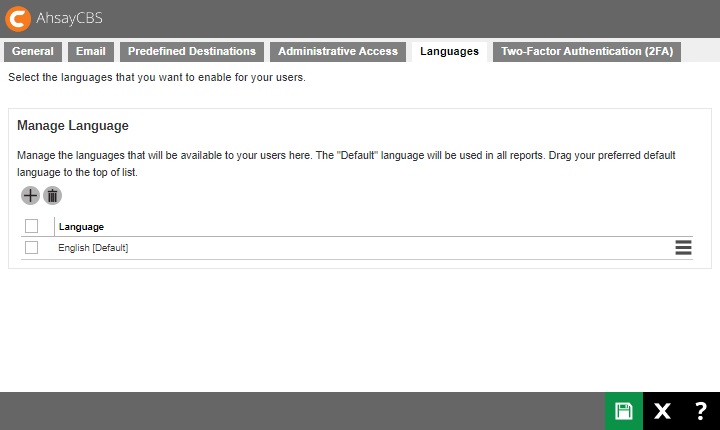
To select the language you want to make available to your users, simply click the Create button then tick the box next to the language and click OK. Click the Save button once done.
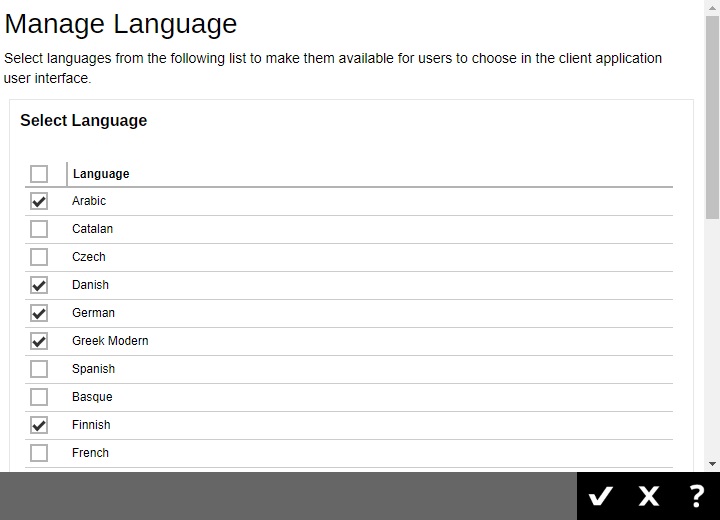
The available languages are:
- Arabic
- Basque
- Catalan
- Chinese (Simplified)
- Chinese (Traditional)
- Czech
- Danish
- Dutch
- English (default)
- Finnish
- French
- German
- Greek Modern
- Hebrew
- Hungarian
- Indonesian
- Italian
- Japanese
- Korean
- Lithuanian
- Norwegian
- Polish
- Portuguese (Brazil)
- Portuguese (Portugal)
- Russian
- Slovenian
- Spanish
- Swedish
- Thai (Western digits)
- Turkish
- Vietnamese
To change the default language settings for the AhsayCBS web console, simply drag your preferred default language to the top of the list.
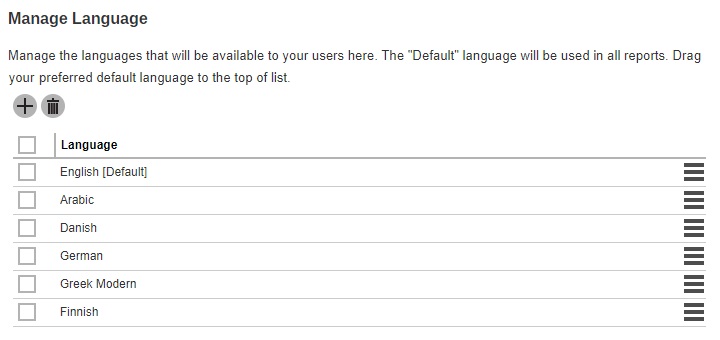
For newly installed AhsayCBS v9, the only language available is English. You need to manually add the languages that will be made available to your users. See instructions on how to add languages above.
Two-Factor Authentication
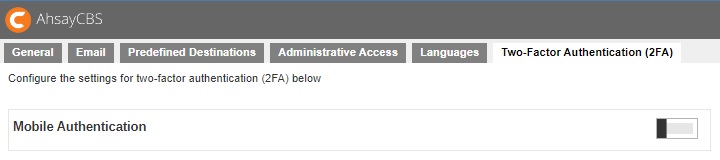
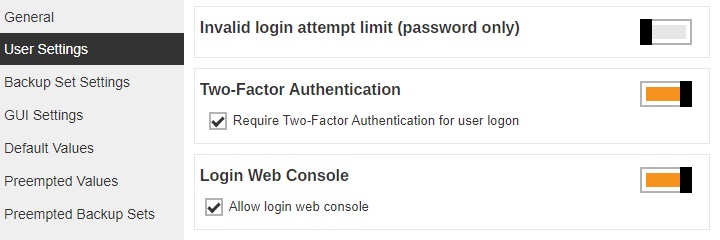
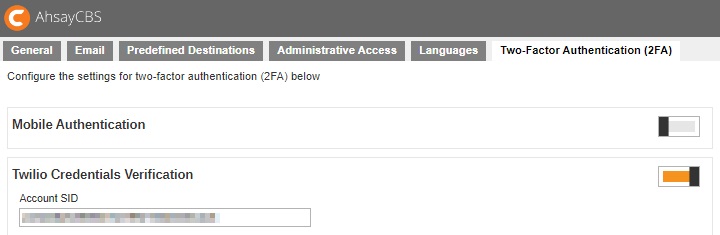
The following shows the “Two-Factor Authentication (2FA)” tab under System Settings > Basic.
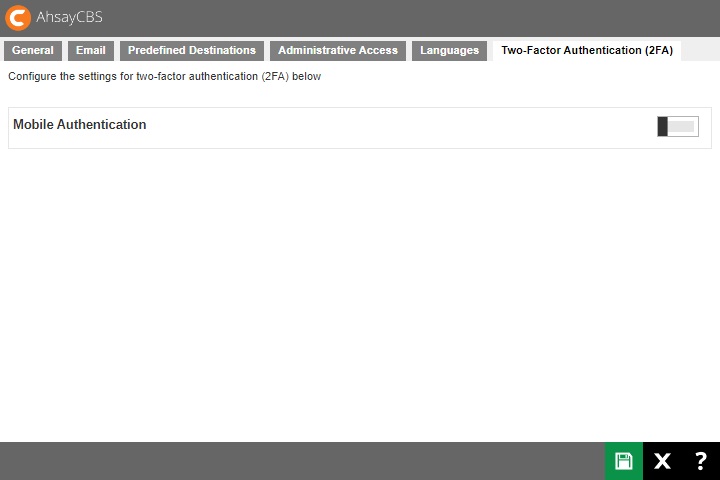
For newly installed AhsayCBS v9.1.0.0 and onwards, the Two-Factor Authentication that will be available will be the Mobile Authentication.
However for upgraded AhsayCBS with Twilio Credentials Verification setup, there will be two options available for two-factor authentication which are the following:
Mobile Authentication
Mobile Authentication feature is introduced to provide two-factor authentication during log in for added security. During log in, aside from providing the normal Ahsay password, an additional step will need to be completed to finish the log in steps.
Users have two options once this feature is enabled to complete the log in:
- Accept the notification request sent to the Ahsay Mobile app or use a time-based one-time password code.
- Provide the time-based one-time password code generated by a third-party authenticator app. Examples of these apps are Google Authenticator, Microsoft Authenticator, LastPass Authenticator etc.
Twilio Credentials Verification
This option will only be available to legacy clients who are currently using Twilio Credentials Verification on AhsayCBS v8.3.0.30 to 8.3.6.x and have upgraded to AhsayCBS v9.1.0.0 or above. Users of Twilio Credentials Verification may continue using this on AhsayCBS v9.1.0.0 or above. After the upgrade, settings of Twilio Credentials Verification will be automatically migrated.
As Twilio Credentials Verification has been replaced with Mobile Authentication, for users who have not setup Twilio Credentials Verification in pre-AhsayCBS v9.1.0.0 versions, this option will not be available once you upgrade to AhsayCBS v9.1.0.0 or above.
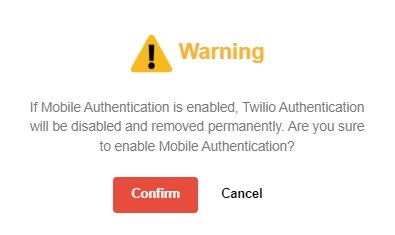
For legacy Twilio clients, only one of the options for two-factor authentication may be enabled. It is not possible to enable both Mobile Authentication and Twilio Credentials Verification at the same time. Either continue using Twilio Credentials Verification or switch to Mobile Authentication.
Once the two-factor authentication switch to Mobile Authentication is confirmed, the Twilio Credentials Verification will be permanently deleted from AhsayCBS and you will no longer be able to re-enable this feature.
If the “Require Two-Factor Authentication for user logon” is enabled, on the next log in on all AhayOBM/AhsayACB v9.1.0.0 or above clients or AhsayCBS web console, the user will be required to register a mobile device for the new Mobile Authentication 2FA, otherwise they will not be allowed to proceed with the log in.
The system administrator can select which authenticator app the backup users must use to log in with 2FA. Here are the differences between Ahsay Mobile and third-party authenticator app:
| Ahsay Mobile | Third party authenticator app |
|---|---|
| Features | |
| Can be used for 2FA. | Can only be used for 2FA. |
| Can be used for mobile backup. | |
| Requirements | |
| AhsayCBS v9.1.0.0 or onwards must be installed. | |
| Must be registered with AhsayOBM and AhsayACB. AhsayOBM and AhsayACB must be connected to the internet. | |
| The mobile device must have a functioning camera for scanning of QR code to register 2FA. | |
| A mobile device with the latest version of Ahsay Mobile installed is available for 2FA. | A mobile device with a third-party authenticator app installed is available for 2FA. |
Ahsay Mobile must be installed on a supported Android or iOS mobile device.
| A mobile device with a third-party authenticator app installed is available for 2FA. |
| The mobile device must have a valid mobile service and be able to receive SMS notifications. | |
| To use 2FA with https protocol, a valid SSL certificate from a trusted CA must be installed on AhsayCBS. Otherwise, you will have to use http instead which means all AhsayOBM/AhsayACB users with 2FA enabled will need to connect using http as well. | |
| The firewall on the AhsayCBS machine must be configured to allow outbound connections to pns.ahsay.com via port 80 or 443. Failure to do so will prevent you from logging in to AhsayCBS, AhsayOBM and AhsayACB using Push Notification feature. | |
| To use push notification for 2FA, the mobile device must have an internet connection. | |
| Ensure that Ahsay Mobile is connected to the same local WIFI network as the AhsayOBM/AhsayACB machine. Failure to do so will prevent Ahsay Mobile from performing backup/restore. | |
| Ensure to allow Notification on Ahsay Mobile for your mobile device. | |
| Limitations | |
| 2FA will not work in AhsayOBM and AhsayACB earlier than v8.5.0.0. | |
| For Replication, both sending and receiving are not covered. | |
| For Redirector, both hosting and joining are not covered. | |
| Not supported in AhsayOBR. | |
See table below showing supported system users, backup users and operating systems for 2FA:
| Supported Applications / Modules | |
|---|---|
| AhsayCBS | ✔ |
| - Replication (Accepting Data and Sending Data) | ✖ |
| - Redirection (Joining Redirectors and Hosting a Redirector) | ✖ |
| AhsayOBM | ✔ |
| AhsayACB | ✔ |
| Supported System Users | |
|---|---|
| Admin | ✔ |
| Sub-Admin | ✔ |
| Read-only Admin | ✔ |
| API User | ✔ |
| Read-only API User | ✔ |
| Supported Backup Users | |
|---|---|
| AhsayOBM / AhsayACB User (Paid) | ✔ |
| AhsayOBM / AhsayACB User (Trial) | ✔ |
| Supported Operating System | |
|---|---|
| Windows | ✔ |
| Mac | ✔ |
| Linux GUI | ✔ |
| Linux CLI | ✔ |
| FreeBSD CLI | ✔ |
| Synology DSM | ✔ |
| QNAP QTS | ✔ |
Set up Mobile Authentication
Switching on Mobile Authentication two-factor authentication support for AhsayCBS involves:
1st: Enabling Mobile Authentication in System Settings > Basic > Two-Factor Authentication (2FA)
2nd: Enabling Two-Factor Authentication of AhsayOBM/AhsayACB user accounts
Enable Mobile Authentication in AhsayCBS
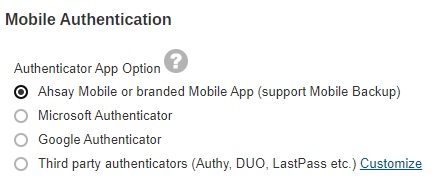
There are two setup options for Mobile Authentication in AhsayCBS v9.1.0.0 and onwards:
- Set up using Ahsay Mobile as authenticator app
- Set up using Microsoft Authenticator, Google Authenticator or other third-party authenticator app
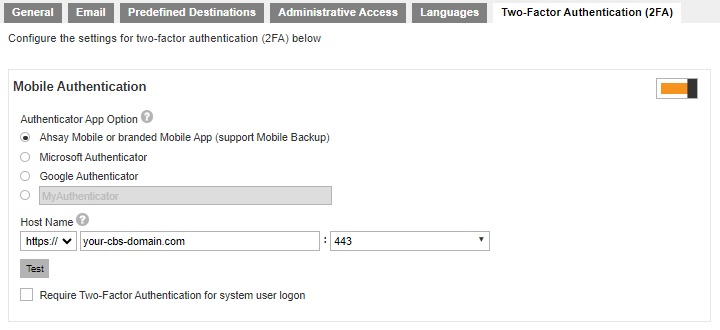
Set up Mobile Authentication Using Ahsay Mobile
Switch on “Mobile Authentication”, by default it is switched off.
The following pop up message appears. Click OK to continue.
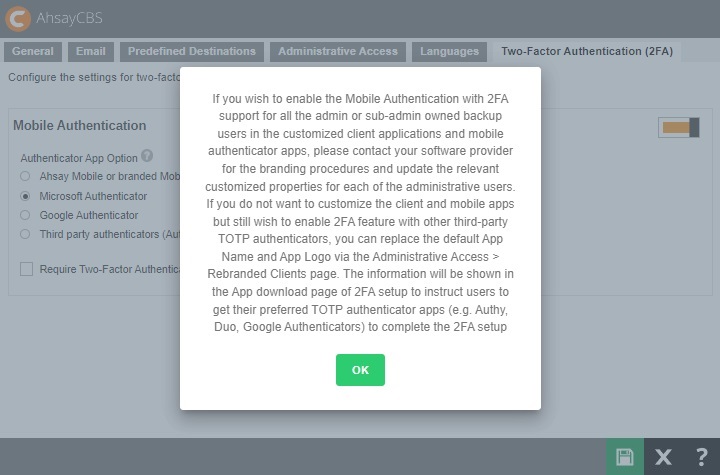 This pop up message will only appear if branded settings have been saved before enabling Mobile Authentication.
Select the Authenticator App to be used for 2FA, in this case select Ahsay Mobile or branded Mobile App.
Register AhsayCBS Host Name details for 2FA:
- Select the type of protocol, whether http or https.
Enter the Host Name or external IP address of your AhsayCBS server.
The host name must be a FQDN (Fully Qualified Domain Name) which consists of the host name and domain name or an external IP address.Select the port used by AhsayCBS, for example 80 for http or 443 for https.
Example: https://your-cbs-domain.com

To use Two-Factor Authentication with https protocol, a valid SSL certificate from a trusted CA must be installed on AhsayCBS. Otherwise, you will have to use http instead which means all AhsayOBM/AhsayACB users with Two-Factor Authentication enabled will need to connect using http as well.
Another option would be to use other Authenticator App Option, i.e. Microsoft Authenticator or Google Authenticator, then there is no need to worry about SSL certificate and you may continue to use SSL with dummy certificate.
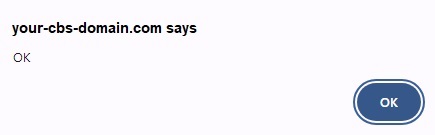
Click Test to verify. A confirmation message will be displayed once the verification is done.
Optional: Check the box if it is mandatory for system users to log in using two-factor authentication.

- Click Save to save.
Set up Mobile Authentication Using Third-Party Authenticator App
Switch on “Mobile Authentication”, by default it is switched off.
The following pop up message appears. Click OK to continue.
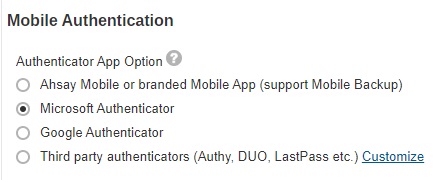
- Select the Authenticator App to be used for 2FA, choices are:
- Microsoft Authenticator – will be used as the authenticator app for 2FA.
- Google Authenticator – will be used as the authenticator app for 2FA.
Third party authenticators – this option will allow end users to choose their preferred TOTP authenticator app for 2FA.
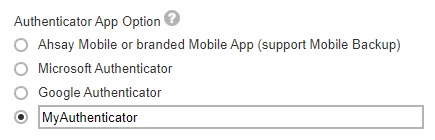
If Third party authenticators is selected, click Customizeto enter the name that will be displayed for the authenticator app on the “App Download and Device Pairing” screen”.
Example: MyAuthenticator
Optional: Check the box if it is mandatory for system users to log in using two-factor authentication.
- Click Save to save.
Although the 2FA setting has been setup on the AhsayCBS server, you have to enable 2FA for each AhsayCBS/AhsayOBM/AhsayACB user account before they can use it. For more information please refer to Enable Two-Factor Authentication of AhsayOBM/AhsayACB user accounts. For information on how to enable 2FA of AhsayCBS system user account, please refer to Enable two-factor authentication of system user.
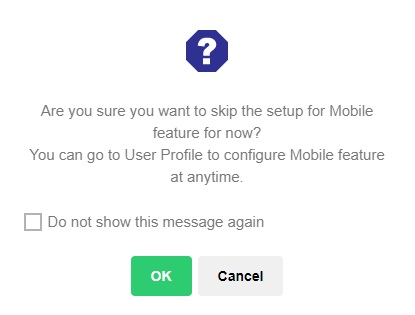
Once 2FA is enabled, upon login a message will be displayed where user can setup their 2FA.
This message will be displayed everytime the user logs in if there is no device paired for 2FA, not unless the “Do not show this message again” checkbox is ticked.
Enable Two-Factor Authentication of AhsayOBM/AhsayACB User Accounts
There are three ways to enable two-factor authentication of AhsayOBM/AhsayACB users:
The two-factor authentication can be enabled per individual AhsayOBM/AhsayACB user account in Backup / Restore > Users, Groups & Policies > Backup User > %backup user name% > User Profile > Authentication > Two-Factor Authentication.
It can also be enabled for several AhsayOBM/AhsayACB user accounts at once in Backup / Restore > Users, Groups & Policies > Backup User.
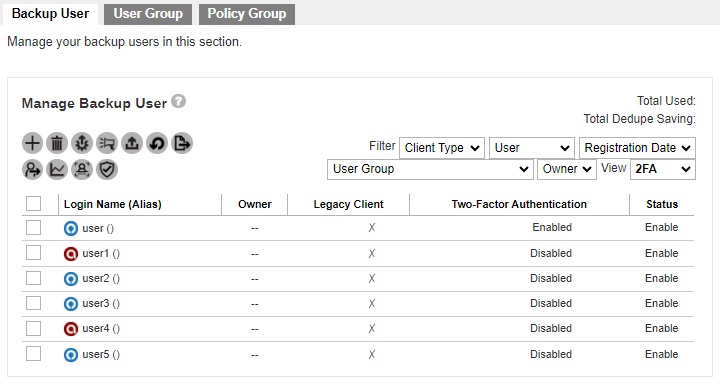
The “View” should be 2FA. Select the backup user that you want to enable 2FA. Then click the Enable / Disable Two-Factor Authentication button.
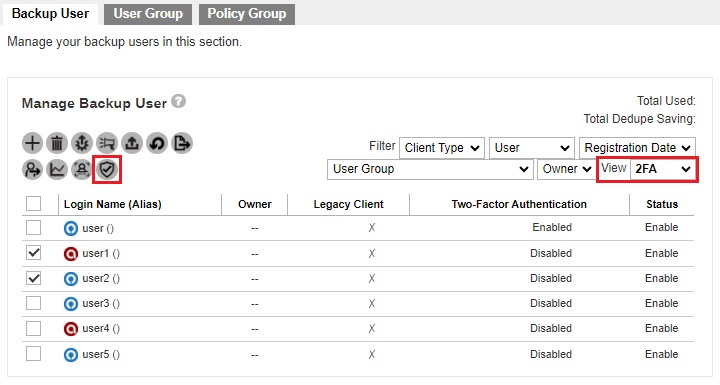
Click Enable to enable 2FA for the selected backup users.

Or be enabled for all AhsayOBM/AhsayACB user accounts which can be done by enabling Require Two-Factor Authentication for user logon setting in Backup / Restore > Users, Groups & Policies > Policy Group > %policy name% > User Settings > Two-Factor Authentication.
Once enabled, on the next log in for all AhsayOBM/AhsayACB v9.1.0.0 or above clients which support Mobile Authentication 2FA or AhsayCBS web console user login, will be required to register a mobile device for the new Mobile Authentication 2FA. Otherwise, they will not be allowed to proceed with the log in.
Here are examples of the next login in AhsayCBS web console after Require Two-Factor Authentication for user logon has been enabled.
Depending on the Authenticator App selected during setup of Mobile Authentication, the screen that will be displayed may be one of the four:
- Ahsay Mobile
- Microsoft Authenticator
- Google Authenticator
- Third-party authenticators
Ahsay Mobile
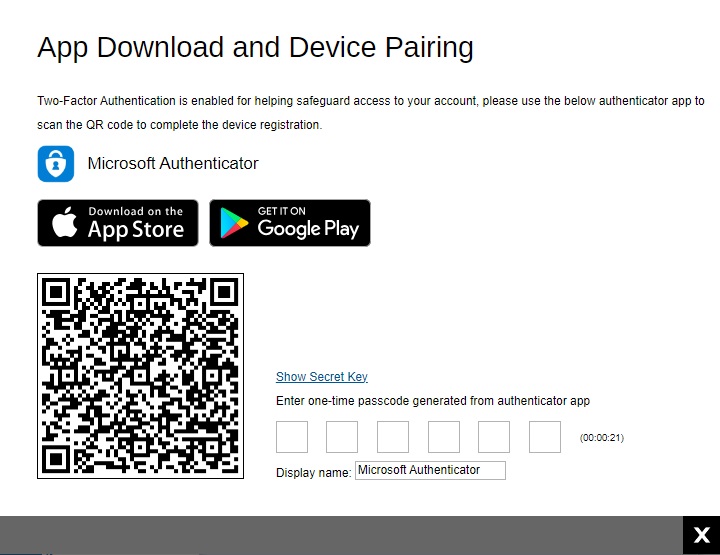
This is the default screen which has instructions to download Ahsay Mobile from the Apple App Store / Google Play Store. Scan the QR code to complete device pairing and finish the log in.
Microsoft Authenticator
If Microsoft Authenticator is selected, this will be the screen displayed. Scan the QR code using Microsoft Authenticator and enter the one-time passcode generated to finish the device pairing and log in.
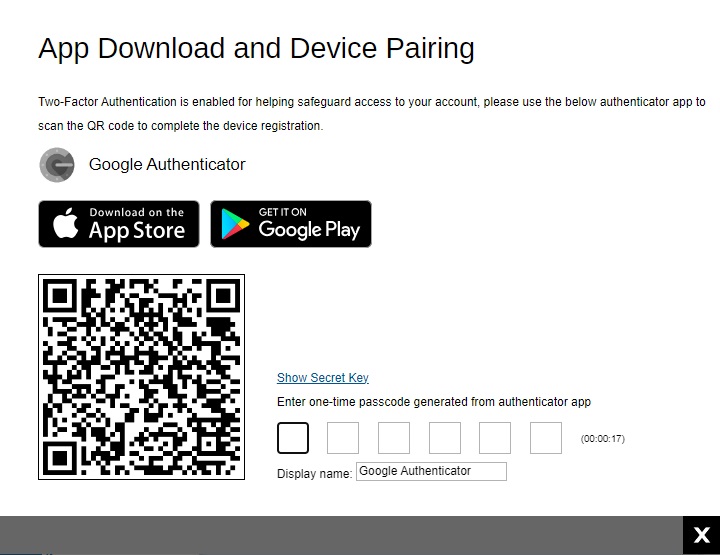
Google Authenticator
If Google Authenticator is selected, this will be the screen displayed. Scan the QR code using Google Authenticator and enter the one-time passcode generated to finish the device pairing and log in.
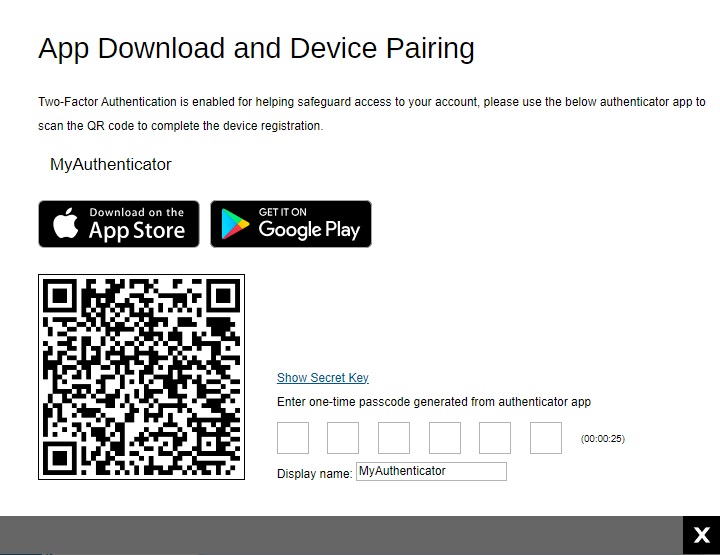
Third-party Authenticator
If Third party authenticators is selected, the name of the third party authenticator that will be displayed will vary. Here is an example using “MyAuthenticator” as the display name. Scan the QR code using your third party authenticator and enter the one-time passcode generated to finish the device pairing and log in.
Migrate Users From Twilio to Mobile Authentication
Switch on Mobile Authentication.
Click Confirm.
Twilio Credentials Verification is now deleted. Set up two-factor authentication and click Save to save.
Enable for your users by enabling the Require Two-Factor Authentication for user logon setting.
Once enabled, on the next log in for all AhsayOBM/AhsayACB v9.1.0.0 or above clients which support Mobile Authentication 2FA or AhsayCBS web console user login, will be required to register a mobile device for the new Mobile Authentication 2FA. Otherwise, they will not be allowed to proceed with the log in.
For examples of the default screen during next login in AhsayCBS web console after “Require Two-Factor Authentication for user logon” has been enabled, please refer to the previous section.
Twilio Credentials Verification
For users on AhsayCBS v8.3.0.30 until v8.3.6.x using Twilio, after upgrading to the latest AhsayCBS v9.1.0.0 or above, the existing Twilio Credentials setup will be migrated to the new version. So existing users can still continue using Twilio for two-factor authentication.
However, if Twilio has not been setup in the previous AhsayCBS version, setup of Twilio is desupported in AhsayCBS v9.1.0.0. Only modification of existing Twilio setting is allowed.
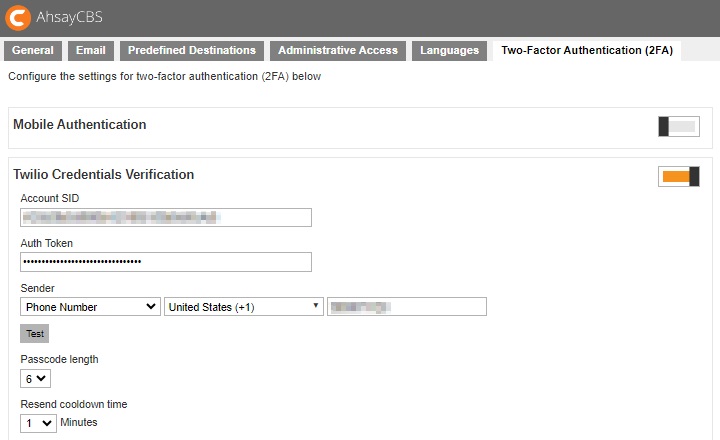
Modify Twilio Credentials
- Update the “Account SID”, “Auth Token” and “Sender” details, if needed.
- Click Test to verify.
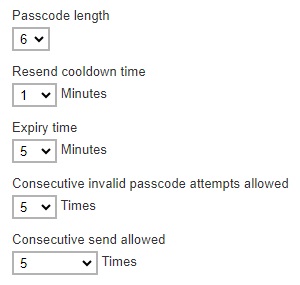
Update the following: “Passcode length”, “Resend cooldown time”, “Expiry time”, “Consecutive invalid passcode attempts allowed” and “Consecutive resend allowed”, if needed.
Check the box if you will allow legacy clients to skip SMS authentication. Legacy clients are AhsayOBM users who has an old version of AhsayOBM installed who upgraded to the latest version but has not run any backup yet. If this box is not checked, the user will be directed to the 2FA page.

- Click Save to save.
The “Allow legacy client to skip SMS authentication” box must be checked if you are using AhsayOBM/AhsayACB version older than 8.3.0.30 or else you will not be able to log in and your scheduled and continuous backups will not run. All functions requiring access and authentication to AhsayCBS will also not work. Like starting a manual backup from the System Tray in AhsayOBM/AhsayACB in Windows. Running AhsayOBM/AhsayACB batch files in Windows. Running AhsayOBM scripts in Linux/FreeBSD. Running AhsayOBM/AhsayACB scripts in MacOS. AhsayCBS server initiated backups on AhsayOBM/AhsayACB. And Auto Upgrade (AUA) on AhsayOBM/AhsayACB.
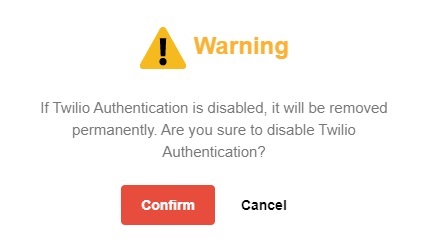
If you switch on Mobile Authentication or switch off Twilio Credentials Verification, Twilio Credentials Verification will be deleted from AhsayCBS permanently. It will not be possible to re-enable Twilio Credentials Verification at a later date.
Here are the warning messages you will receive:
Switch on Mobile Authentication
Switch off Twilio Credentials Verification
Advanced Backup Server Configuration
To manage your AhsayCBS advanced backup server configurations, simply click the Advanced icon under “System Settings” from your AhsayCBS environment.
![]()
You can perform the following advanced configurations on your Backup Server:
- Restore data that has been automatically saved to Ahsay License Server.
- Configure settings for proxy connection.
- Publish system and error messages to third party monitoring tools.
- Retrieve system files for troubleshooting.
- Configure run time options such as Java heap size, thread stack, etc.
There are 5 tabs under the Advanced system settings section, each of which is described below:
- Auto Save
- Proxy
- Logging
- File Explorer
- Runtime Options
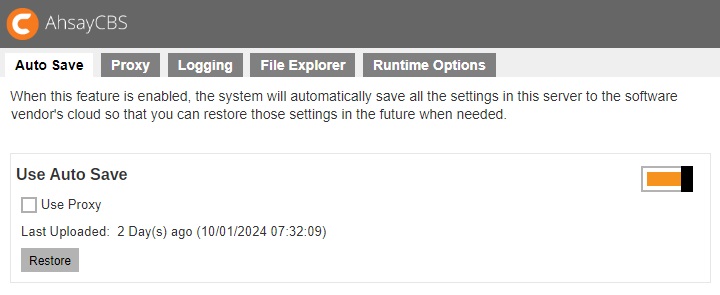
Auto Save
The following shows the “Auto Save” tab under System Settings > Advanced. Default setting of Auto Save feature is disabled, you can slide the switch to the right to enable it.
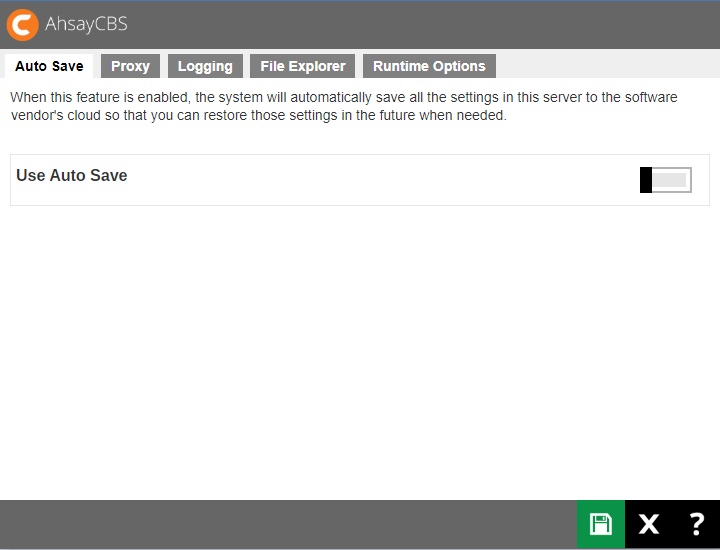
When this feature is enabled, the system will automatically save all the settings in this server to the Ahsay License Server daily between 5:00 to 7:00 AM, so you can restore those settings in the future when needed.
- The Auto Save feature is NOT supported for either Evaluation license keys or expired license keys. If the license is expired, neither backup nor restore will be supported, and there will be “LicenseError” in “Monitoring > Backup / Restore Logs > Activities Log” showing “[disableConfArchival] License maintenance and support period has expired”.
- Maximum of 30 snapshots will be created and saved in the Ahsay License Server. When over 30, the 31st snapshot will overwrite the 1st one. The size limit for each snapshot uploaded to Ahsay License Server is 50MB, there will be “RoutineJobError” of “The size of “filename” is larger than 50MB.” when the snapshot exceeds the size limit.
- There are two snapshots created, one configuration and one branding, which will be stored in the local drive with directory of “%AhsayCBS_INSTALL%\AhsayCBS\conf\Backup\dr-YYYY-MM-DD_Branding.zip” and “%AhsayCBS_INSTALL%\AhsayCBS\conf\Backup\dr-YYYY-MM-DD_Configuration.zip”. Maximum of 25 snapshots can be saved in the local drive, so when over 25, the 26th snapshot will overwrite the 1st one. You can check whether there is an automatic delete process by searching the logs for “[ConfigurationArchival.removeLocalBkp] Removed configuration backup file(s) [filename.zip] locally.” in the AhsayCBS web console > Monitoring > Backup/ Restore Logs > Activities Log.
To check the Auto Save daily job status:
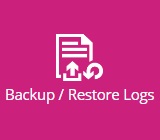
Click the Backup / Restore Logs under “Monitoring” from your AhsayCBS environment.
Click Activities Log to find the according system log.
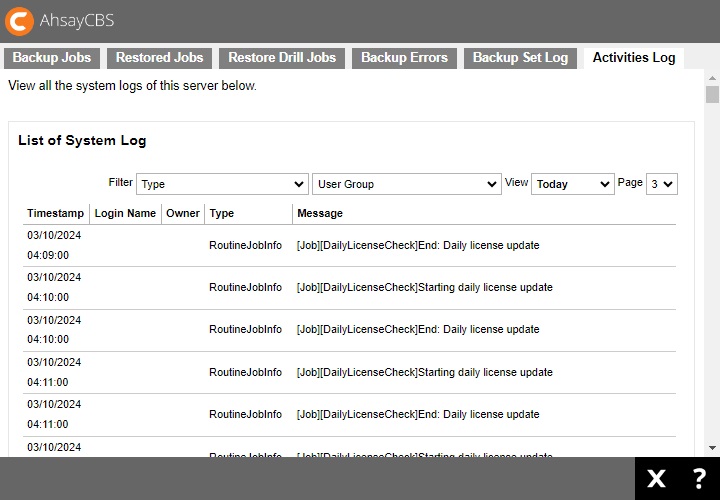
Search for the log message “[Job][CustomDailyJob][ConfigurationArchival] Starting configuration archival” and “[Job][CustomDailyJob][ConfigurationArchival] End: configuration archival” with timestamp being around 05:00:00.
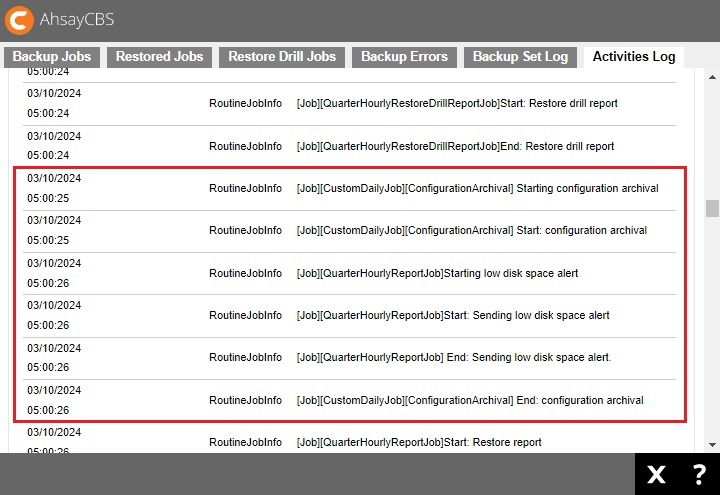
- If the job is finished with no “RoutineJobError”, the Auto Save job has finished successfully.
The following system configuration files will be saved on the cloud daily by the auto save system job.
| Server Configuration | |
|---|---|
| Description | Path |
| Connector setting file | /conf/server.xml |
| CBS option files | /conf/afc.opt /conf/cbs.opt |
| Runtime setting file | /conf/cbssvc.ini |
| Default certificate files | /conf/ca.crt /conf/ssl.crt /conf/ssl.key |
| CBS setting file | /conf/cbs.json |
| Redirector configuration file | /conf/lfsConfig.xml |
| CBS Configuration | |
|---|---|
| Description | Path |
| Backup Server setting file | /conf/obs.json |
| License files | /conf/lic.json /conf/license.xml |
| CBS option file | /conf/cbs.opt |
| CBS database file | /conf/cbs.db |
| Autoupdate index (pre-v9.1) | /conf/autoUpdate.bdb |
| Replication configuration file | /conf/rpsSend.xml |
| RPS Configuration | |
|---|---|
| Description | Path |
| Replication configuration files | /conf/rps.xml /conf/rpsRecv.xml /conf/rps-recv.json /conf/rps.json |
| RDR Configuration | |
|---|---|
| Description | Path |
| Redirection configuration files | /conf/rpdr.xml /conf/rdr.json |
| License files | /conf/rdr-lic.json /conf/rdr-license.xml |
| CBS User Profile | |
|---|---|
| Description | Path |
| Users' profile | /conf/users.xml |
| Others | |
|---|---|
| Description | Path |
| User group definition | /system/obs/policies/userGroup.xml |
| Policy group definition | /system/obs/policies/policyList.xml |
| SSL Certificate directory | /conf/cert/*.* |
Restore Process
Click the Restore button.
Choose which operation you want to make.
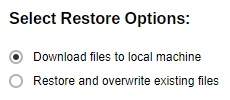
Select the date of the system settings backup from the drop-down list.
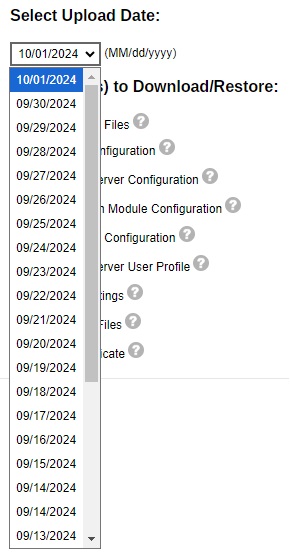
Select the type of configuration that you want to restore.
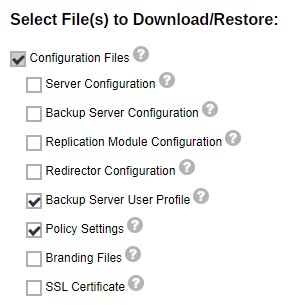
- Click Restore to start the restore.
If Download configuration files is clicked, the configuration file dr-YYYY-MM-DD_Configuration.zip” will be downloaded and you can manually restore the configuration file.
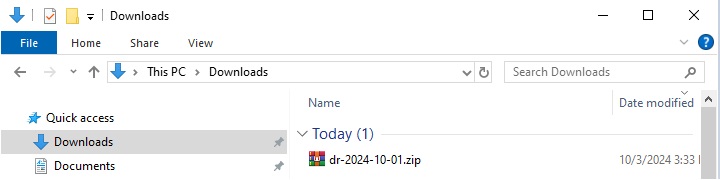
Extract the .zip configuration file.
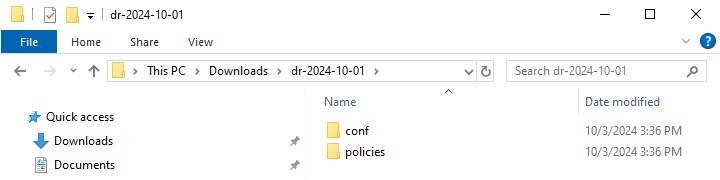
- Copy the contents of “conf” folder to “%AhsayCBS_INSTALL%\AhsayCBS\ conf”.
- Copy the contents of “policies” folder to “%AhsayCBS_INSTALL%\AhsayCBS\ system\obs\policies”.
- Restart the AhsayCBS service.
Refer to the article Recover users.xml File on AhsayCBS for further details on this feature.
If Overwrite existing configuration files is clicked, the backed up configuration file will overwrite the existing configuration file.
Please kindly note that if Overwrite existing configuration files option is chosen, the backed up configuration file will automatically overwrite the existing configuration file and the process cannot be canceled.- After the restore process, the interface will skip back to the previous page. Click and to save and exit.
Click Administration Logs under "Monitoring".

- Click Activities Log to find the according system log.
- Search for the log message “Starting configuration recovery” and “Finished configuration recovery” with timestamp being starting restore operation time, which means the restore process is finished successfully.
- Restart the AhsayCBS service.
Proxy
The following shows the “Proxy” tab under System Settings > Advanced. It is used for defining whether AhsayCBS should use a proxy to gain access to the Internet.
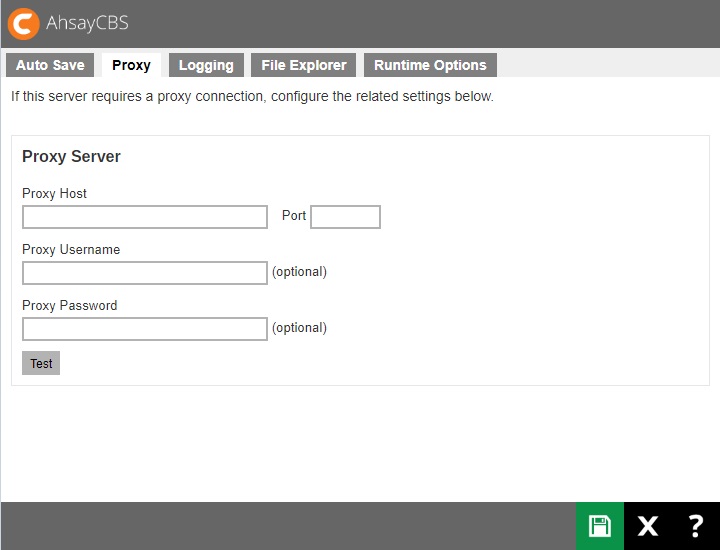
Two types of proxy, HTTP/HTTPS and SOCKS 4/5, are supported. You can use the “Proxy Host” and “Port” entries to define the location of your proxy server.
If the proxy server you are using requires user authentication, please use the “Proxy Username” and “Proxy Password” entries to set the username/password for your proxy server.
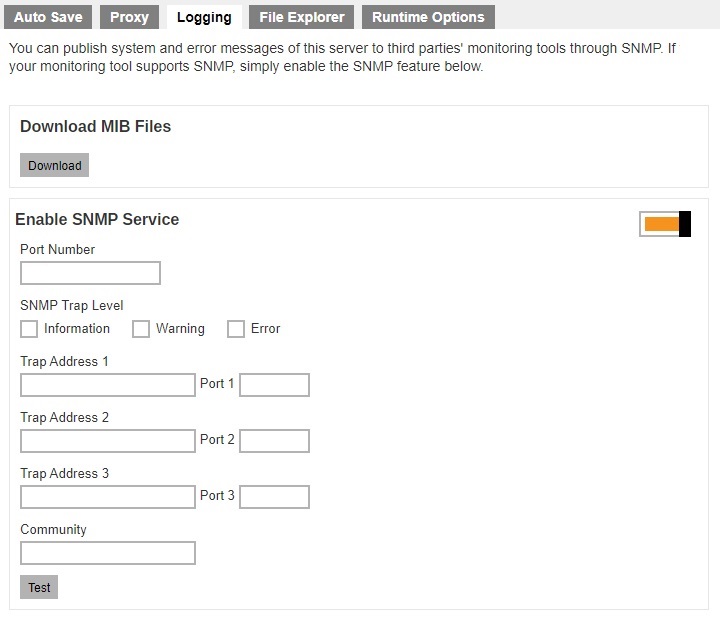
Logging
The following shows the “Logging” tab under System Settings > Advanced. There are two types of third party monitoring support, SNMP and Windows Event Log.
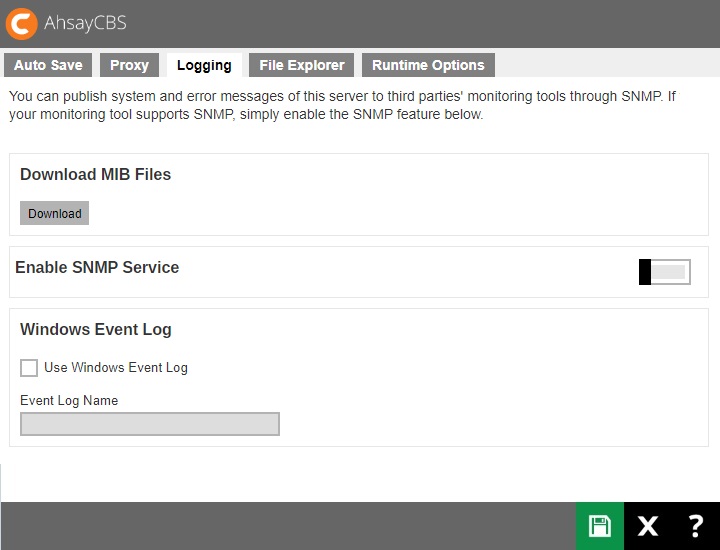
SNMP
You can download the MIB definition file and import to your SNMP application by clicking the Download button under “Download MIB Files”.
Windows Event Log
This feature is supported for AhsayCBS installations on Microsoft Windows platforms with the Windows Event Log service enabled. All AhsayCBS system log information such as errors, warnings, and information message types will also be written to the Windows event logs. The event log name is limited to eight characters.
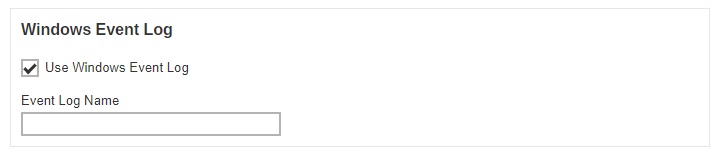
The backup server’s administrator can view the log entries using the Windows event viewer.
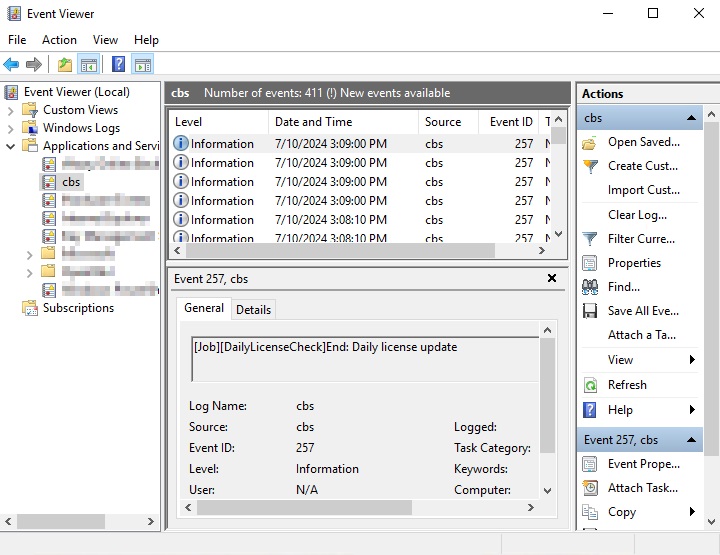
File Explorer
The following shows the “File Explorer” tab under System Settings > Advanced. If administrator or support staff needs to retrieve system related files on the AhsayCBS server for troubleshooting, they can make use of the File Explorer feature to download log or configuration files from the server without having to log in remotely using RDP or SSH.
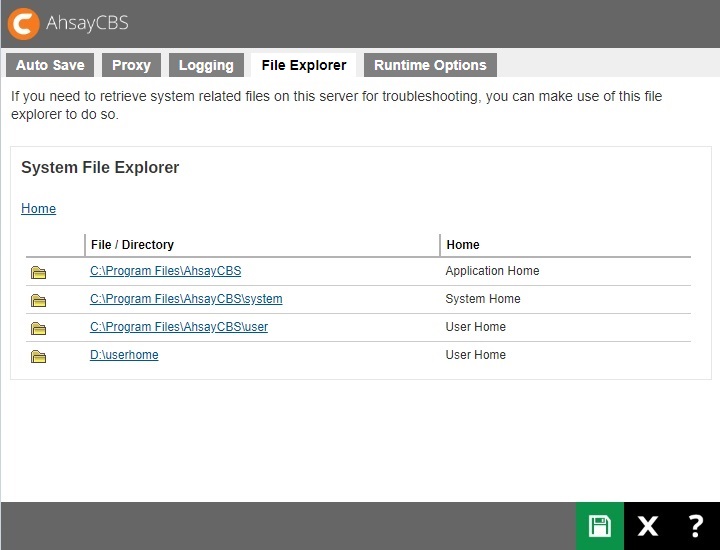
The File Explorer feature is limited to access files/folder related to AhsayCBS:
- AhsayCBS Application Home
- AhsayCBS System Home
- AhsayCBS User Home(s)
All files downloaded via the AhsayCBS File Explorer tab are compressed by default.
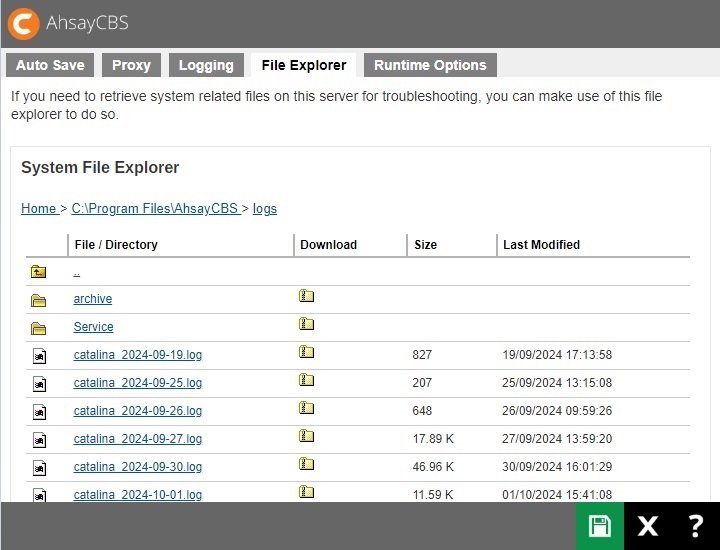
Starting with v9.13, the "Beautify JSON" checkbox has been added to give users an option if they want the single JSON file that they downloaded be in a more readable format. Meaning it is already sorted and has 4-space indentation to make reading easier.
You can access this by going to System Settings > File Explorer > %Application Home% > conf.
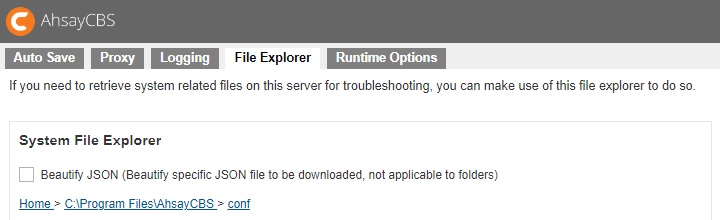
Runtime Options
The following shows the “Runtime Options” tab under System Settings > Advanced. It allows administrators to modify Java options such as Java heap size (maximum and minimum), thread stack size and IP allowed to access the AhsayCBS management console. It also has a feature to prevent session hijacking, if enabled, will force the current user session to be logged out immediately if it detects that the IP address used in the session has changed from the original IP address used upon log in.
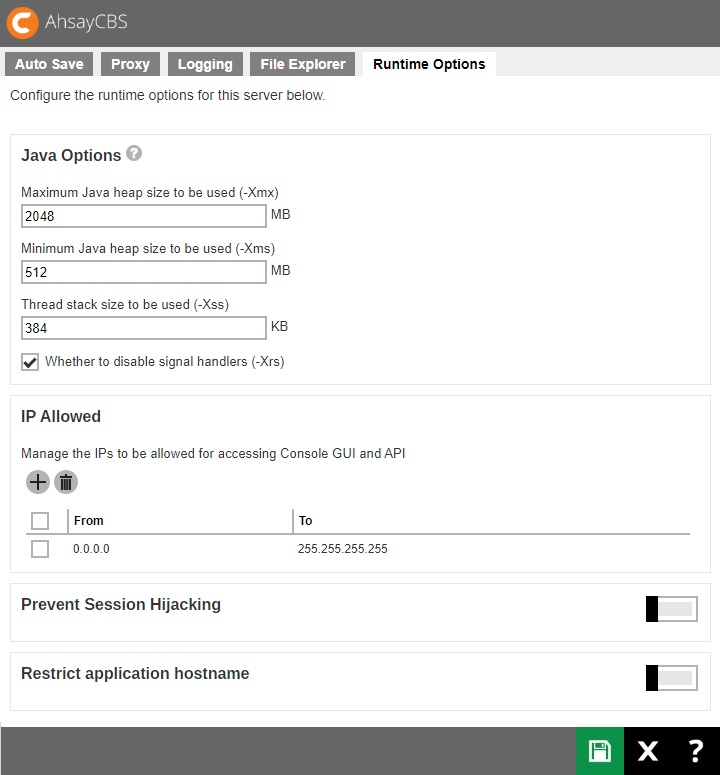
By default the maximum Java heap size is 2048MB, there are no restrictions on IP address access to AhsayCBS web console and the prevent session hijacking is enabled.
For a Windows machine, you can disable this using a local computer by signing in to AhsayCBS. For Linux/FreeBSD/AhsayUBS machines, follow instructions below on how to disable prevent session hijacking.
The following are the installation path of AhsayCBS:
- In Linux/FreeBSD the path is /usr/local/cbs.
- In AhsayUBS the path is /ubs/mnt/eslsfw/obsr.
- Stop the AhsayCBS service.
In your %Application Home%/conf folder, locate the cbs.json file and open it using a text editor. Change the value of “PreventSessionHijackingEnabled” to false.

- Start the AhsayCBS service.
When editing the maximum heap size for AhsayCBS, ensure that there is sufficient memory reserved for the operating system.
It is not recommended to set excessively high values for the maximum Java heap size, as this could result in AhsayCBS performance issues during internal Java VM garbage collection or memory recycling routines.
For changes in Java heap size setting, the AhsayCBS service needs to be restarted before it becomes effective.