
 FAQ
FAQAhsayOBS to AhsayCBS Upgrade and Backup Data Migration
The following are the 14 Key Steps for an in-place upgrade from AhsayOBS v6.29.0.x to AhsayCBS, and backup set data migration (the conversion of backup set data from v6 format to AhsayCBS block format):
Step 1 - Before you Upgrade and Upgrade Sequence
Take note that you may need to return to this section after completing one upgrade sequence.
AhsayCBS has been totally re-designed from the ground upwards to provide the best cloud backup solution with changes to core functions, such as file storage system, indexing, backup set features, replication, group policy, system user, and branding.
As upgrading from AhsayOBS v6 to AhsayCBS is a major undertaking, involving migration of settings for AhsayOBS Group Policy, System user, AhsayOBM/AhsayACB, indexes, user profiles, backup set settings, and backup data migration (conversion of v6 data format to AhsayCBS v7 block data format, and again to AhsayCBS v9 deduplication block format). This guide provides an overview of how to upgrade your AhsayOBS v6 installation to AhsayCBS with steps required to ensure a smooth transition and, help you to plan and inform your customers of changes to their backups after an AhsayCBS upgrade.
You should review the Release Notes, AhsayCBS HRL, and AhsayCBS SCL to ensure compatibility with your environment as there have been many changes to the requirements of the newer version.
Your server and clients should be running v6.29.0.x, as this was the final EOL sunset version.
Your server should be in good health, and without disk issues. If you are experiencing product issues and have not yet consulted with Ahsay Technical Support; it would be advised that you have your issue resolved prior to upgrade.
Prior to upgrading, we recommend you temporarily disable any Antivirus, scanning checks, or system updates. This will ensure no conflicts that could cause the upgrade to fail.
Upgrade Sequence
Before upgrading your AhsayOBS/AhsayRPS/AhsayRDR, please consider the upgrade sequence to avoid possible issues. The following details provide the recommended sequences for AhsayCBS upgrade.
AhsayRDR (if applicable)
Upgrade of AhsayRDR has a higher precedence than the AhsayOBS and it is recommended to upgrade each AhsayOBS one by one after running AhsayCBS (Redirector Server) for at least a week to ensure the whole production environment is stable.
AhsayOBS Backup Server
The AhsayOBS server must be running v6.29 before upgrading to AhsayCBS, this is to avoid any outstanding issues from becoming a problem after you upgrade to v9 and to ensure any devices incompatible with v9 are running the latest v6.29 client. You can still proceed with the upgrade if your OBS is lower version, but we do not recommend this approach. The Backup Server must be upgraded to AhsayCBS before your clients are upgraded. As AhsayCBS v9 (Backup Server) is backward compatible with v6 and will be able to process both backup clients from v6 and v7/v8/v9.
It is advised to disable any v6 replication (if enabled) before upgrading your AhsayOBS system to AhsayCBS.
You should document any preexisting Backup Error (i.e. for the past seven days), so that you can exclude them from your post-upgrade checks (check for new errors post-upgrade).
AhsayOBM / AhsayACB
Before enabling the Auto Update or manual software update for your users, it is strongly recommended to allow your AhsayCBS system to run for a period of time to resolve any new issues first, before upgrading the clients to the latest version.
With Auto Update, it is recommended to perform the upgrade of the clients in small batches e.g. 5-10 users, to avoid network congestion and to allow you to monitor for Destination disk usages.
Clients running the following two types of backup set must run a manual upgrade of AhsayOBM on each node rather than upgrading with AUA. Upgrading with AUA may result in some nodes failing to upgrade in time for the next backup and will cause backup failure.
- Hyper-V 2008 R2 Cluster Backup Set
Exchange 2013 DAG Backup Set
It is highly recommended to manually uninstall AhsayOBM first and perform a fresh AhsayOBM v7+ installation for the Exchange DAG nodes.
Supported Clients running on Linux and FreeBSD must have installed GLIBC v2.14.
AhsayACB v9 is not supported running on server platform (ie Windows Server 2016).
AhsayRPS Replication Server (if applicable)
It is recommended that AhsayRPS is upgraded last to provide a backup of your v6 system’s configuration and data. The AhsayRPS v6 receiver(s) should be disabled before AhsayOBS upgrade is carried out.
Please consider only upgrading your AhsayRPS system after AhsayCBS (previously AhsayOBS) has been running stable for a period of time.
Given that AhsayCBS will initiate a Backup Set data conversion to the new Blocks format, it is suggested you retain a copy of the v6 data, until all users have converted to the new Blocks data format. As such, you may want to deactivate the license assigned to your Ahsay RPS, and startup a new AhsayCBS Replication Receiver host to replicate data from the AhsayCBS Backup Server to resume data protection.
Assumptions
AhsayRDR and AhsayRPS is/are not hosted on the same AhsayOBS machine.
- If your AhsayRDR, AhsayOBS and AhsayRPS are still on pre-v6.27 versions, please upgrade your Ahsay products to the latest v6.29 version before upgrade to AhsayCBS.
If your AhsayOBS and AhsayRDR are hosted on the same machine, both AhsayOBS and AhsayRDR will be upgraded at the same time. You are required to manually add the HTTP and HTTPS connector definitions for the Redirector in the %CBS_HOME%/conf/server.xml.
Example:
If your Redirector was using HTTP 8080 and HTTPS 8443 as the connection (substitute your port numbers), you need to add 2 extra connectors by duplicating the two connector definitions (Backup Server) and change to your Redirector ports.
Your server.xml contains:

You will need to duplicate the existing two Connectors, then modify the ports for the Redirector connector as shown in red.
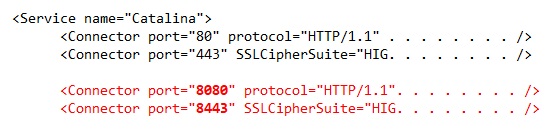
Assuming that you are using wildcard SSL certificate for both Redirector and Backup Server.
If you are using different SSL certificates, you will need to change the values in SSLCACertificateFile, SSLCertificateKeyFile, and SSLCertificateFile in your HTTPS connector definition so they point to the correct files.
API Tests
As new REST APIs (JSON format) are introduced in the AhsayCBS, if you have written API in previous version using XML format or Ahsay API v1 format, it is highly recommended you retest and modify your API calls on AhsayCBS in your testing environment first, so that it will not affect your current CRM, billing systems, etc. when new AhsayCBS is upgraded. Please refer to the API section for reference.
Custom Website or Other Non-Ahsay Application
If you have customized website/database or other non-Ahsay application related files stored anywhere in the AhsayOBS installation path, you need to backup and relocate to the new installation path if necessary. The upgrade process will not handle or preserve these.
Software License Check
The licensing model has changed starting with AhsayCBS v7, same model applies for AhsayCBS v9.
Additional AhsayCBS license fee is required for running AhsayCBS as a Backup Server, a Replication Server, or a Redirector; this requirement applies to both purchase and meter licenses.
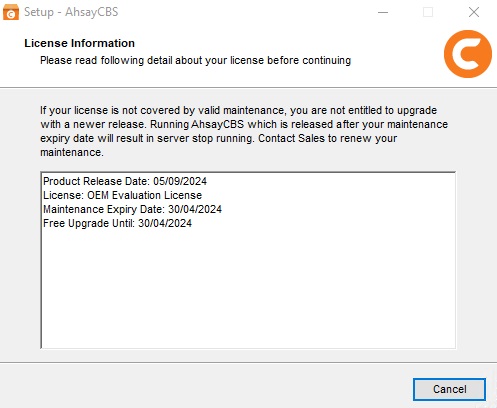
Aside from additional license modules, you must also have a valid support maintenance to ensure that the new version 9 installation will not fail.
Furthermore, AhsayCBS replication module (replication CAL) is required if you are currently using AhsayRPS and would like to continue to replicate your data; this CAL is applied to your Backup Server’s license key.
Important to note that, the pricing for AhsayOBM, AhsayACB clients, as well as the Replication and Redirection Module in AhsayCBS are calculated per device basis. If you currently have AhsayOBM user accounts that are setup for multiple devices, extra licenses will be required per device.
Please check on the following outlines before you upgrade your Ahsay products:
- Before upgrading the standalone AhsayRDR to AhsayCBS, please ensure that you have two keys.
- A valid AhsayRDR license key, with RDR CALs assigned.
A separate AhsayCBS Server License with an AhsayCBS module enabled.
In a standalone AhsayRDR setup where it is not also acting as a Backup Server, under your AhsayCBS Server License key, you will not need any CAL assignment. Only the AhsayCBS module is required on this specific key.
Upgrade of standalone AhsayRPS system will require an additional AhsayCBS Backup Server License with AhsayCBS module enabled, you will not need any CAL assigned for this license key.
However, you will need Replication OBM CALs and Replication ACB CALs assigned to your Backup Server’s License key, per new licensing requirements.
- Here is a summary of the license CAL required for the AhsayCBS:
- AhsayOBM (per device to back up) – license count based on unique backup set owner
- AhsayACB (per device to back up) – license count based on unique backup set owner
- AhsayCBS (per running instance) – anytime you install, you will need to be licensed
- Replication Module (per device to replicate) for AhsayOBM/AhsayACB devices
- For most scenarios, you will need 1:1 with your device CAL.
- For scenarios where you only offer Replication to some users but not all, your Replication Module CAL can be reduced.
Redirection Module (per device to redirect)
For most scenarios, you will need 1:1 with your total device CAL usage.
You can calculate the extra client access license required into usage.xml report, by referring to the instruction provided in the article How to determine the number of client licenses required before upgrading from AhsayOBS version 6 to AhsayCBS?
For your convenience you may adopt this worksheet:
Number of OBM CAL: <ObmCountV7>___ </ObmCountV7> (values from usage.xml)
Number of ACB CAL: <AcbCountV7>___ </AcbCountV7> (values from usage.xml)
Number of Backup Server: ___ x 1 CBS module license = ___
Number of Replication Receiver Server: ___ x 1 CBS module license = ___
Number of Redirector Server: ___ x 1 CBS module license = ___
Number of Replication OBM CAL: 1 x ___ OBM CAL = ___ Replication OBM CAL
Number of Replication ACB CAL: 1 x ___ ACB CAL = ___ Replication ACB CAL
Number of Redirector OBM CAL: 1 x ___ OBM CAL = ___ Redirector OBM CAL
Number of Redirector ACB CAL: 1 x ___ ACB CAL = ___ Redirector ACB CAL
Do you want to rebrand CBS? If Yes == Did you already purchase Rebrand Option? Yes/No
Ensure that all license requirements are met before upgrading your AhsayOBS to AhsayCBS.
It is recommended to check on the AhsayOBS License page to view your key’s Support and Expiry Date to make sure it has not expired before performing the upgrade, so that the license key is eligible to run on the latest version.
Failure to have adequate licenses at time of upgrade, may cause your newly upgraded AhsayCBS server to become "Stopped".
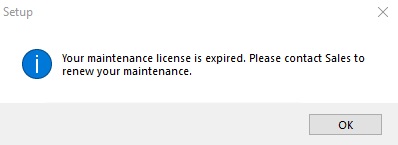
Also make sure that your license key has a valid support maintenance otherwise installation will fail. You will receive the following messages if you have an expired maintenance license.
If you upgraded AhsayCBS from v6 without purchasing AhsayCBS module and the quota exceeded, then there will be a grace period of 60-days to allow sufficient time to resolve the license related problems.
If you upgraded AhsayCBS from v6 with purchasing AhsayCBS module and the quota exceeded, then there will be a grace period of 12-hours for you to manage the quota usage. If quota usage issue was not resolved within the grace period, the server will be stopped. After login to the AhsayCBS system console, the web console will redirect to the “To Do” page and the license error will be shown on the top.
Step 3 - Backup your AhsayOBS and Users Configuration
Backup your AhsayOBS server configuration before the upgrade. The configuration backup will provide you with a fallback plan if the upgrade does not go according to the plan.
- Login to the AhsayOBS web management console.
- Select Manage System > Routine Job.
Check if the "Configuration Archival" system routine job is enabled.

"Configuration Archival" is enabled
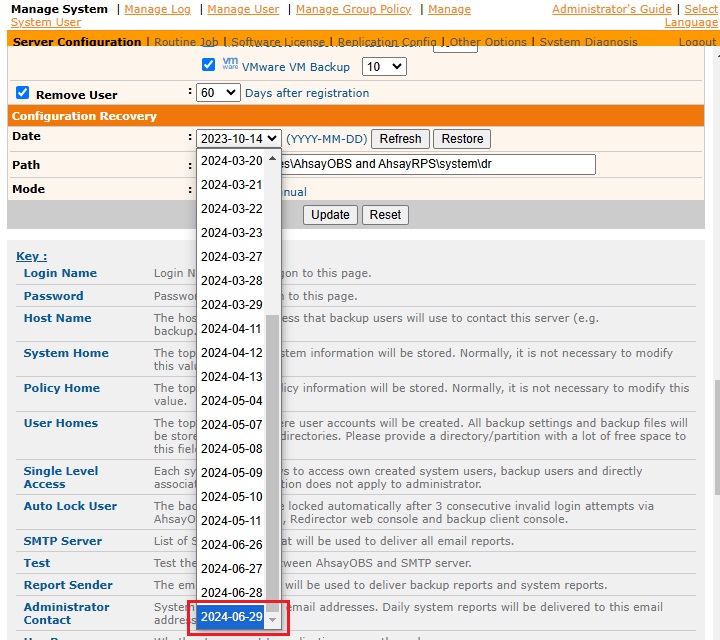
Then you can restore a copy of your server configuration files and all user profiles on the AhsayOBS web management console at Manage System > Server Configuration > Configuration Recovery.
Select the latest date from the "Date" dropdown menu, and then enter the corresponding directory path in the "Path" field. Click Restore to restore the files (in a zipped file) to the corresponding path on the AhsayOBS server.
"Configuration Archival" is disabled
Then you need to Enable the "Configuration Archival" system routine job. Do this today. On the AhsayOBS web management console at Manage System > Routine Job, enable the "Configuration Archival" routine job. Adjust the time to start the job immediately, then click Update.
Once the job is completed, refer to the steps provided in “Configuration Archival” is enabled, to restore a copy of your server configuration files and all user profiles. Store this in a location separate from your AhsayOBS Installation path.
Backup your AhsayOBM and AhsayACB client installers.
We recommend you retain copies of your v6 client installers, in case in the future you need to install Ahsay onto unsupported v9 devices or need to reinstall v6 client onto the same machine.
If you prefer added precaution, you may archive (ZIP) your entire AhsayOBS Installation folder (except User Home, as this would be huge), just before you run the AhsayCBS installer upgrade.
Step 4 - User Profile Check
Check on the user profile of all backup accounts.
Confirm that the user profiles for all backup accounts are valid, to ensure that all accounts will be properly migrated during the upgrade process.
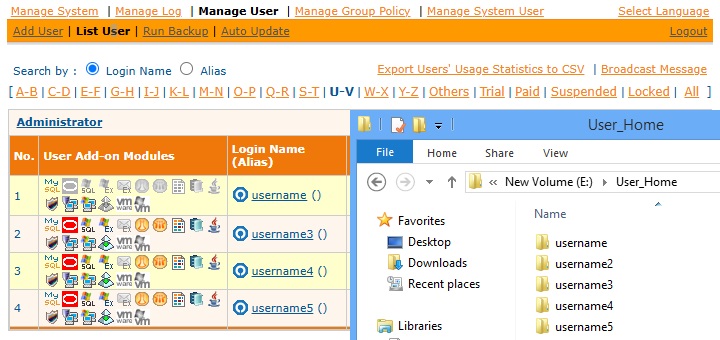
Confirm on the number of backup accounts displayed on the AhsayOBS web management console under Manage User > List User (select All to show all users), compare the number of users listed to the number of user folders (e.g. folder names with username) found in all User Home(s):
%USER_HOME%\%username1%
%USER_HOME%\%username2%
%USER_HOME%\%username3%
Example 1
Four backup accounts are listed on the AhsayOBS web management console:
Username
Username3
Username4
Username5
But there are five user folders within the User Home:
D:\AhsayUserHome\username
D:\AhsayUserHome\username3
D:\AhsayUserHome\username4
D:\AhsayUserHome\username5
D:\AhsayUserHome\username2
The backup account username2 is not displayed on the AhsayOBS web management console but appears as a folder in the file system.
For any missing backup accounts (e.g. accounts that have a user folder within the User Home, but are not displayed on the AhsayOBS web management console), check if the user profile of the affected account is corrupted. It must be dealt with, before upgrading to AhsayCBS.
Example 2
Ahy corrupted user profiles will also be recoded in the AhsayOBS system log.
For example, the profile for user 'van' is corrupted.
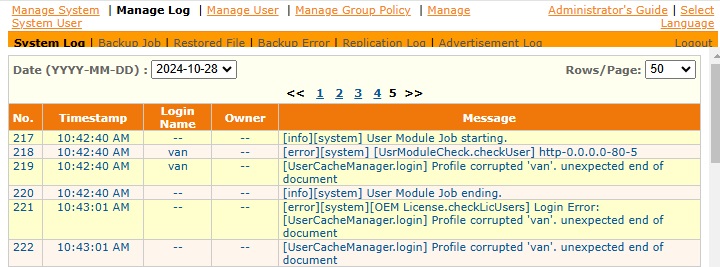
Recover the corrupted user profile. If you need help in doing this, please contact Ahsay Support.
Example 3
Another common user profile issue is duplicated folders/profiles which may occur after relocating or moving user accounts to different User Homes, when the original user account folders are not cleaned up properly.
The following messages will be recorded in the AhsayOBS system log if there are duplicated folders.

If there are duplicated folders on your User Home, please stop your AhsayOBS server and remove the duplicate folders. Identical User’s foldername must not be found in more than one User Home path.
Example 4
Another common User Home issue is extra files or folders which exist in the User Home path. These extra files or folders must be removed before upgrade to AhsayCBS.
User Home path should only contain folders of users, and not contain any extra folders (example %USER_HOME%\ArchiveFolder, %USER_HOME%\notes.txt or %USER_HOME%\thumbnail).
Step 5 - Backup Set Index Check
The backup set index check must be done to ensure that immediately after upgrading your Backup Server from v6 to AhsayCBS, your backup and restore jobs will run without errors caused by pre-existing problematic indexes. Also, indexes issue could affect data migration conversion of v6 data to AhsayCBS block format.
The weekly rebuild job on AhsayOBS v6 already performs a check of all index files and automatically fixes any problematic index files.
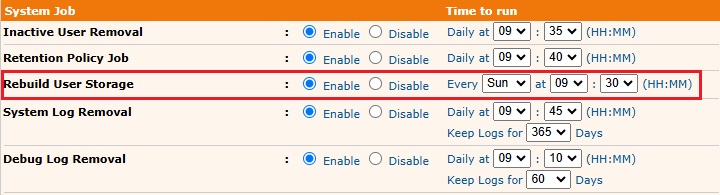
If the Rebuild User Storage job is Disabled, please make sure it is enabled and runs to completion before you schedule an upgrade.
You can check for index related issues in between the weekly rebuild jobs for specific backup user accounts. By quickly scanning the AhsayOBS system logs to check for corrupted index related errors.
For example, indexes for user account “user1” are corrupted.
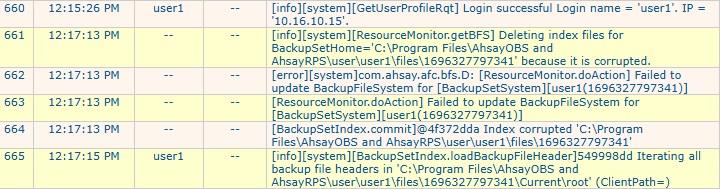
You can perform a Single User Rebuild of indexes on each affected backup set from AhsayOBS v6 web console.
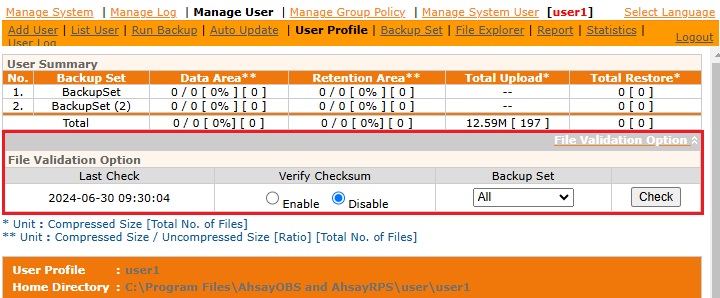
You can set the "Verify Checksum" option to "enable" to perform an additional data integrity check on the data, to rule out any possible data corruption. But with this option enabled the Single User Rebuild process will take longer to complete as each individual file/folder is checked. The actual time taken increases in proportion to the number of files/folders in each backup set.
Please remember to check the User Log, to monitor the Single User Rebuild status and after the job is completed, to verify if the issue has been resolved or if further follow up action is required.

From v7.15.0.0 onwards this step does not have to be performed on AhsayOBS v6 for all backup sets prior to upgrade, as AhsayCBS will automatically perform a rebuild of the indexes on each v6 backup set before it proceeds with the migration of v6 indexes files to AhsayCBS block format.
However, if you have previously encountered corrupted index or data issues with specific backup sets, you may want to rule this out by running a Single User Rebuild with the “Verify Checksum” option to “enable”; to perform an additional data integrity check. This should be done while still in v6.
Step 6 - OS and Application Support Check
The list of supported Operating System and software platforms for Ahsay software has been updated. Review the software compatibility list in Software Compatibility List for version 9.
Some important changes include:
- MS Exchange 2003 is not supported.
- MS SQL 2000 is not supported.
- Windows XP, Server 2003 supports are on best effort basis.
- AhsayACB can only be installed on non-server grade Windows platform.
- Support for: Oracle Database, IBM Lotus Domino / Notes, and StorageCraft ShadowProtect modules are discontinued in version 8.
- In version 9, GLIBC v2.14 is required for all supported Linux and FreeBSD platforms.
- In version 9, OpenJDK v8 is required for all supported FreeBSD platform.
Review the list to ensure that all changes are taken into consideration (e.g. you may need to inform users that their OS / software platform is no longer supported, they will need to upgrade the OS / software to stay up-to-date with AhsayOBM / ACB, or they can remain on version 6).
For unsupported applications running supported OS, your user must remain using v6 client. For example, Windows 2003 is OBM v7+ supported, however, Windows 2003 System State backup is not supported in AhsayCBS; therefore, device must remain using v6 client to continue Windows 2003 System State backup. Furthermore, User should not have AUA enabled, even if some devices are v7/v8/v9 compatible, otherwise device may inadvertently upgrade to latest release when they should have remained running v6.
AhsayACB v7+ does not support running on server grade OS. To allow user to run v9 client and unlock new features, for existing AhsayACB installation on server grade Windows platforms, switch the backup account type to an AhsayOBM account, then re-install AhsayOBM version on the affected computer. Otherwise, the client can remain on version 6 with v6 features.
For replication between AhsayCBS to AhsayCBS where the Backup Server was upgraded from AhsayOBS v6, to allow for v6-data replication, you can enable AhsayCBS with v6-compatible replication for v6 data format (Receiver listen on default port 9444).
Before they can be replicated in the new block format, you are still required to undergo the data migration process to convert all v6 backup sets (on the Backup Server) to AhsayCBS block data format, to the AhsayCBS Replication Server.
Step 7 - Build your AhsayCBS Installation File (if applicable)
This step only applies to existing custom branded AhsayOBS who have previously purchased Branding Option (Ahsay Customization Portal) and will continue branding in AhsayCBS.
The branding process of Ahsay software has been enhanced in AhsayCBS over the previous Ahsay Customization Portal used in version 6. Customized CBS (server application) and OBM / ACB (client application) installation files are now built via the AhsayCBS web console, instead of the Ahsay Customization Portal (decommissioned 2018-12-31),
There are two methods to upgrade your branded AhsayOBS:
Method 1: Build after you upgrade to AhsayCBS
- This method is compatible with AhsayCBS.
- Upgrade your AhsayOBS to AhsayCBS by standard AhsayCBS installer downloaded from Ahsay website.
- Your production server will display the Ahsay logo and text, and any backup jobs run will contain such details, until you have the chance to brand your server.
- Upload your custom branding assets using the new AhsayCBS interface.
- Generate new branded AhsayOBM and AhsayACB installers using the AhsayCBS interface.
Pros
- Straight forward with minimal setup resource.
- Perform the branding on a single machine.
Cons
- Before the branding applied to the AhsayCBS interface, client may see the "Ahsay" name on the AhsayCBS management console, reports, and client installer download page.
- The Service name and the Desktop icons in Windows platform, will continue to display the standard Ahsay brand.
Steps
- Prepare the branding graphics according to the Image Specification discussed in the Branding section.
- Upgrade AhsayOBS by the standard AhsayCBS installer.
- Before proceeding, you should jump down to Step 9 to continue with directions to upgrade your server.
- For Windows, refer to the steps in Windows Upgrade Procedure.
- For Linux, refer to the steps in Linux (CentOS, RHE, Ubuntu) Upgrade Procedure.
- For FreeBSD, refer to the steps in FreeBSD Upgrade Procedure.
- Globally disable the client auto update to prevent inadvertent client upgrades. Rename the "index.xml" file in %CBS_HOME%/download/liveUpdate/ to "index.xml.disable".
- For detailed information on how to brand the AhsayCBS interface, reseller interface or AhsayOBM/AhsayACB installers, please refer to the Branding section.
- Go to the Rebrand Clients page, click the Build Installers tab, click the Build Branded Client button to generate branded client installers (allow ~15-30 minutes).
- The branding is now applied to the AhsayCBS server. You can download branded AhsayOBM and AhsayACB client installers from the download page for testing.
- When testing completes, you can reenable the client auto update by renaming the "index.xml.disable" file in %CBS_HOME%/download/liveUpdate/ to "index.xml".
Method 2: Build branded CBS and Client Installers before upgrade
- Install fresh AhsayCBS on a second machine that will be used for installer generation.
- Upload your custom branding assets using the new AhsayCBS interface.
- Apply temporarily your production license to the AhsayCBS.
- Generate branded AhsayCBS installers.
- Run the branded AhsayCBS installer on the AhsayOBS machine (production platform) to perform the upgrade.
Pros
- Smooth transition, clients will not be able to see Ahsay related materials on the AhsayCBS interface after you upgrade.
- The upgrade scenarios can be tested and approved before deploying the new version to production.
- Branded installer can be used by your resellers who want to set up their own AhsayCBS server.
Cons
- Your production AhsayOBS Backup Server may be stopped due to license violation.
- The need to contact Ahsay Support to relax your license.
- Require to setup extra machine for working AhsayCBS installer generation.
Steps
- Prepare the branding graphics according to the Image Specification discussed in the Branding section.
- Download the standard version of AhsayCBS from our website.
Then install and setup AhsayCBS on a new machine. This new machine will strictly be used to perform your branding text customization and upload customized images, and finally build your branded CBS Installer binary, for use later with your AhsayOBS upgrade.
AhsayCBS Installation instructions may be found in the Installation section.
You do not need to go through a full AhsayCBS configuration setup on this new machine. After you install, you basically need to access the AhsayCBS management console URL, login, and browse to the Branding menu pages to begin.- Login to AhsayCBS management console.
This new AhsayCBS install, which had no prior installation of Ahsay, you will be permitted to temporarily use the 60-day evaluation license. You should make use of this time to begin branding customization. If you encounter an expired Evaluation license, it is likely that you had previously installed Ahsay onto that server, and time has elapsed.
Evaluation Only license key is not permitted to Build; however, you can still create your custom branding properties and export as a JSON file.
- For detailed information on how to brand the AhsayCBS interface, Reseller (Sub-Admin) interface, or AhsayOBM/AhsayACB installers; refer to the Branding section.
- The Evaluation key is not permitted to perform the Build Installers. When you have completed your customization and are ready to build your installers, you can temporarily use your production license key on this new machine.
Apply your production license key that you use in AhsayOBS into the AhsayCBS interface in the System Settings > License page.
Your production license key must have assigned and enabled the CBS Module, prior to applying to the AhsayCBS server.It is a violation to run a single license key on two servers. However, if you do not have a spare AhsayCBS license key, then this is your alternative to build the branded installers. You will encounter the license error 1011/1012 error message on either the production server or this demo AhsayCBS. You have limited grace period to use this license on this machine. Excess violation may render both servers inoperable (“Stopped” status). Contact Ahsay Support for further assistance.Under Rebrand Web Console page, go to the Build Installers page, select the correct installer type, save changes (this procedure is important). After properties are saved, then return and click the Build Installer button to generate new branded AhsayCBS installers.
Please be patient as the generation time would take around 15-30 minutes for each installer to build and download to your server. The generation time would depend on the traffic condition on the Ahsay build engine. If you have slow bandwidth, process may take longer (e.g. ~60 minutes).
- Click OK and Save the setting.
- Re-apply the "Evaluation Only" license key onto the new machine. This will prevent your production AhsayOBS server from Stopping due to license violation.
Optional: For validation testing, download branded AhsayCBS installer from the AhsayCBS Download page; test install on another server, and then test the client customization.
You can simulate the upgrade scenario with the branded AhsayCBS installer by installing it on a third machine (testing platform) with AhsayOBS installed. The testing platform could be cloned from your existing AhsayOBS machine, or an old installation with few user data.
- Repeat branding steps if you need to make any changes; then re-test. Continue if you are satisfied with the results.
- Once satisfied with the branding, you may proceed to perform the in-place upgrade.
In order to customize the AhsayCBS web console, client user interface, server and client installation files, the Rebranding Option feature must be enabled for your existing license account AND the support maintenance plan for the license must be valid.
Contact Ahsay sales representatives if you need to purchase the Rebranding Option, or if you need to renew the support maintenance plan for your license.
For customers who prefer Ahsay to create your custom CBS Installer, Ahsay Professional Services offers the Build My Branded CBS Installer Service. If you have a graphics designer, but do not have the time to build the branding profile and build the custom installer, our team can assist you with this project.
Step 8 - Upgrade Concept
Before performing the upgrade, this is what the upgrade will do.
During the upgrade of AhsayCBS, the process will be performing a migration of your current setup. While this process is running, you may see a pause. The delay can vary depending on the files and setup.
As the upgrade runs, the upgrade and migration will process the following items:
- Copy all the required XML files such as obs.xml, rps.xml, license.xml, sysUser.xml, etc to the /conf folder in AhsayCBS. The XML data will be converted into the file obs.json and cbs.json.
- Convert the server.xml in v6 to server.xml in AhsayCBS format.
- Copy the option file obsr.opt and afc.opt, and convert it into the obs.json and cbs.json file.
- Move the system log folder to system/obs.
- Extract the keystore file and convert it into three certificate files: conf/ssl.crt, conf/ssl.key, and conf/ca.crt.
- Startup AhsayCBS service.
- Perform User Profile migration by reading the %USER_HOME%/%USER%/db/Profile.xml and convert it to %CBS_HOME%/conf/users.xml, for unsupported languages in the User Profile, reset them to the default language settings. User Home path will not change.
- Perform User Group Policy migration.
After the upgrade/migration, you should be able to find the following in the AhsayCBS installation home.
- Previous settings will be migrated into the file obs.json and cbs.json, such as System Home path, Hostname, System Admin login, SMTP settings, etc.
- The System Home path in AhsayCBS should be referring to the %OBS_HOME%/system/ folder, which contains /cbs, /obs, /rdr and /rps subdirectories.
- Three certificate files, i.e. ssl.crt, ssl.key and ca.crt can be found in the %CBS_HOME%/conf folder. You can check the HTTPS connection with a browser if the SSL certificate has been migrated successfully. Future SSL Certificate updates should be handled via the AhsayCBS Web Management GUI, using the SSL Import feature.
- In the %CBS_HOME%/bin/Migrate.log, you will be able to see the entry “Migration is Completed” at the end of the log file.
In the %CBS_HOME%/logs/obs_context_yyyy-mm-dd.log (yyyy-mm-dd refers to the upgrade/migration date), you will be able to see information such as
"INFO: [UserConverter.migrateProfile] Migrated user 'my_user' successfully"and
"INFO: [UserConverter.migrateProfile] Write 'C:\Program Files\AhsayCBS\conf\users.xml' successfully after migration".- In %CBS_HOME%/conf/users.xml, you will be able to see the entry such as "Value name="name" inheritParentAttribute="Y" type="string" data="my_user" />", where Username "my_user" was imported into the AhsayCBS during the migration progress.
By default, the backup set will be converted to the AhsayCBS block data format automatically when the device has upgraded to v9 client and continues to perform backup jobs per backup set.
If a backup set is dormant, then it will not be able to perform the Data Migration processes (Stages), and it will remain in v6 format. You should retain copies of v6 client, for future restore purposes, as v7+ client cannot restore v6 format data.
If your User Home disk volume is low on space, you should plan to extend the storage well before upgrading to AhsayCBS. You will need 150% in temporary free space to migrate from v6 data format to CBS v7 Blocks format. You may need up to 2x in additional temporary space to convert from CBS v7 Blocks to CBS v9 Deduplication optimized Blocks afterwards.
Alternatively, you can disable the Backup Schedule of the v6 Backup Sets and create new Backup Sets that will run natively in v9 Blocks. This will eliminate the needed time to process through the required Data Migration conversions. The legacy Backup Sets can be archived or removed once enough Retention covers v9 Backup Sets.
Step 9 - Upgrade AhsayOBS to AhsayCBS
After performing all pre-upgrade steps above, you are ready to upgrade your production AhsayOBS v6.29 server to AhsayCBS.
Since AhsayOBS v6 is EOL since 2018 Dec 31, upgrade to AhsayCBS is only compatible with AhsayOBS v6.29 (v6 Sunset) and client v6.29.
Any earlier version pre-v6.29, should first perform an intermediate upgrade and enable AUA v6, so that server and clients run v6.29.
When upgrading on Linux and FreeBSD, in order to support AhsayCBS v9.1 or later, your system must run GNU GLIBC v2.14 or later. To check your version, run “ldd -version” from shell. For FreeBSD only, the version of your OpenJDK must be v8.
- Before you do the upgrade, make sure you have the following two items prepared:
- A recent set of the latest v6 configuration files.
- A copy of your existing v6 binaries/system home and client installers (AhsayOBC).
- On the AhsayOBS server slated for upgrade:
- For default AhsayOBS with no branding, download the latest public release AhsayCBS installer at: Free trial/download
- For customized / branded AhsayOBS, download your branded AhsayCBS installer that you built from the previous step (e.g. from the stand-alone server with AhsayCBS installed).
- For continuity with the flow of this guide, for platform-specific upgrade instructions, jump to Upgrade Procedure Steps for your Operating System. Follow those instructions, before continuing here.
- After you have completed upgrade of your server, return here and continue with the next section.
Step 10 - Post Upgrade
Here are some general guidelines and tasks, soon after your upgrade.
- Login to the AhsayCBS web console; review the server settings after the upgrade is completed.
- Navigate through each sub-page (and tabs) and review settings.
- Review License page, verify no negative usages. Note your Maintenance Exp Date.
- Verify System Settings > Basic > General > Host Name is your server’s FQDN.
- Review Default Settings policy, modify according to your needs.
- Download Client installers and verify branding and test connectivity.
- Connect from any AhsayOBM/AhsayACB to AhsayCBS to verify clients can connect.
Check HTTPS connection to AhsayCBS from different browsers (Internet Explorer, Firefox and Chrome).
Check your server’s SSL Certificate validity. You can use your web browser to load your AhsayCBS web console URL (example, HTTPS://hostname.domain.com/cbs/Logon.do), to view the SSL Certificate details using your browser.
When are the default Ahsay Dummy self-sign certificate acceptable for business
- Here is a list of suggested items to check after you started up your AhsayCBS.
- Login to the AhsayCBS web console with an admin account.
- Check all users’ profile, backup and policy group settings in Backup/Restore > Users, Groups & Policies.
- Navigate through each sub-page (and tabs), familiarize and review settings.
- Check “Host Name” valid represents your Fully Qualified Domain Name (FQDN) of your AhsayCBS server for which this installation was installed onto. You may find it in System Settings > Basic > General > Host Name.
- Confirm SMTP settings are accurate, in AhsayCBS web console System Settings > Basic > Email.
- Test connect AhsayOBM/AhsayACB (v6) to AhsayCBS with both HTTP and HTTPS connection.
- Monitor your AhsayCBS status via the AhsayCBS web console at Monitoring > Dashboard. Pay attention to the Memory and Storage charts.
Check for any error displayed under To Dos > System Errors.
Resolve any new system error that may be displayed, not seen when previously running OBS. Contact Ahsay support representatives if you require any assistance on resolving system error that is displayed.
- Allow your v6 clients to perform Backup jobs, to validate if any new errors appear, before upgrading them to the new client version.
- Allow the AhsayCBS server to run for a few days, to reduce troubleshooting efforts from making many changes in a single sitting. Staggering your changes can pinpoint issues easily.
Please be aware that two active paths, as mentioned in the table below, remain in the AhsayOBS installation path after you finish upgrading to AhsayCBS. DO NOT remove them as they are symbolic links used by some of the new AhsayCBS installation paths. Removal of the original v6 installation folder may cause AhsayCBS fail to operate.
You can consult with your System Administrator, if you prefer to change or remove the symbolic link.
Corresponding new paths in AhsayCBS Original paths in v6.x AhsayOBS
(DO NOT REMOVE)C:\Program Files\AhsayCBS\system\obs C:\Program Files\AhsayOBS and AhsayRPS\system C:\Program Files\AhsayCBS\system\rps C:\Program Files\AhsayOBS and AhsayRPS\rps-system /usr/local/cbs/system/obs /usr/local/obs/system /usr/local/cbs/system/rps /usr/local/obs/rps-system *Substitute the standard path above with your custom path.
For replication from AhsayCBS to AhsayCBS where the backup server is upgraded from v6, starting from AhsayCBS v7.11.0.0 or above the replication of v6 backup sets is supported. If the "Replicate v6 backup sets to v7 server" feature is enabled on backup server under [Sending Data] and the "Enable V6 Backup Sets Replication" feature is enabled on the replication receiver under [Accepting Data]. Default port 9444.
Consult the Replication section for further details.
For AhsayOBS with Reseller Settings
If you have dedicated connector for your sub-admin in version 6, after you upgraded to AhsayCBS. You need to set the corresponding connector in your sub-admin.
Example
After the upgrade, you may have found the following connectors settings in the AhsayCBS management console System Settings > Basic > General > Connectors.
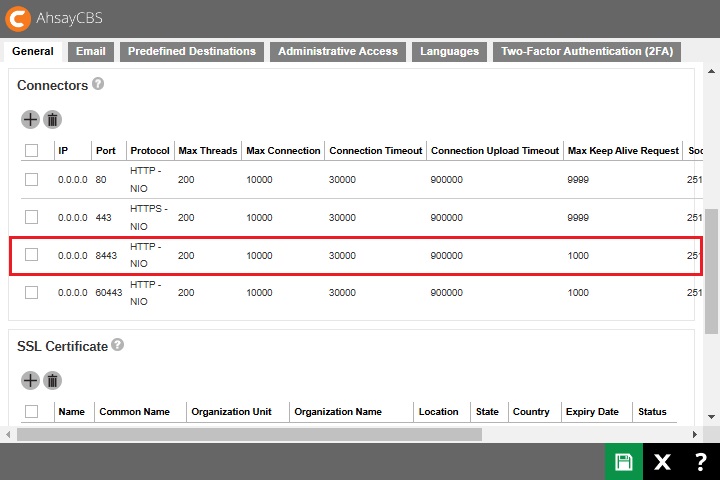
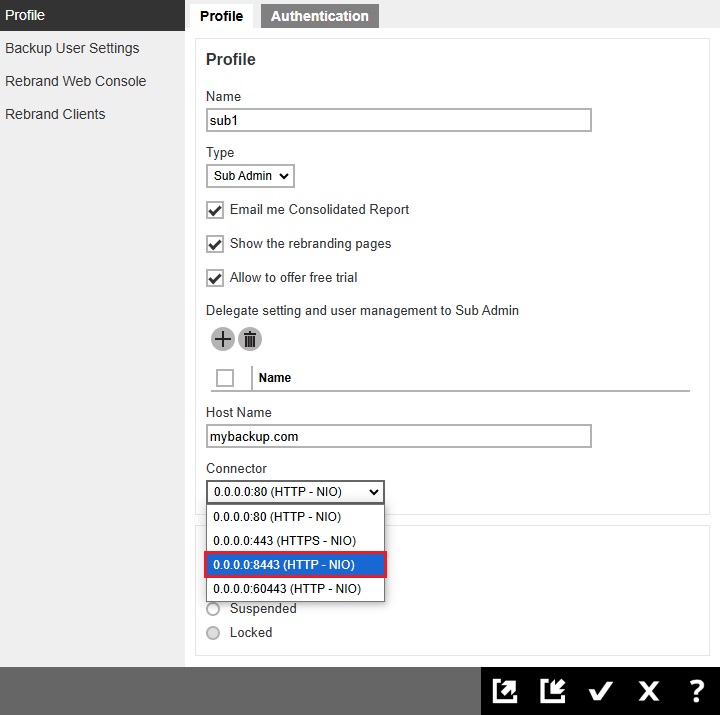
In order to make the connector, for example 8443 (highlighted in red), so that it can be used for the corresponding reseller account, you must edit the reseller profile setting in the AhsayCBS management console System Settings > Basic > Administrative Access, then click on the corresponding reseller account.
In the Profile page, select 8443, for example, from the dropdown list of the connector. Save the changes after the modification.
Step 11 - Temporarily Disable the Auto Update (AUA) and Data Migration Settings
Temporarily disable the Auto Update (AUA) settings on the AhsayCBS server to reduce unintentional changes or consuming all User Home disk space due to the Backup Set Data Block conversion.
It is important that the AhsayCBS application is running properly with minimal error, before upgrading the AhsayOBM/AhsayACB clients to version 9, and before migrating data to the new AhsayCBS block data format.
Disabling will reduce complex troubleshooting in the event an issue is found.
- Login to the AhsayCBS web console.
- Disable the Auto Update (AUA) option, under Backup / Restore, click Users, Groups & Policies > Backup User.
- Select all users, then click Auto Update.
- Select all users, then click Cancel Auto Update.
Step 12 - Upgrade AhsayOBM / AhsayACB with Auto Update (AUA)
Upgrade the client applications for all backup accounts in phases. This will reduce high system resource. AhsayCBS simplifies the client upgrade with the Auto Update Agent (AUA) to push out the newer version to user’s devices. This will reduce impact to your User Home storage, as once your user’s device upgrades to v9 AhsayOBM / AhsayACB and perform backups, the AhsayCBS server-side will undergo background Backup Set Data Migration (consisting of four total stages and up to 150% of disk usage per v6 backup set).
The AUA feature, when enabled, will auto upgrade any connected devices for that backup user. For example, if user Johnny has five devices, then when AUA is enabled, all five devices will auto update. It is not configurable to select which devices participate in AUA.
Prioritize and divide all backup accounts into small batches.
Consider upgrading clients with existing software issue that are resolved in new version, or clients who require new features introduced in newer version; with higher priority (e.g. support for MS Exchange 2019, Run Direct feature for virtual machine backup). Divide all users into small batches (e.g. 10 users per batch).
Note that, Auto Update for AhsayOBM / AhsayACB installation Windows XP and 2003 are only supported by AhsayCBS version 7.15.0.20 or above. However, if these OS have backup sets which are not compatible with AhsayCBS (double-check SCL), then DO NOT ENABLE AUA for this user.
For instructions on how to enable AUA please refer to the How to enable AUA section. Stagger the upgrade process to avoid network congestion. Review the upgrade process after user has performed a job. The client application should be upgraded automatically within 12 hours. Check on the client version via the Auto Update page. Check for any backup issue after the upgrade. In the AhsayCBS web console at Monitoring > Dashboard > To Dos. All failed backup jobs are displayed under "Failed Backups". Resolve all backup errors, contact Ahsay support should you require any assistance to resolve a backup error. Repeat the same process for the next batch of users, until all client applications are upgraded.
- For clients upgraded to v9 OBM/ACB agent, until the Data Migration has fully completed your User Home storage may see considerable free space reduced. If your User Home storage is low on free disk space, you may want to limit the number of users who upgrade from v6, to v9 OBM/ACB, and waiting after several days so that those who upgraded and run scheduled backups can complete the v6 to Blocks data conversion; before continuing with enabling AUA for more users.
- For branded environments, before you enable AUA, you should manually test your branded clients to validate correct branding and theme. And for future CBS upgrades, you repeat this test. You wouldn’t want to push out an untested branded client, only for those end-users to find mistakes.
- AUA is not supported for server OS running ACB, due to AhsayCBS licensing terms.
- Each individual user’s AUA setting (Enabled/Disabled) is retained even after future AhsayCBS upgrade installation.
AhsayCBS AUA supports auto update of AhsayOBM / AhsayACB installation on Windows XP and 2003. However, please note that support for Windows XP and 2003 platforms are on best effort basis. These OS may run incompatible applications not supported in v7+, therefore those devices should remain running v6 client.
Example, for AhsayOBM installation on Windows 2003 with MS Exchange 2003 database or mail level backup sets, upgrading from OBM 6 to OBM 7 will stop these backup set from working properly, as Exchange 2003 is not supported by AhsayOBM version 7+.
If you have any users with mix-compatible devices, you should avoid enabling AUA, as this may cause issues to the user and failed backup.
Auto Update Limitation
Auto Update Agent does not support a full AhsayOBM installation on the following operating system platforms:
- QNAP
- Synology
For these platforms, you must manually upgrade each time you upgrade your AhsayCBS.
Auto Update Agent may not support a full AhsayOBM / AhsayACB installation on the following operating system platforms:
- FreeBSD
- Linux
Since the use of OpenJDK 8, and requirement for GLIBC 2.14 (or later). The AUA will not deploy installation or upgrade of GLIBC and OpenJDK during the auto update. Please update them manually on these platforms. Refer to the AhsayOBM Installation guides of the respective platform for further details.
For instances when AUA did not update the client, please refer to the Troubleshooting AUA section.
If you need to manually upgrade your AhsayOBM / AhsayACB, the instruction will be the same as a brand new installation. Please refer to the AhsayOBM / AhsayACB installation guides for more information.
Step 13 - Storage and Version Requirement Check for Data Migration
The backup set data migration requires temporary disk space as it converts your v6 data into the pre-v9 block format. Check on the User Home; ensure that there are sufficient disk spaces available for the data migration process to take place.
Starting with AhsayCBS v9.1, it is not possible to have granular selection of which user’s Backup Sets perform the Backup Data Migration conversion to AhsayCBS block format. For AhsayCBS v9, any v6 backup set, upon client upgrade to AhsayOBM or AhsayACB v9.x, will initiate the process automatically. You should be aware this process requires free disk space on the AhsayCBS User Home path(s), and without the ability to pause or stop the conversion process after the client upgrades to v9 AhsayOBM/AhsayACB, you must ensure you have adequate storage for the User Home path prior to upgrade.
- Ensure there are no disk related issues on your server (by checking the OS logs).
- Ensure that there are sufficient disk spaces available on your User Home drives for the data migration conversion process, and clients are upgraded to v9.1.0.0 or above.
If you know your User Home disk is limited on space, you should limit and stage your client upgrades. The conversion is automatically processed on the AhsayCBS server, in the background. There is no ability in AhsayCBS v9 to pause or skip this feature. If you find disk space hardship you may need to relocate backup users to another User Home drive or add more physical storage before you decide to schedule an upgrade of your Backup Server.
During the data migration process, storage capacity of the corresponding backup set will be doubled, as data in version 6 and AhsayCBS pre-v9 block formats will co-exist temporarily, until the migration process is complete for the backup set. After the backup set has been successfully migrated to AhsayCBS block format, the original v6 data will be automatically removed at the start of next hour by a system job.
Check on the User Home; ensure that there are sufficient disk spaces available. The absolute minimum requirement of free storage is 100 GB; the migration process will not start unless there is 100 GB of free space available per User Home volume.
The free space requirement will be 150% per backup set running v9 agent. Manually check on the size of each and all backup set folders in the User Home in the following path:
%USER_HOME%\username\files\%BACKUPSET_ID%
Make sure that you do not exceed your free disk space. If the calculation yields an estimated size greater than your User Home available free disk space, you should first make plans to increase disk space BEFORE continuing with client upgrade.
Example:
- User Home: D:\users == 99GB free ➔ Does not meet minimum requirements
- User Home: E:\users == 200GB free ➔ Backup set conversion can proceed
- User: John Doe, User Home: E:\users\JohnDoe, has one Backup Set: 50GB ➔ Data Migration temp space required on E: = 75GB free
- User: Jane Doe, User Home: E:\users\JaneDoe, has one Backup Set: 150GB ➔ Data Migration temp space required on E: = 225GB free ➔ Conversion will fail (stop) due to lack of disk space
If at any time you fall below disk space requirements, the conversion process will stop. It will automatically resume when free space is achieved.
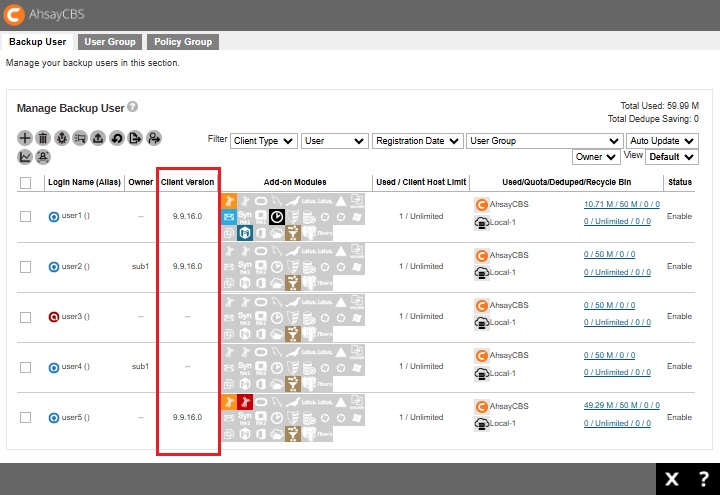
- Next, check the client version of all backup accounts. The data migration process is triggered when a backup job is started; User device’s client agent must be on minimum version 9.1 to start the migration process:
- Login to the AhsayCBS admin web console.
- Under Backup / Restore, select Users, Groups & Policies.
Under Backup User tab, you will see your list of users, look at the "Client Version" column to identify which user has upgraded and which have not.
- After client upgraded, make sure that at least one backup job had been performed for each backup sets. If backup sets are inactive, then they cannot participate in the conversion.
Step 14 - Data Migration for all v6 Data Backup Sets
Starting with AhsayCBS v7, we introduced a new data block format (16MB/32MB). And with AhsayCBS v9, the data block format is further enhanced (32MB/64MB, 8 threads). This is an improvement over the data file format from version 6 or earlier.
AhsayCBS v9.1 has changed the behavior of the Backup Set Data Migration process. In previous version, i.e. AhsayCBS v8 and AhsayCBS v7, it was possible to skip certain backup sets or not run the conversion at all (leaving a hybrid of v6 data and v7/v8 data blocks). However, starting with AhsayCBS v9.1 and the introduction of Deduplication and the enhanced 32MB/64MB block format, skipping the data block conversion is no longer permitted; all devices running v9 client must undergo the data block conversion process (from v6 data, to pre-v9 blocks format). Also, v9 allows the running of Data Integrity Check (DIC) for v6 data. After the data has converted to pre-v9 blocks format, each Backup Set will need "Migrate Data" feature option enabled, which will then make the data compatible with Deduplication.
To convert data from version 6 data format to the redesigned block format of AhsayCBS. There are several steps to get going, and four stages to fully convert any one backup set for data stored on the AhsayCBS User Home storage destination, details below.
- Verify User Home free disk space is within range of your backup set 150% estimation.
Prioritize and divide all backup accounts into small batches.
Consider migrating data for users with backup or restore performance issues with higher priority. Divide all users into small batches (e.g. 10 - 20 users per batch).
- Phase the client upgrade in stages. Either by enabling Auto Update (AUA) or having the user manually download and upgrade their client software.
- Upon running v9 client and performing the first backup with the new version, there will be an Index migration (conversion). [Stage 1]
- Once that job completes, on the backend, the AhsayCBS server-side will initiate the v6 backup data conversion. This conversion is single threaded, so the first backup set ready, will start to convert. Other backup sets will queue when their stage reach the requirements. [Stage 2]
- After the AhsayCBS server-side conversion completes for that backup set, upon completion of the backup's next backup job, another stage will validate the converted data with the original v6 data. If no errors, the final stage is queued. [Stage 3]
The final stage will purge the v6 data, reclaiming storage on the User Home path, thus freeing up space. Other client-side Utilities such as Data Integrity Check is available. [Stage 4]
For backup set with Data Migration enabled, the migration process may cause a slight delay to the backup operation with the extra I/O operation on the User Home volume.At any time, you can view the overall migration status.
Method 1
On the AhsayCBS web console go to Monitoring > Backup / Restore Logs > Backup Set Log, locate the “Migrate v6 Status” column.
You will see "Pending", "In Progress" or "Completed".
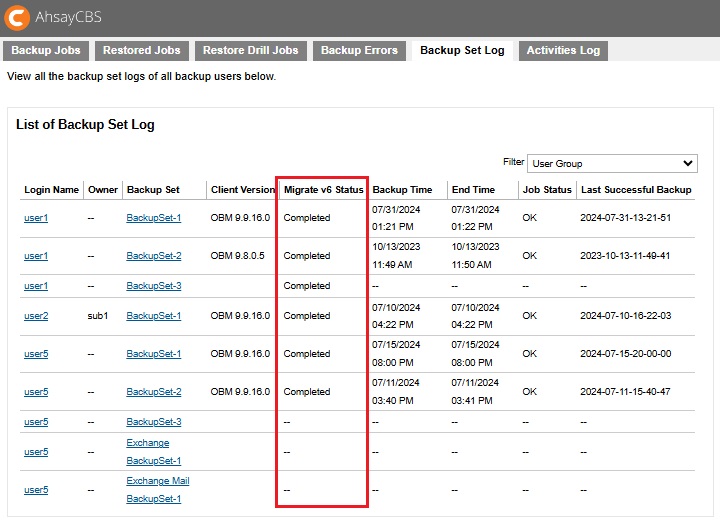
- Pending – No conversion has started. Probably the device is not yet running v9 agent or maybe it has not yet run a backup job since upgrading.
- In progress – Migration is underway. Specific stage is not shown here. If after several backup jobs, and this has not yet moved to Completed, you may want to further troubleshoot by checking the log status.
- Completed – Backup Set has fully converted to blocks data format. Backup Set’s v6 data removed, User Home space freed.
Method 2
On the AhsayCBS web console, go to Monitoring > Administration Logs > Activities Log. Change the “Filter” type to Migrate V6 Data Info to check on the migration process.
The following log entry can be found when a migration process is started for a backup set:
[Thread][Job][MigrateV6File]Start Migrating v6 data of user 'username’, backup set 'backupset_name'The following log entries can be found when the server-side migration is complete:
[Thread][Job][MigrateV6File]Finish migrating v6 data of user ' username ', backup set ' backupset_name '
[Thread][Job][MigrateV6File]End Migrating v6 data of user ' username ', backup set ' backupset_name '
Check for any backup issue after the data migration. In the AhsayCBS web console go to Monitoring > Dashboard > To Dos. All failed backup jobs are displayed under “Failed Backups”.
Review user's migration status.
From the AhsayCBS admin web console, go to Backup / Restore Log > Activities Log, change the "Filter" type to User Change Log, and "View" to This Week.
There are four stages for each backup set conversion.
Stage 1
First backup job run using v9 client (manually or schedule).
Backup Report will log:
Migrating index entry Job="Current" Path="xxxxxxxxxx" Type="xxxxx" from v6 to v7Stage 2
Enable server-side conversion from CBS. data-migration-status = Running.
When processing server-side conversion, you can search for the "data-migration-status" value to determine progress of stage 2.
Completed stage; data-migration-status = Finished.
Stage 3
After previous stage is Finished, upon next backup job run, start of Data Validation to compare v6 data and converted data.
If errors detected, it will repeat from stage 2 (Running). If you encounter it repeats Stage 2 for the same backupset multiple times (Finished > Running > Finished > Running; or Running > NotStarted > Running > NotStarted), verify that you have adequate free disk space and check the logs (Migrate V6 Data Error); open an Ahsay Support ticket if you need further assistance.
If no faults, then it automatically continues to stage 4.
Stage 4
data-migration-status = Verified. Indicates the conversion completed for this backup set.
Each backup set will need to undergo each of the four stages independent of another backup set’s stage progress. If a backup set finished stage 2, another backup set can start stage 2, so forth.
- Resolve all backup errors; contact Ahsay support should you require any assistance to resolve the backup error.
Once you have enough “Completed”, then you can repeat the process for the next group of users to upgrade and start their data migration.
After the user’s Backup Set data has converted to pre-v9 blocks format, each Backup Set should have the "Migrate Data" feature option enabled, which will then make the data compatible with Deduplication. More details about "Migrate Data" are found in the Ahsay v9 New Features Datasheet or the Overview section.