
 AhsayCBS
Backup Sets GUI Overview
Backup Sets Overview
The backup set page is where you will set the files and/or folders to be backed up. This feature allows the user to select files individually or an entire folder to backup. It is also used to delete backup set(s).
To create or modify a backup set, follow the instructions in the Backup & Restore section.
Below is a list of configurable settings under a Backup Set:
- General
- Source
- Backup Schedule
- Continuous Backup
- Destination
- Deduplication
- Retention Policy
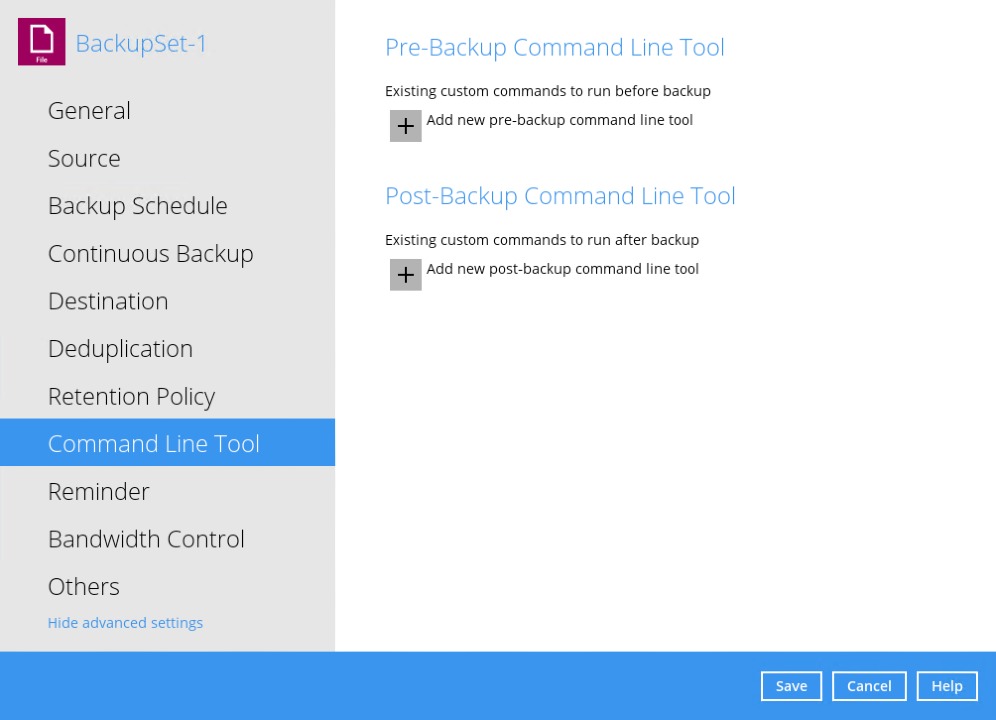
- Command Line Tool
- Reminder
- Bandwidth Control
- Others
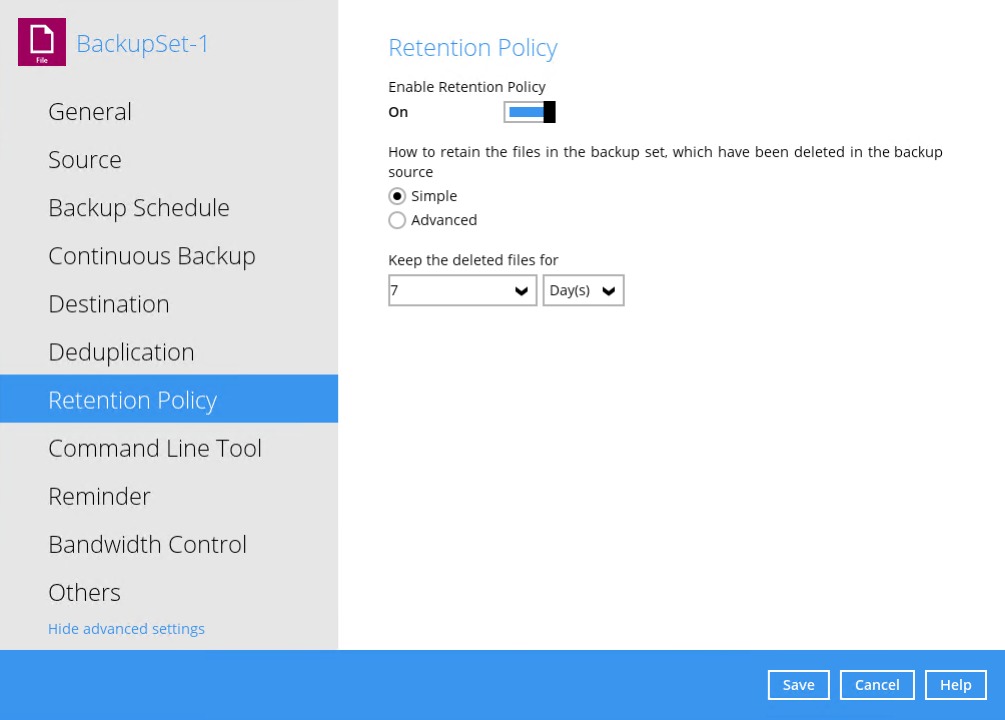
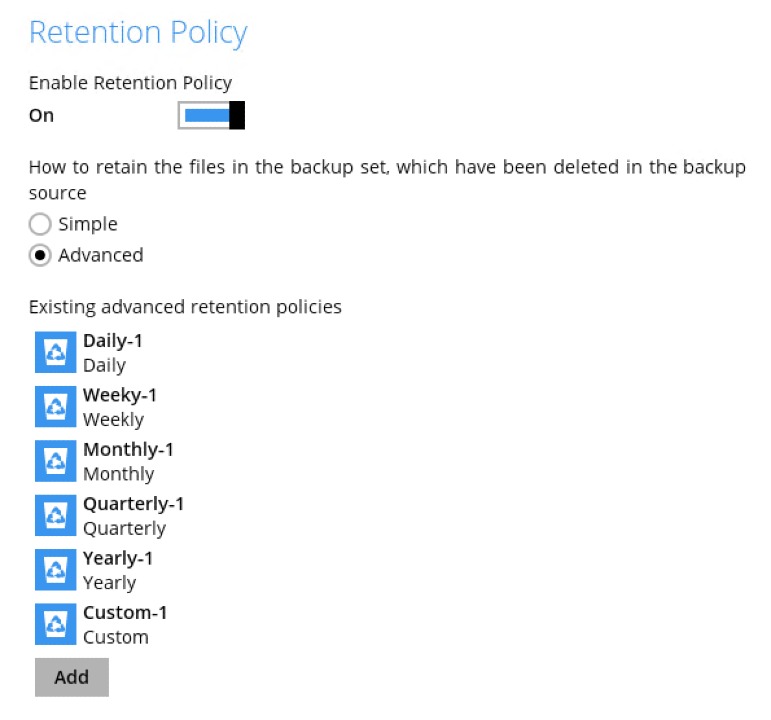
Retention Policy
When AhsayOBM identifies files and/or folders that are deleted, updated, or with updated permission/attributes during a backup job, these files and/or folders will then be moved from the data area to the Retention Area.
Retention Area is a place used as a temporary destination to store these files (deleted, updated, or with updated permission/attributes during a backup job). Files and/or folders in the Retention Area can still be restored.
The Retention Policy is used to control how long these files remain in the Retention Area before they are removed which can be specified in the number of days, weeks, months, or backup jobs. Retained data within all backup destinations (e.g., AhsayCBS, local drive, SFTP/FTP and cloud storage) are cleared by the Retention Policy job.
The default Retention Policy setting for a File Backup Set is 7 days, but the appropriate Retention Policy setting depends on individual, contractual, or regulatory requirements.
There are two (2) types of Retention Policy:
| Retention Policy | Description |
|---|---|
| Simple | A simple Retention Policy is a basic policy where the retained files (in the Retention Area) are removed automatically after the user specifies the number of days or backup jobs. |
| Advanced | An advanced Retention Policy defines a more advanced and flexible policy where the retained files (in the Retention Area) are removed automatically after a combination of user defined policy |
Simple and Advanced Retention Policy Comparison
| Control | Simple | Advanced |
|---|---|---|
| Backup Jobs | Can keep the deleted files within 1 to 365 backup job(s) | Not applicable |
| Days | Can keep the deleted files within 1 to 365 day(s) | Can keep the deleted files within 1 to 365 day(s) |
| Type | Not applicable | • Daily • Weekly • Monthly • Quarterly • Yearly • Custom |
| User-defined name | Not applicable | Applicable |
Configuring a Simple Retention Policy
- Go to Backup Sets, then select a backup set.
- Click the Retention Policy tab in the backup set settings.
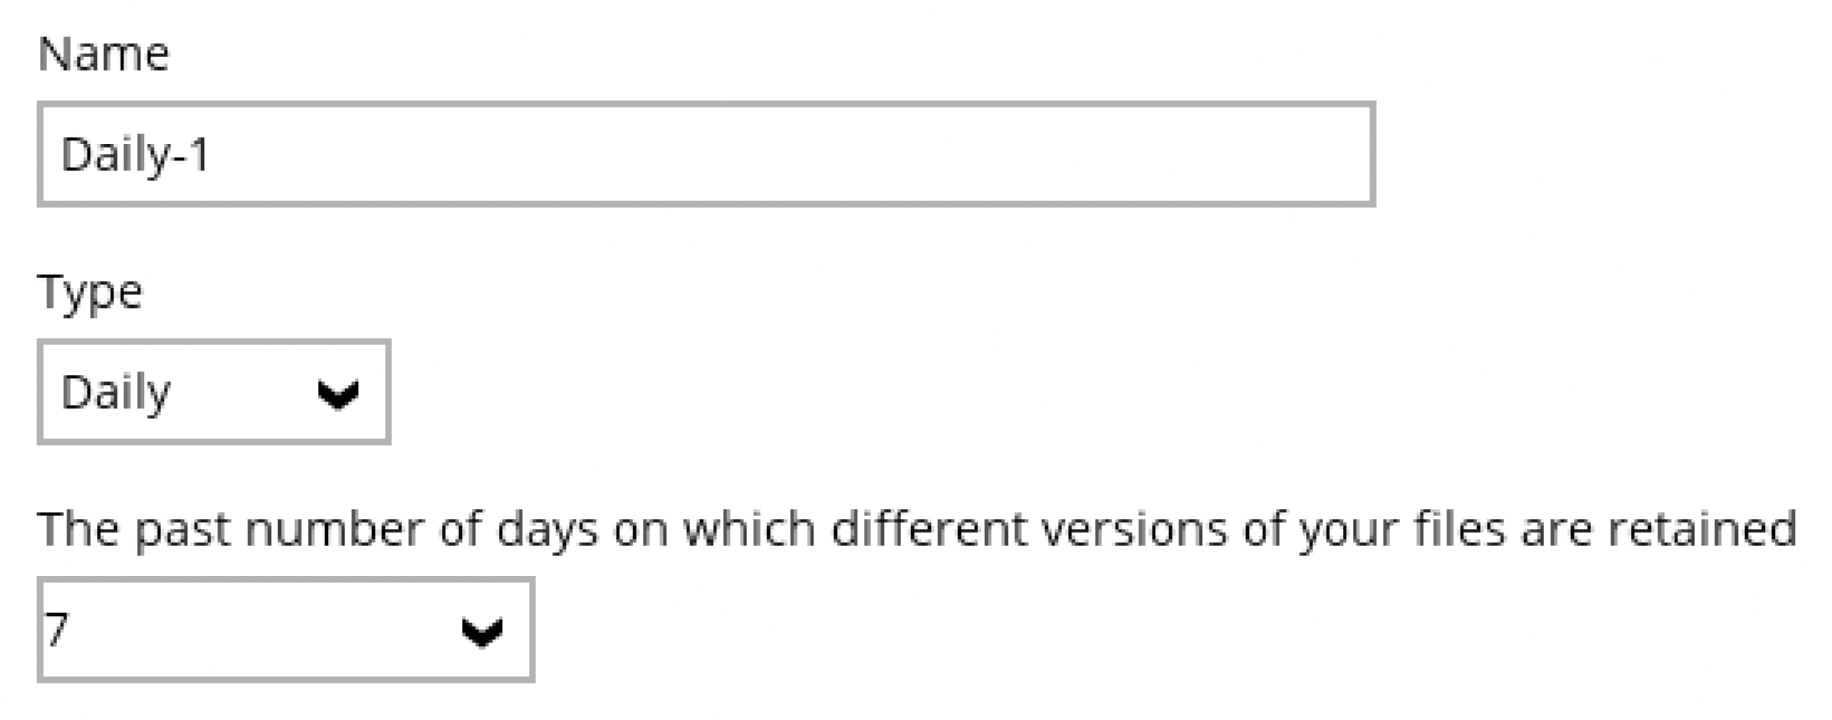
Select Simple from the options, then click the drop-down button to define how long in number of day(s) or job(s) when the deleted files will be retained. This is configured as seven (7) days by default.
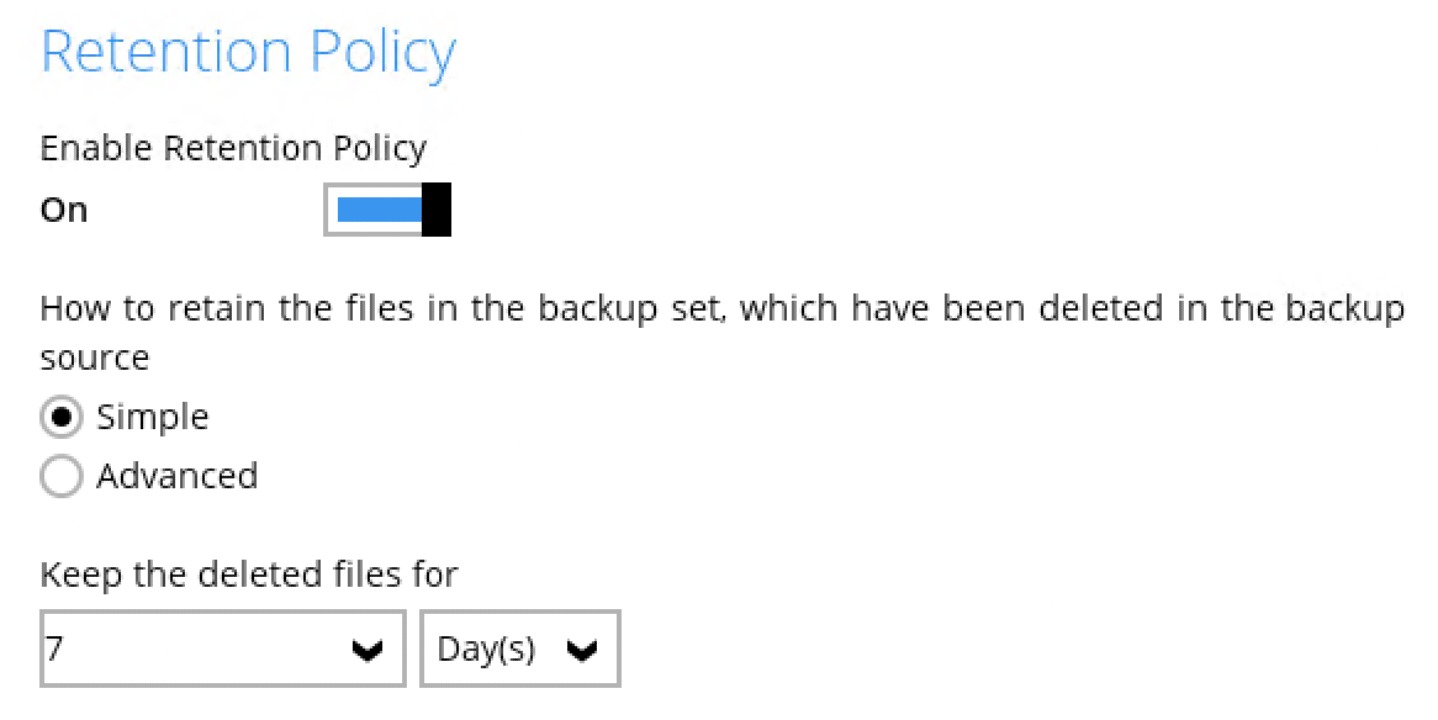
- Click the Save button to save the configured Retention Policy settings.
Configure an Advanced Retention Policy
- Go to Backup Sets, then select a backup set.
- Click the Retention Policy tab in the backup set settings.
Select Advanced from the options, then click the + button to create.
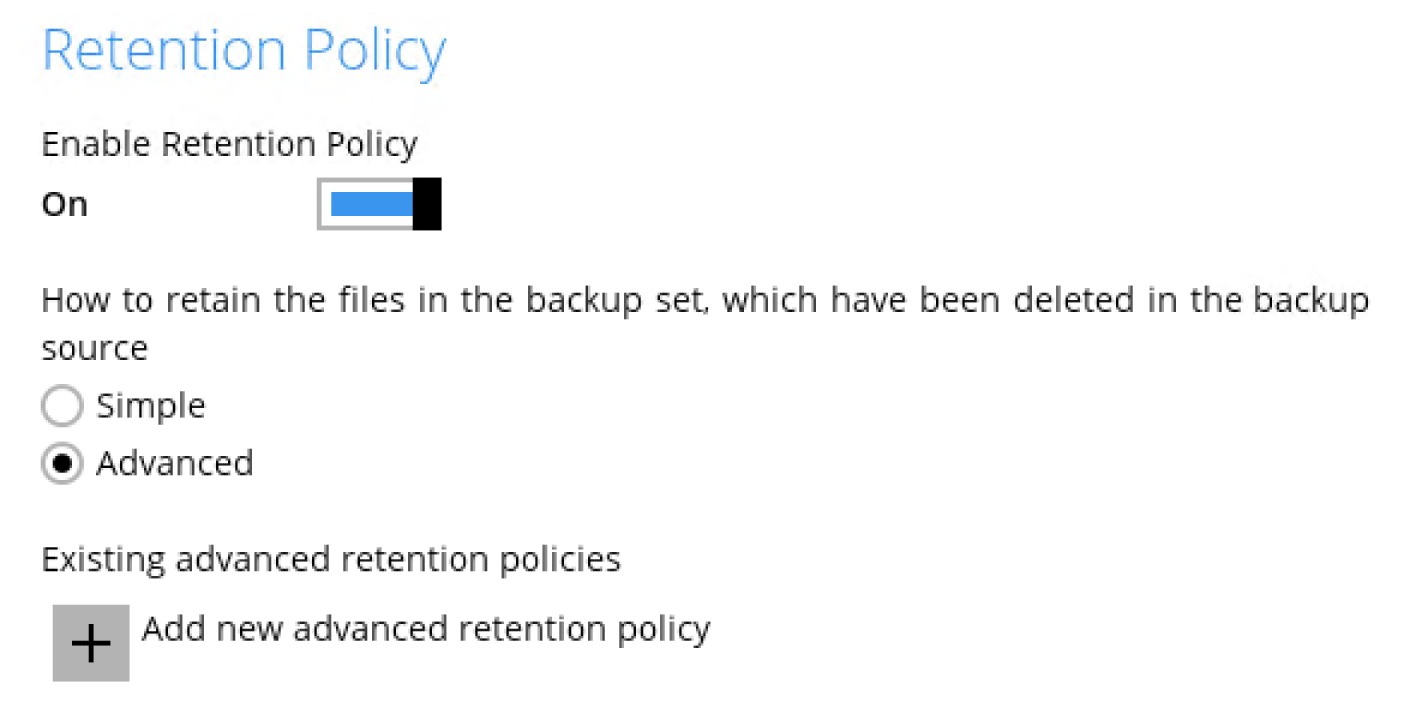
Assign a desired name for the Retention Policy.
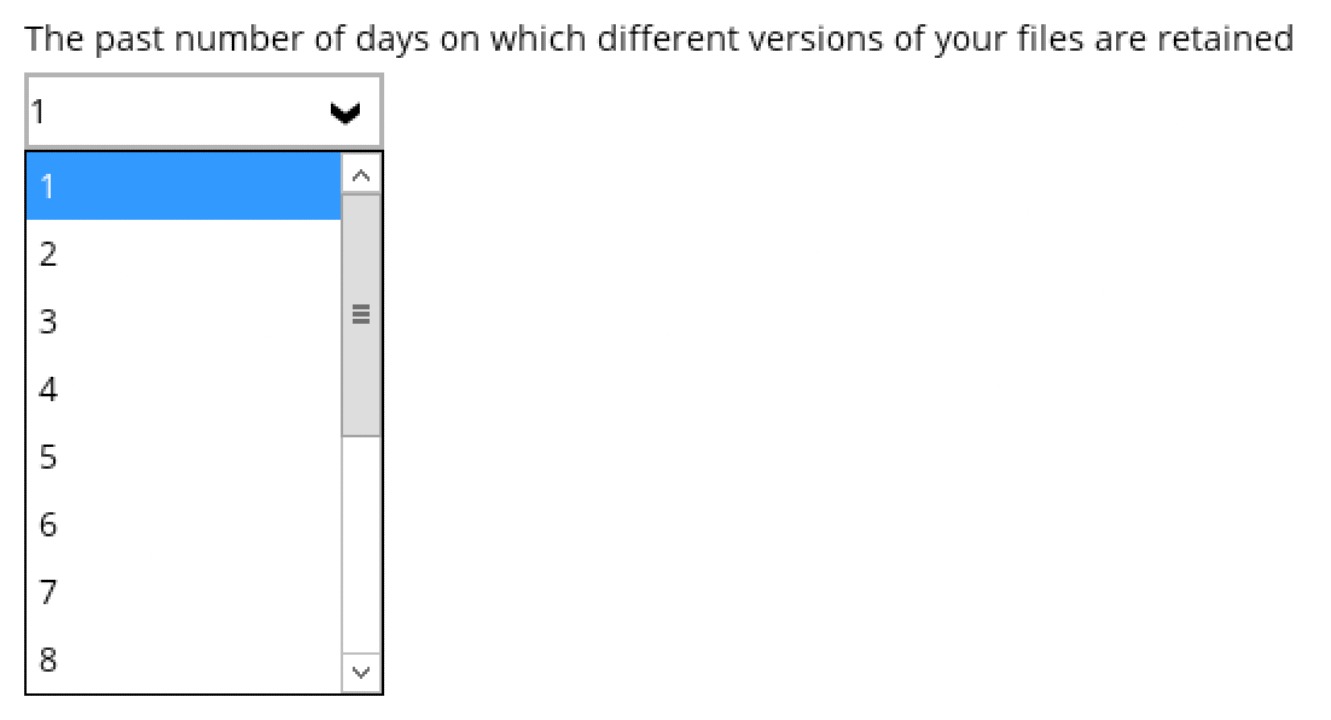
Click the drop-down button to display the "Type", then select one.
Click the drop-down button to specify the period on which the deleted files will be kept in the backup set. Number of days can also be entered manuallly.
- Click the OK button to save the configured advanced Retention Policy, then click Save to store the settings.
Disable Retention Policy
- Go to Backup Sets, then select a backup set.
- Click the Retention Policy tab in the Backup Set Settings.
Slide the switch to the left to disable Retention Policy.
For further details about how to configure an advanced Retention Policy for each type (i.e., Daily, Weekly, Monthly, Quarterly, Yearly, Custom), refer to the examples below:
Example 1: To Keep the Retention Files for the Last Seven (7) Days
Example 2: To Keep the Retention Files for the Last Four (4) Saturdays

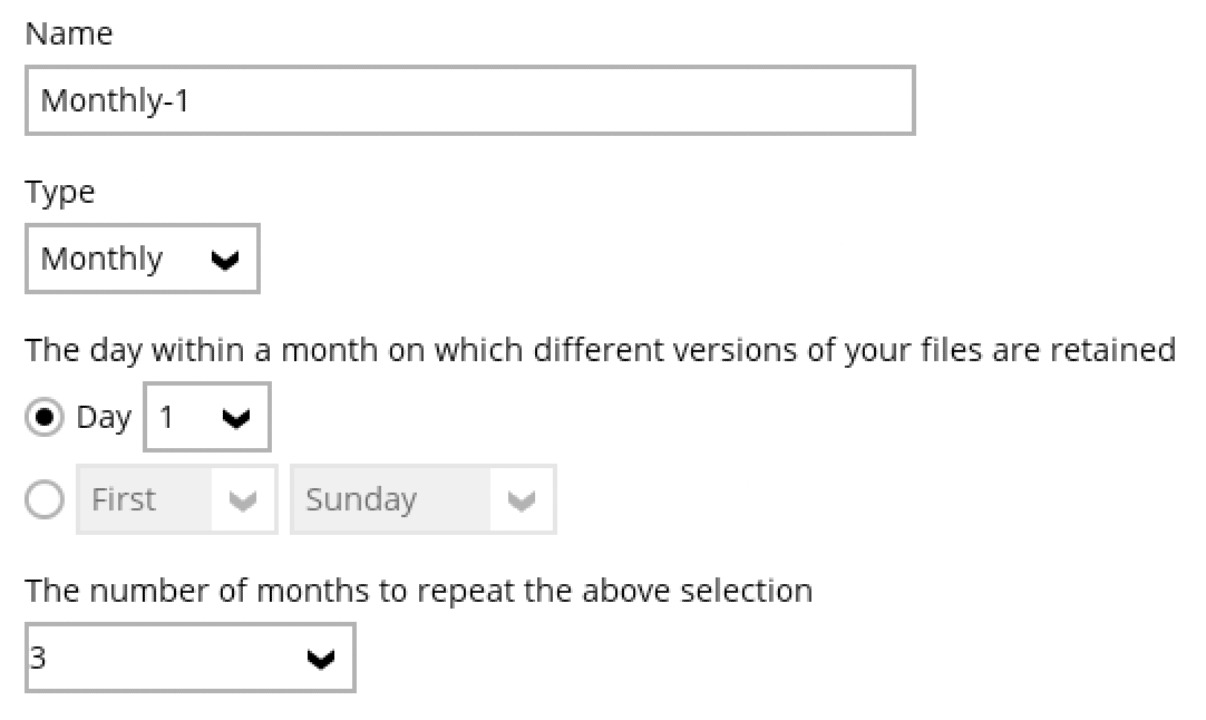
Example 3: To Keep the Retention Files for the 1st Day of Each Month for the Last Three (3) Months
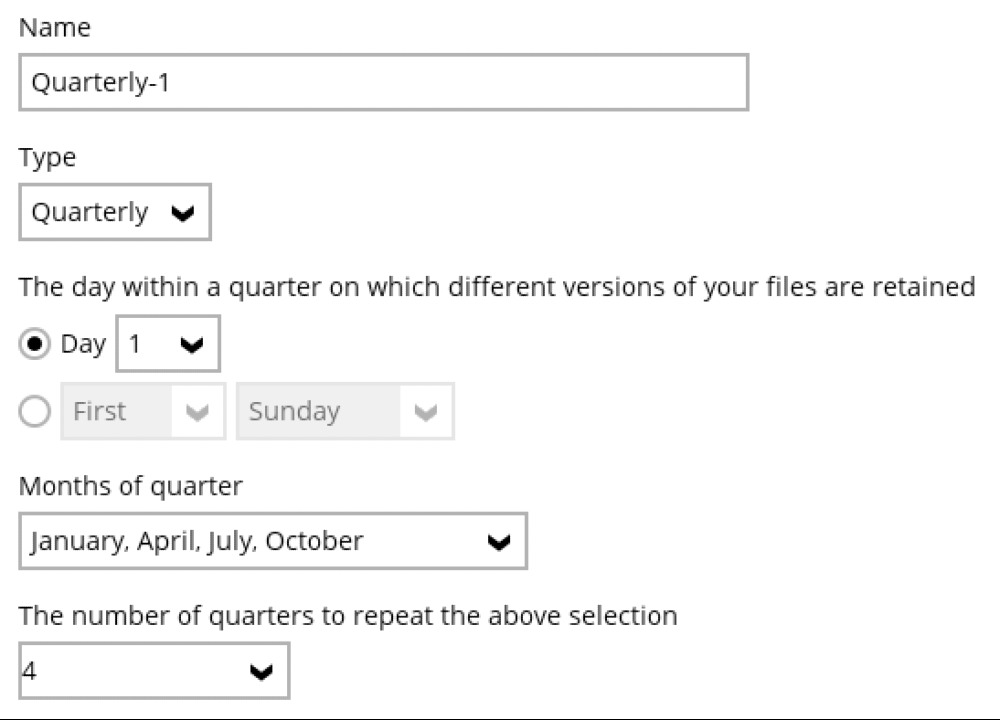
Example 4: To Keep the Retention Files for the 1st Day of Each Quarter for the Last Four (4) Quarters
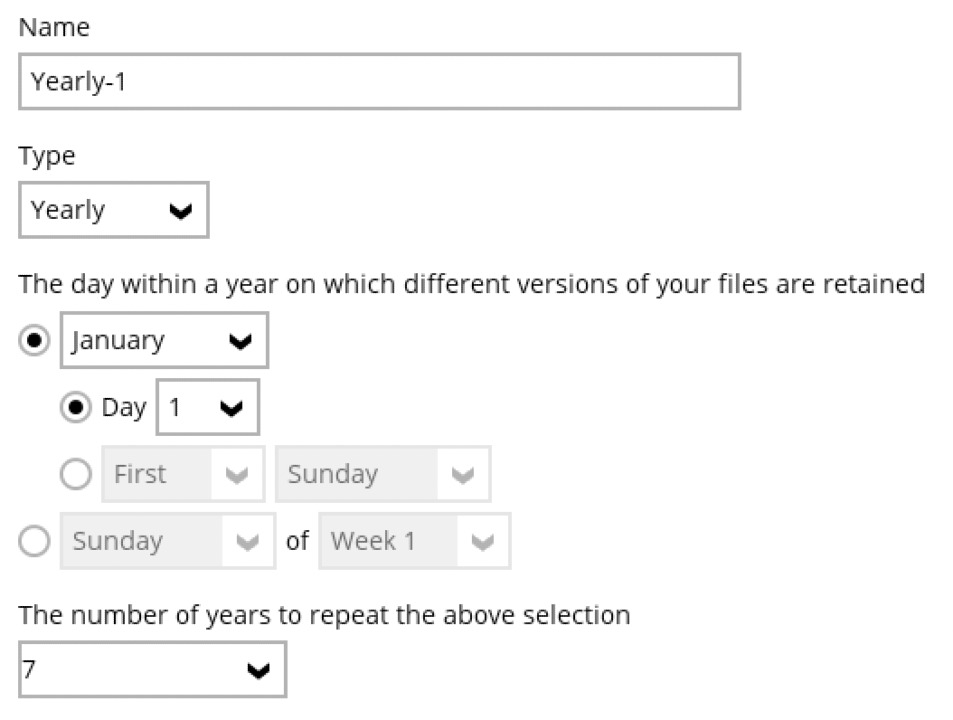
Example 5: To Keep the Retention Files for the 1st Day of Each Year for the Last Seven (7) Years
Example 6: To Keep the Retention Files on the Last Sunday of the Last Week of a Particular Year
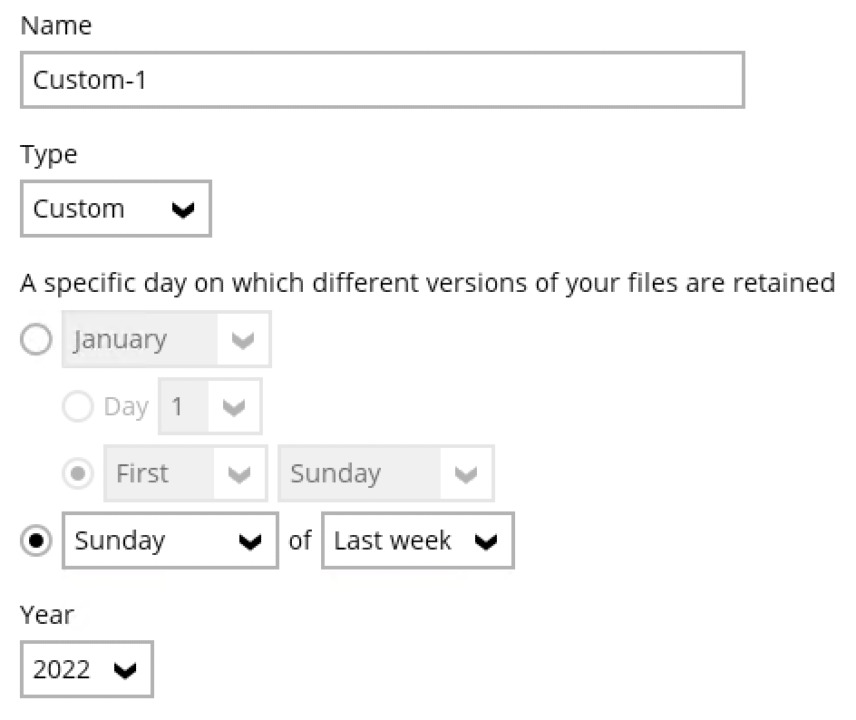
Multiple Advanced Retention Policy can be created:
Space Freeing Up
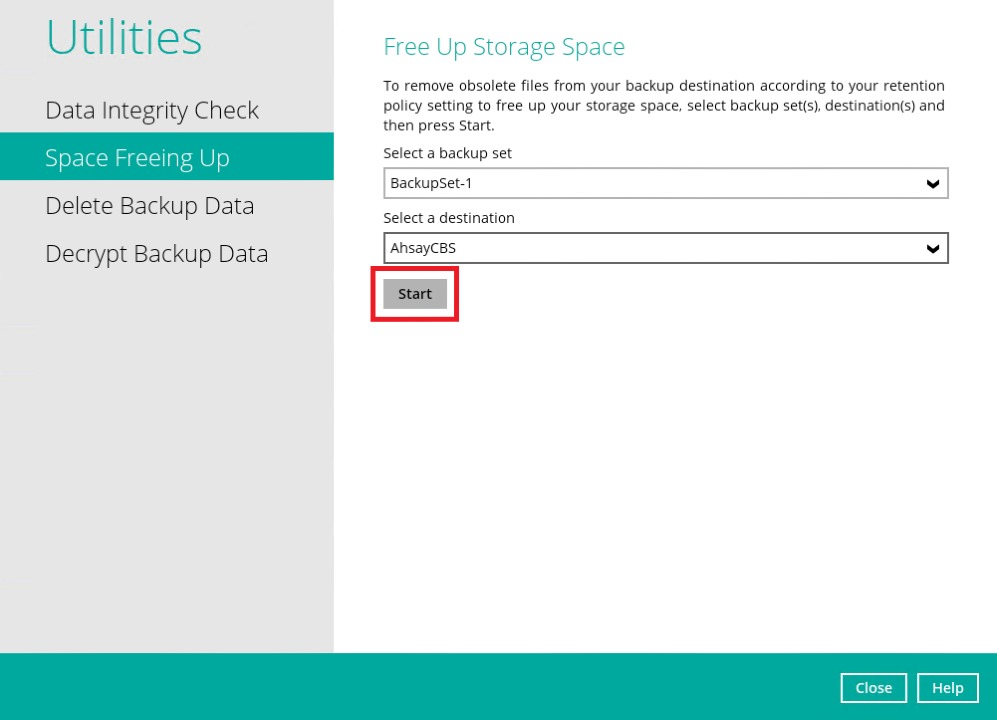
Click the Utilities icon in the AhsayOBM main interface.
Select the Space Freeing Up tab in the Utilities settings.
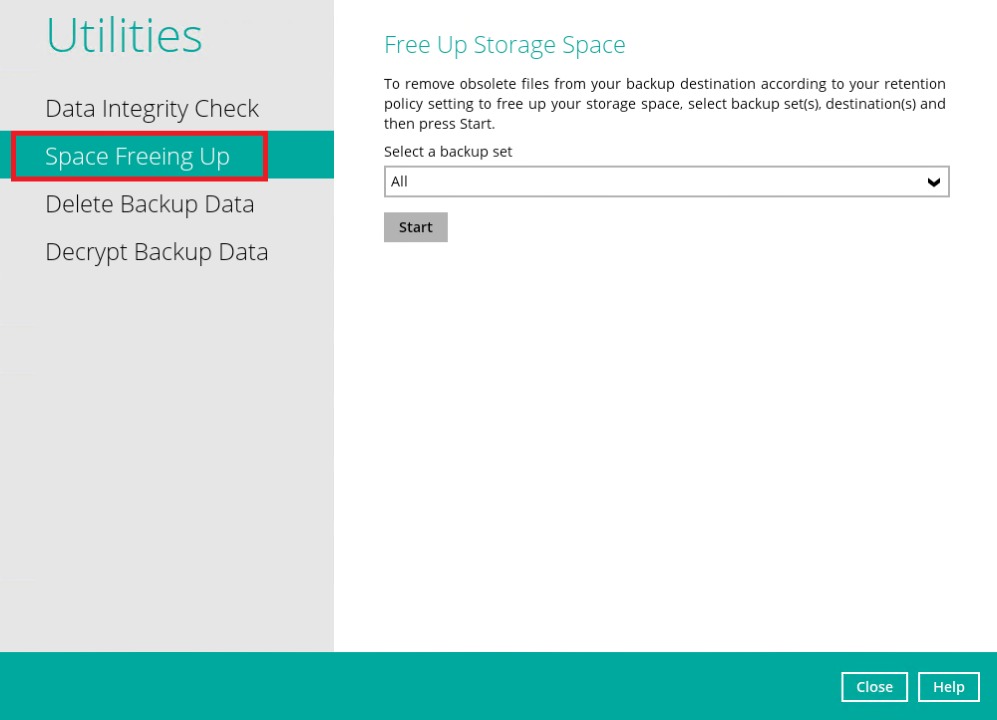
Select the corresponding backup set and destination (e.g., AhsayCBS, local drive, cloud storage) where you want the Retention Policy job to run on.
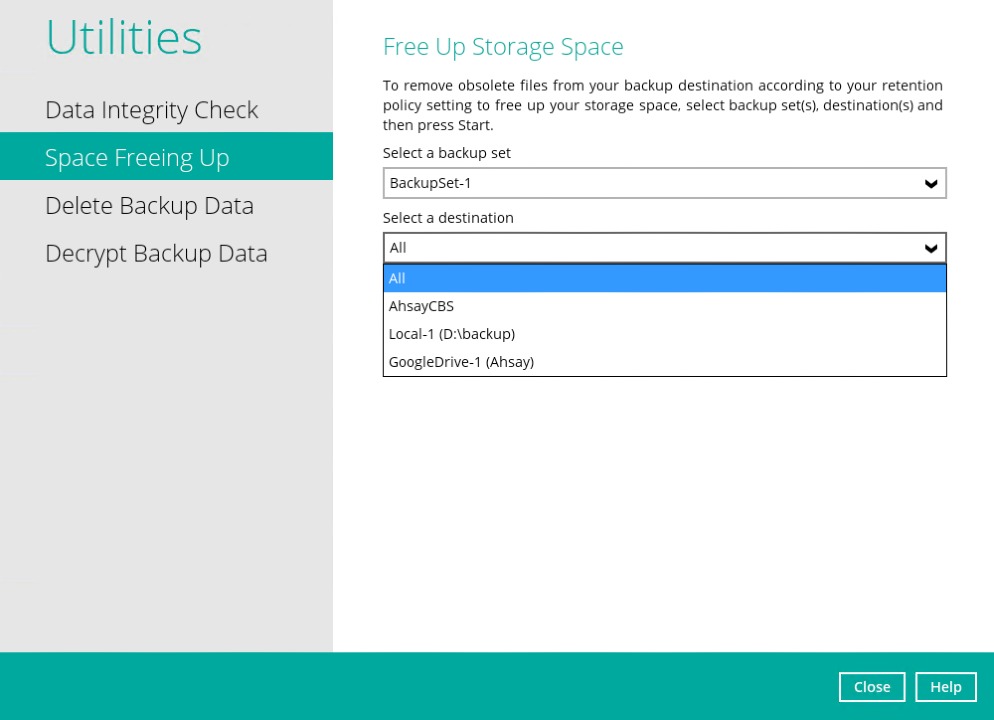
Click the Start button to run the Retention Policy job on the selected backup set(s) and backup destination(s).
 For more details about Space Freeing Up, refer to the Space Freeing Up section.
Command Line Tool
This feature allows the user to configure a pre-backup or post-backup command which can be an operating system level command, a script, or batch file, or third-party utilities to run before and/or after a backup job.
Example: Connecting a network drive an disconnecting a network drive, stopping a third-party database (not officially supported by Ahsay) to perform a cold backup, and restarting a third-party database after a backup.
Requirements and Best Practices
Error and Exception Handling
Each pre-backup command or batch file should have an error and exception handling. If a pre-backup command contains an error, although an unhandled error may not hinder the backup job process, and the backup is successful, it will result in a status indicating completed backup job with warning(s). For more details about backup report status, refer to the Reports section.
Command or Batch File Compatibility
Make sure that each command (pre-backup and post-backup) are tested thoroughly before including them in the backup job.
Scheduled Backup
If the scheduled backup job is set to stop after x no. of hours, make sure that the duration of the running backup job will not be affected. You may need to adjust the number of hours in the backup schedule configuration. Please refer to the Backup Schedule section for more details.
Pre-Backup Command Limitation
A Windows reboot or shutdown must not be used in the pre-backup command. Otherwise, the machine will shut down immediately that will result in a status indicating "Backup not yet finished", which can be viewed in the AhsayCBS User Web Console. Please refer to the AhsayCBS Guide for more details.

Post-Backup Command Recommendation
It is recommended to include a timeout for a post-backup command to shut down the machine. The timeout must be adjusted until when AhsayOBM sends the backup job status to AhsayCBS.
In this example, the configured post-backup command is to shut down the machine that has a timeout set to ninety (90) seconds. The machine will shut down automatically after the specified time.
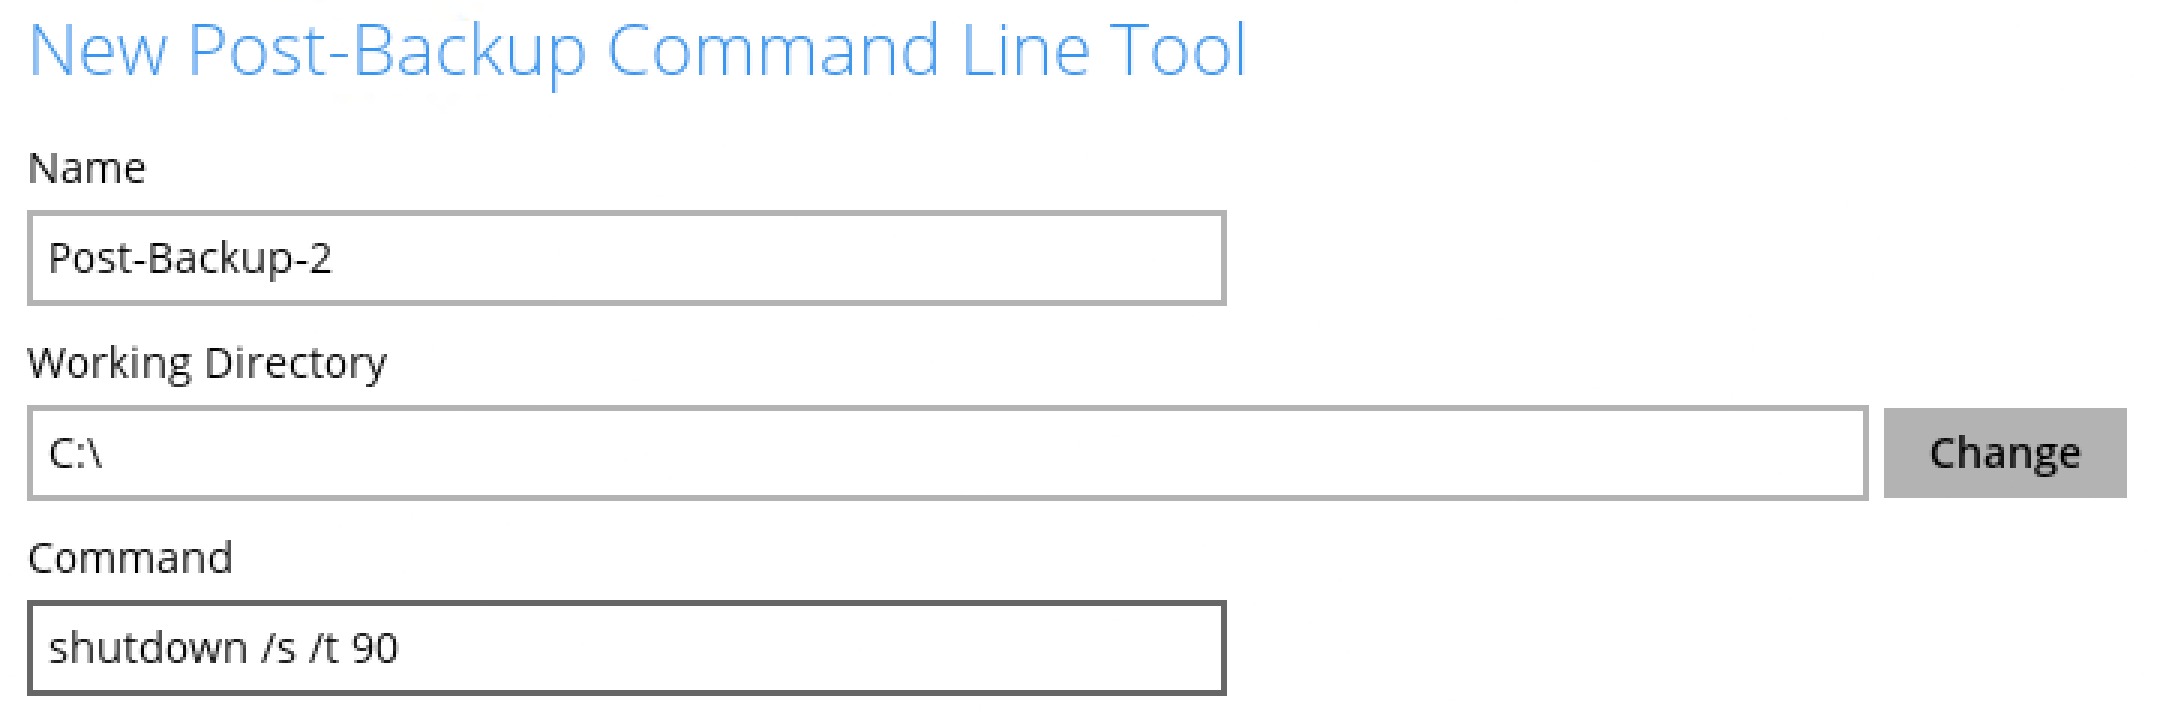
This is to ensure that AhsayOBM has enough time to complete the backup process in order to send the backup job status to AhsayCBS before the machine shuts down. See screenshot below:

There are three (3) fields in the command line tool:
| Field | Description |
|---|---|
| Name | The user-defined name of the pre-backup or post-backup command. |
| Working Directory | The location in the local machine which the pre-backup or post-backup command will run at, or the location of the command or created batch file. |
| Command | The pre-backup or post-backup command which can be defined as a native command or command to execute a batch file, command, or a VBScript (exclusively for Windows). |
Pre-Backup Command
A pre-backup command is used to execute an action or process before the start of a backup job. To create a pre-backup command, follow the steps below:
Click the + button.
Assign a desired name to the pre-backup command.
Click the Change button to locate the working directory of the command.
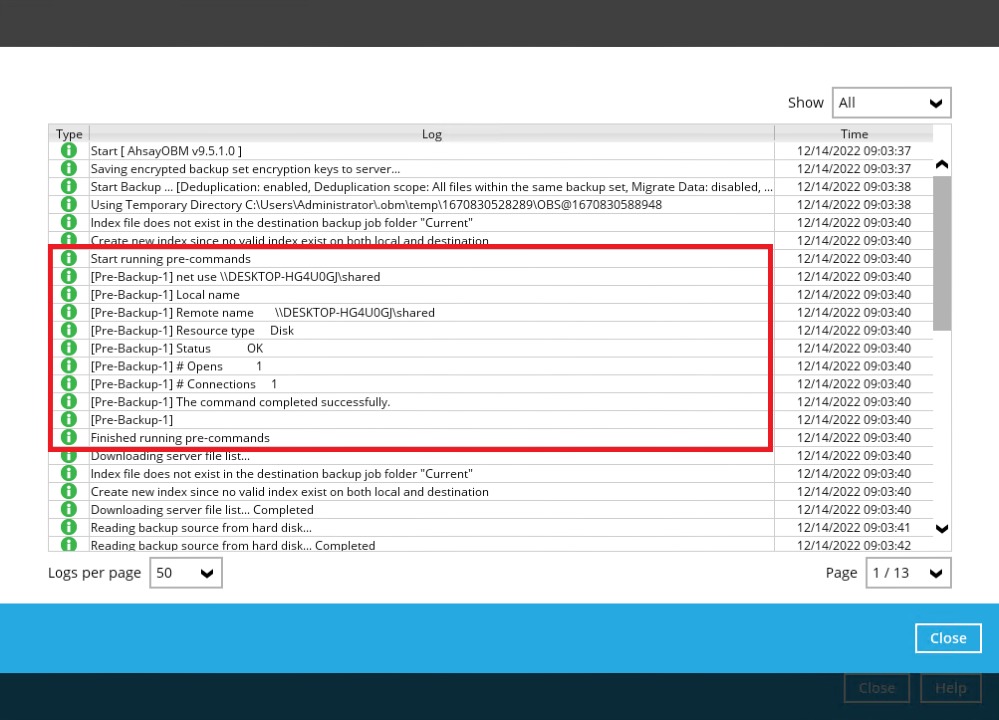
Input a command to be run before a backup job. In this example, the pre-backup command will connect to a network drive before the backup process.
- Click the OK button to save the created pre-backup comman, then click the Save button to save the settings.
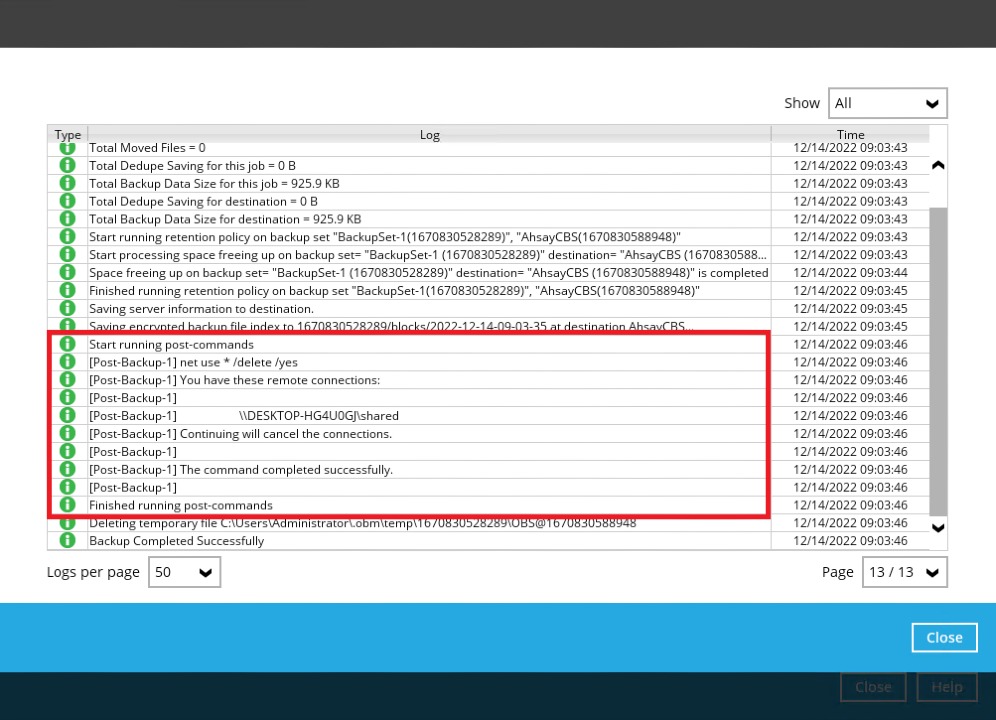
Once the backup job is complete, click the search button to display the backup report log where you can check if the pre-backup command has run successfully.
Post-Backup Command
A post-backup command is used to execute an action or process after a backup job. To create a post-backup command, follow the steps below:
Click the + button.
Assign a desired name to the post-backup command.
Click the Change button to locate the working directory of the command.
Input a command to be run after a backup job. In this example, the post-backup command will disconnect a network drive after the backup process.
- Click the OK button to save the created post-backup command, then click the Save button to save the settings.
Once the backup job is complete, click the search button to display the backup report log where you can check if the post-backup command has run successfully.
- Multiple pre-backup and post-backup commands can be created in the Command Line Tool.
- Errors from pre-backup and post-backup commands will only be flagged as a warning and will not cause an error. The warning may be viewed in the logs.
- To trigger a job warning, pre-backup and post-backup commands must output a message to stderror. It is not possible to cause a job "Error" message to be logged.
Reminder (Windows Only)
There are two types of "Reminder" that can be configured:
- During Windows log off or shut down - On (default)
- When the last backup is over the set tolerance period - Off (disabled)(default)
When either of the options are enabled, a backup confirmation dialog box will prompt the user to start a backup during Windows log off/shut down or when the latest backup job is over the configured tolerance period.
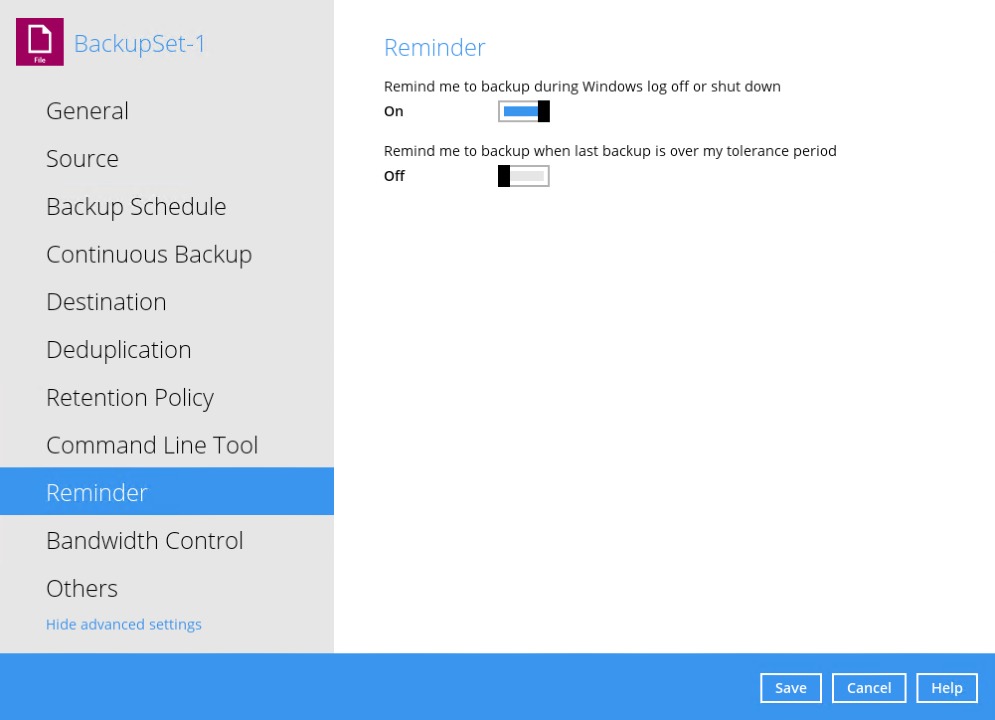
Configuring Reminder Settings
- Go to Backup Sets, then select a backup set that you would like to enable the "Reminder" option for.
- Click the Reminder tab in the backup set settings.
Slide the lever to the right to enable the reminder to start a backup during Windows log off or shutdown.
Slide the lever to the right to enable the reminder when last backup is over the tolerance period.
This will allow you to set the tolerance period by selecting the number of day(s) or hour(s). You may select from 1 - 31 days or 0 - 23 hours. When this option is enabled, the default tolerance period is 1 day.
When the latest backup is over the configured tolerance period, the following prompt to run a backup will be displayed.
- Click the Save button to apply the "Reminder" settings.
- This feature is only supported on Windows 7 (and older) and Windows Server 2008 (and older). Due to limitations on Windows where the shutdown screen overrides the backup prompt, the feature is removed on Windows 8/Windows Server 2012 or above.
- The dialog box will only appear if there is a backup set with On (enabled) Reminder setting.
- During Windows log off or shut down, the confirmation prompt will only be displayed for four (4) seconds.
- If there are multiple backup sets displayed, you cannot select one (1) backup set to back up. It is recommended to only enable the Reminder setting for the backup sets you regularly back up.
For more detailed examples of the Reminder feature for Windows log off, restart, and shut down, please refer to the Reminder Feature Scenarios in the Appendix section.
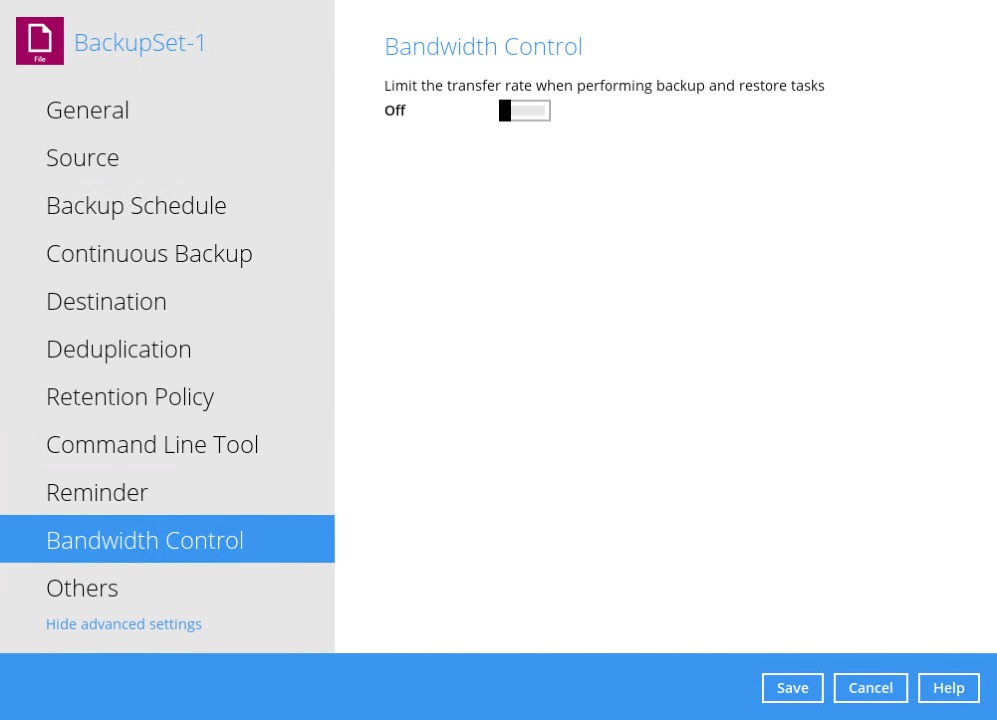
Bandwidth Control
This option allows the user to limit the amount of bandwidth used by backup traffic between specified times. This feature is configured to be disabled by default.
There are two (2) different modes in assigning a bandwidth control:
| Bandwidth Control Type | Description |
|---|---|
| Independent | Each backup and restore has its assigned bandwidth. |
| Share | All backup and restore operations are sharing the same assigned bandwidth. |
Enabling Bandwidth Control Setting
Slide the lever to the right to turn on the bandwidth control.
Select a bandwidth control mode.
If you want to add a modified bandwidth control, click the + button.
Complete the following fields:
- Name - the name of the bandwidth control set.
- Type - the type of enforced bandwidth control period.
Maximum transfer rate - the maximum bandwidth used.
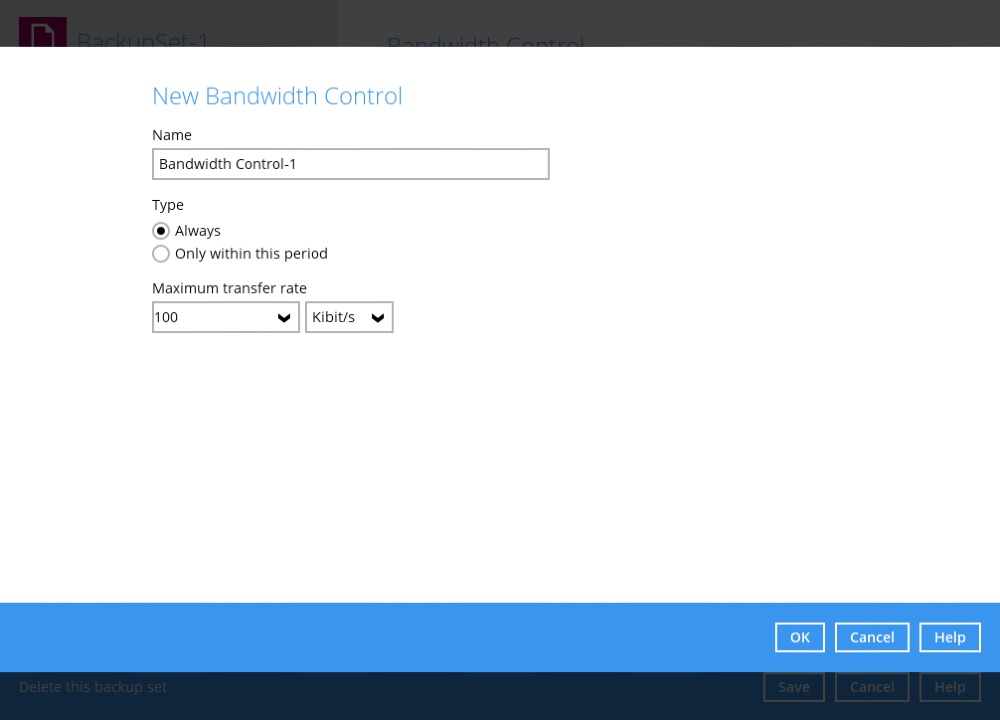
- Click the OK button to save the created bandwidth control set, then click the Save button to save settings.