Article ID
Last Reviewed Date
Product Version
Operating System
Description
This Know-How article contains instructions on how to move a backup user from one AhsayCBS server to another AhsayCBS server, either:
- under the same Redirector host.
- or, between two stand-alone AhsayCBS servers for users who are not owned by Sub-Admin.
Solution
The following assumptions are made:
- AhsayCBS A and AhsayCBS B are in the same Redirector setup (AhsayCBS C).
- AhsayCBS A, AhsayCBS B and AhsayCBS C are all on same AhsayCBS Version (+ hotfix).
- Backup user's username will be moved from AhsayCBS A to AhsayCBS B and will not duplicate another similarly named user (unique regardless of case-sensitive).
- Backup data are stored on the AhsayCBS server. Moving user with data on cloud storage or pre-defined destination are not supported (the settings and ID# might not align on destination AhsayCBS).
- Both AhsayCBS A and AhsayCBS B can be accessed physically (for best result) instead of over Remote.
-
On the original AhsayCBS server (AhsayCBS A), export the backup user settings and data.
- Login to the AhsayCBS web console (AhsayCBS A's web console).
- Under Backup / Restore, click Users, Groups & Policies.
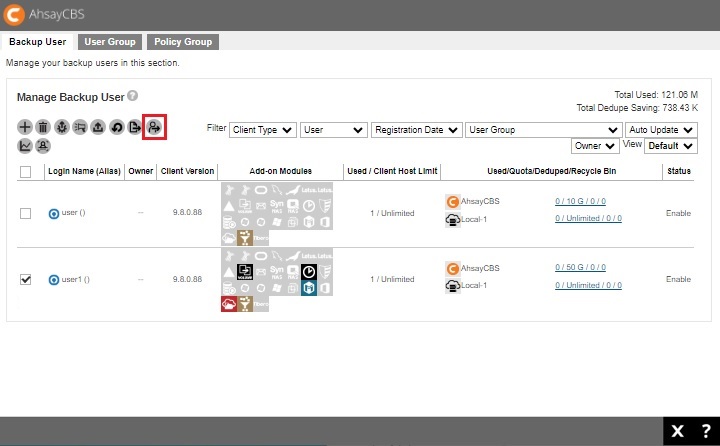
- Under Backup User, select the checkbox beside the backup user to be moved.
-
Click the Move / Import / Export Users icon under Manage Backup User.
-
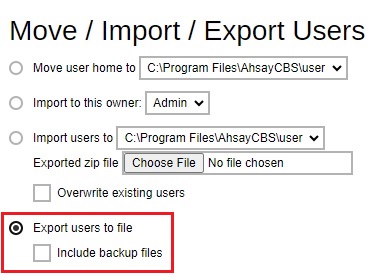
Export the user settings and data by selecting the radio button beside Export users to file, also click the Include backup files checkbox to have it packaged together (otherwise if you leave it unchecked, you will need to manually transfer the user's {UserHome} directory yourself).
-
Click the OK button to save the "users.zip" file.
For backup users with large amount of data, please perform the user data export at a time when the resource usage is low on the AhsayCBS server. Also, if the "users.zip" file is not saved to a local destination, ensure that the network between the AhsayCBS server and the save destination remail stable throughout the export process. -
Copy the "users.zip" file to the new AhsayCBS server (AhsayCBS B).
For best result, it is recommended that the "users.zip" file is copied directly onto the destination AhsayCBS server, or a network drive in the same LAN environment.
-
On the new AhsayCBS server (AhsayCBS B), import the backup user settings and data.
- Login to the AhsayCBS web console (AhsayCBS B's web console).
- Under Backup / Restore, click Users, Groups & Policies.
-
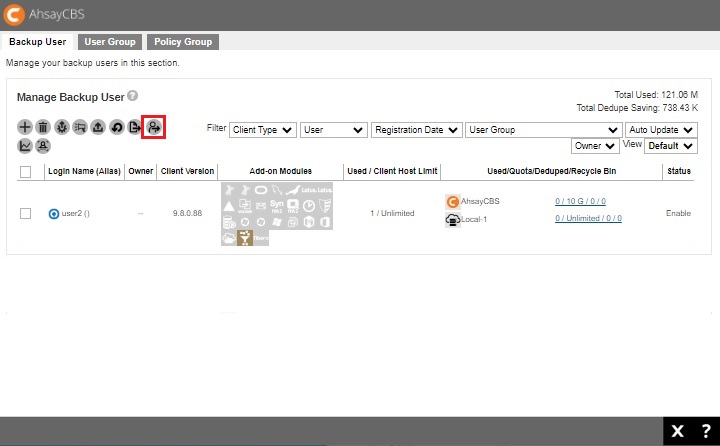
Under Backup User, click the Move / Import / Export Users icon.
-
Import the user settings and data by selecting the radio button beside Import users to.
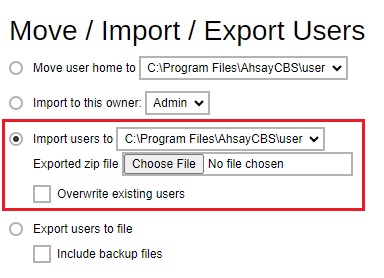
- From the dropdown box, select the User Home for the user to be moved to.
- Click the Choose File button beside Exported zip file.
- Select the "users.zip" file (exported from Step 1).
- Click the OK button to start the import process.
- If you did not include the backup files and opted to move the user's {UserHome} directory yourself in Step 1-v, you should do that now.
- Confirm if the backup user is moved properly.
- Login to the AhsayCBS web console (AhsayCBS B's web console).
- Under Backup / Restore, click Users, Groups & Policies.
- Confirm if the backup user is listed under Backup User.
- Cleanup the user from the original AhsayCBS server (AhsayCBS A). For the user that was moved, delete the user account and their data from their User Home directory.
-
(Optional)To retain user's data on the original server, locate the backup user's directory then relocate its User Home folder to outside of the User Home directory.
For example, move
D:\UserHomePath\username
to
D:\AnotherLocation\username
- If the same volume does not have sufficient disk space, move the User Home directory of the user to another volume.
- You may need to recreate an empty directory (C:\UserHomePath\username) if later you are prompted that the User Home path is missing.
- Login to the AhsayCBS web console (AhsayCBS A's web console).
- Under Backup / Restore, click Users, Groups & Policies.
- Under Backup User, tick the checkbox beside the backup user to be moved.
- Click the Delete icon under Manage Backup User.
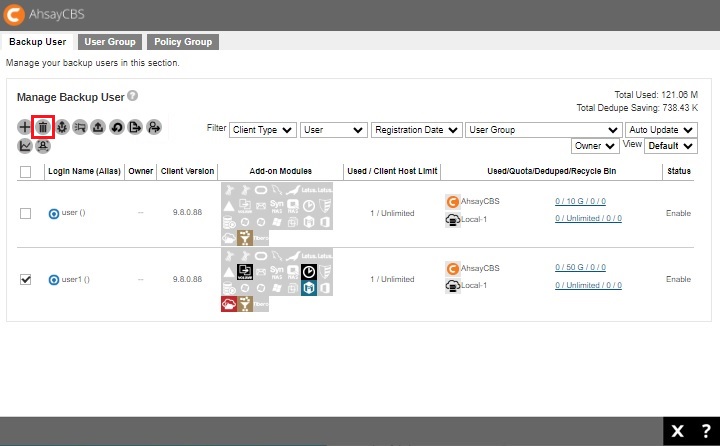
- Click OK when prompted to confirm deletion of the selected row.
- Click Save afterward to save the changes.
-